Welcome!
You'll find over 470 of my favorite recipes here, including ideas for Quick meals, Cooking for 2, Feasting on Leftovers, and cooking with 5 Ingredients or Less. I'm adding new posts regularly; you can subscribe by email or RSS feed if you'd like to receive the latest recipes. Bon appétit!
Authentic Chana Masala!
I wanted to explore Indian cooking more, but the only Indian cookbook I had was Vij’s: Elegant and Inspired Indian Cuisine.
Vikram Vij is the classically trained chef/owner of one of my favorite restaurants, Vij’s, in Vancouver. (And right next door he has Vij’s Rangoli, a more casual restaurant for lunch, dinner, or takeout.) His cookbook is excellent and I love being able to recreate some of Vij’s food at home, but the recipes are definitely gourmet Indian cuisine.
I wanted a book that had great recipes for the basics. I wanted one that was authentic, but not too intimidating. I was thrilled to receive 660 Curries by Raghavan Iyer for my birthday. (Thank you, Mark and Erica!) It’s a beautiful book; I will have a lot of fun learning more about Indian food.
Yesterday I made the chana masala. I made ghee in the morning and got the chickpeas started. I ground the coriander seeds and cumin seeds in my old Krups coffee grinder. (I haven’t ground coffee in years, so it is now my spice grinder. I got rid of any lingering coffee odor by grinding some raw white rice in it.)

This recipe makes a fairly hot chana masala. I’d say it’s definitely a 2, possibly approaching a 3 on a scale of 1 – 4. If you don’t like hot foods you could decrease the cayenne pepper. It will still be very flavorful with the other spices.
I ordered the mango powder (Amchur) from indianblend.com; everything else was available at the grocery store. You can substitute lime juice for the mango powder, but I bought some because it seems to be a fairly common ingredient in Indian cuisine.
Raghavan provides recipes for making Ginger Paste and Garlic Paste to use in the recipe. I attempted the Ginger Paste; first in my blender, then in my mini food processor, and I finally tried using my immersion blender. It never really turned into a paste. Maybe he has a more powerful blender. I decided to mince the garlic, and next time I will also just mince the ginger.

The recipe is supposed to serve 8. Really? Perhaps….maybe if it’s part of a multi-course dinner. Served with a bit of rice and a salad, it’s closer to 4 servings.
I definitely recommend this recipe! You can use canned chickpeas for a quicker version.
Chana Masala (Chickpeas with a Spicy Tomato Sauce)
(Adapted from the recipe in 660 Curries)
~~~
2 tablespoons ghee (use canola oil for a vegan version)
1 teaspoon whole cumin seeds
1 teaspoon ground cumin
2 tablespoons finely minced fresh ginger
1 tablespoon finely minced garlic
2 tablespoons tomato paste
1 tablespoon ground coriander seeds
1 tablespoon mango powder or fresh lime juice
1 teaspoon cayenne (ground red pepper)
½ teaspoon turmeric
4 cups cooked chickpeas
4 tablespoons finely chopped fresh cilantro leaves and tender stems
1½ teaspoons coarse kosher salt (or 1 teaspoon regular table salt)
½ cup finely chopped red onion
~~~
1. Heat the ghee, or oil, in a large pan over medium-high heat. Put the whole cumin seeds in the pan and cook, stirring, until they sizzle and turn reddish-brown, about 10 seconds.
2. Lower the heat to medium and add the garlic and ginger. Cook, stirring, for about 2 minutes.
3. Stir in 1 cup of water and the tomato paste and all of the spices.

Partially cover, and simmer, stirring occasionally, for about 10 minutes. The water will evaporate and you will have a thick sauce.
4. Add 2 more cups of water, the chickpeas, 2 tablespoons of the cilantro, and the salt.
Here’s how it looks at this point, before it thickens:

Cook, uncovered, for 15 – 18 minutes until the water evaporates and the curry thickens.
5. Serve with rice or naan. Sprinkle each serving with some of the remaining cilantro and some of the red onions.

Share this:

Maple Sugar-Pecan Shortbread
Today I made some Maple Sugar-Pecan Shortbread cookies for my Valentine. ♥

The recipe is based on one from the Julee Rosso & Sheila Lukins book, The Silver Palate Good Times Cookbook. Their brown sugar version is delicious! I have often made them for holiday treats to give to friends.
These cookies are made with maple sugar. The maple sugar that I have is not as fine as regular sugar; I processed it in a mini food processor before using it.
A food processor is essential for grinding the pecans with the flour. If you don’t have a food processor, you can order pecan meal at the King Arthur Flour website. (That is also the source for my maple sugar if you’re interested in using that instead of brown sugar.)
♥ ♥ ♥ ♥ ♥ ♥ ♥ ♥ ♥ ♥ ♥ ♥ ♥ ♥ ♥ ♥ ♥ ♥ ♥ ♥ ♥ ♥ ♥ ♥ ♥ ♥ ♥ ♥ ♥ ♥ ♥ ♥ ♥ ♥ ♥ ♥ ♥ ♥ ♥ ♥ ♥ ♥ ♥ ♥ ♥ ♥ ♥ ♥ ♥ ♥ ♥ ♥ ♥ ♥
Maple Sugar-Pecan Shortbread
(Adapted from a recipe in The Silver Palate Good Times Cookbook)
About 50 cookies (easy to cut in half for a smaller batch)
~~~
2 cups flour (240 g.)
1 cup pecan pieces
Pinch salt
1 cup (2 sticks) unsalted butter, room temperature
½ cup maple sugar (or ½ cup dark brown sugar)
~~~
1. Put the flour, pecans and salt in a food processor and process until you have a fine blend.

2. Beat the butter and sugar in a mixer it is light and creamy. This takes several minutes, and you’ll probably have to stop the mixer and scrape down the sides a few times.
3. Add the flour mixture to the butter and sugar and mix well.
4. Gather the dough into a ball. Divide it in half. Put each half on a large piece of wax paper and shape into logs. Wrap the logs in the wax paper and refrigerate at least 3 hours or overnight.
(Alternatively, you can shape the dough into two balls, wrap in wax paper and refrigerate. Then roll the dough out until it is about ¼ inch thick and cut it with cookie cutters. Gather up the scraps and reroll and cut more cookies. I prefer slice and bake!)
5. Preheat the oven to 300˚.
6. Slice the dough into ¼ inch thick cookies. Place them on an ungreased cookie sheet. (I have always used insulated cookie sheets with this recipe. I don’t know if it makes any difference.)

7. Bake for 20 to 25 minutes, until the cookies have lightly colored. (Insulated cookie sheets will increase the baking time a bit. My cookies needed 29 minutes.)

♥ Happy Valentine’s Day, Bob! ♥
~
Batch made December 22, 2010:

Share this:

Huevos con Tortilla
When Laura went to Costa Rica, she bought me a little cookbook of Costa Rican foods — Costa Rican Typical Foods. (Thank you, Laura!) One recipe that we enjoy is Huevos con Tortilla (Tortilla Eggs).
It’s easy to make 1 – 4 servings; use three tortillas and one egg for each serving. If you want to make more than four servings, it would be best to use two skillets so there’s enough room for the tortillas to get crispy.
This is a good vegetarian dish, if made with butter instead of bacon grease.

Huevos con Tortilla
(Adapted from Costa Rican Typical Foods)
Serves 2
~~~
6 corn tortillas (for gluten-free, read the label and choose a gluten-free brand)
2 eggs, beaten
Salt
A few dashes of Tabasco
Butter (or bacon grease if you have made bacon in the skillet first)
~~~
Cut the tortillas into 1-inch squares. Heat the butter in a skillet over medium-low heat. (If you have cooked bacon in the skillet, pour most of the bacon grease out so there’s just a bit for the tortillas.) Add the tortillas, and sprinkle them with salt. Cook, stirring occasionally, until they are crispy. This takes about 15 minutes.
Add a pinch of salt and a few dashes of Tabasco to the beaten eggs. Add to the tortillas, and cook, stirring for a few seconds until the eggs are set.
Serve and pass the salsa!

Share this:

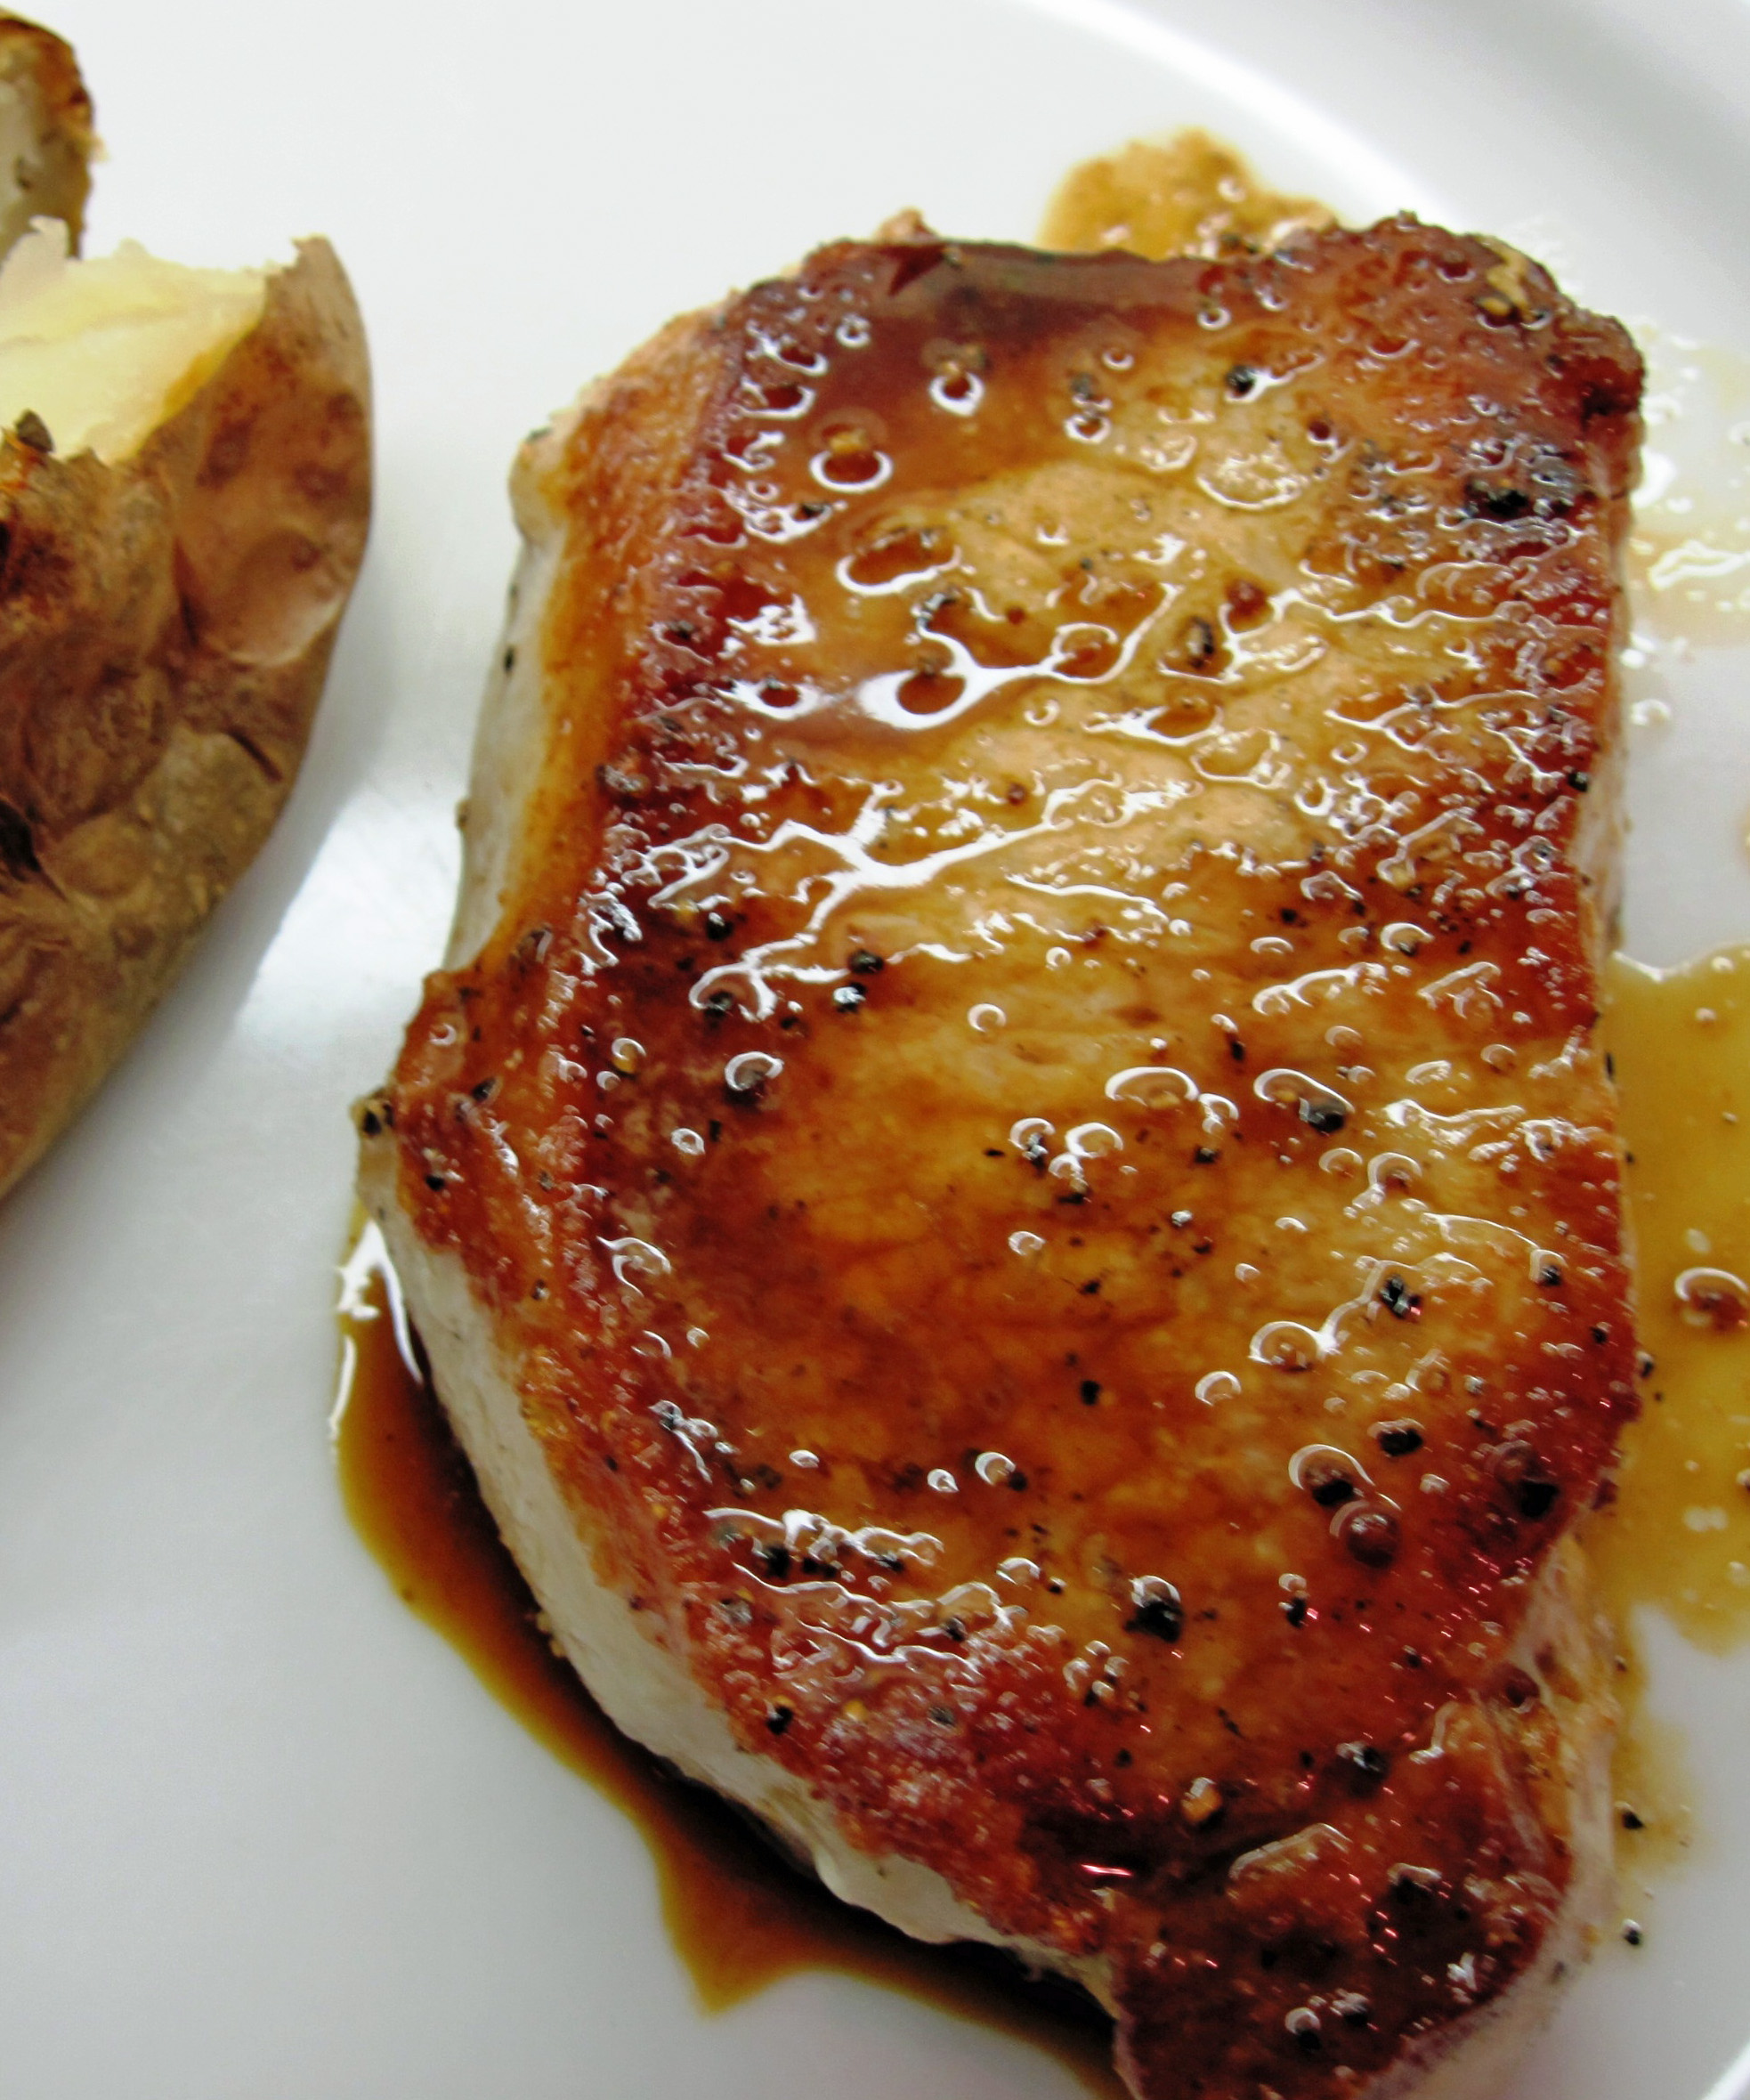
Pork Chops à la Julia
When I make pork chops, I most often use the recipe from Julia Child’s The Way to Cook. It’s fast, easy, and reliable.
Last night we had them with baked potatoes and a big salad.
a

a
Pork Chops à la Julia
(Adapted from a recipe in The Way to Cook)
a
a
Serves 2 (easily doubles to serve 4)
a
2 pork chops, ¾ – 1 inch thick (either bone-in or boneless)
1 Tablespoon olive oil
Salt and pepper
1/3 cup Vermouth or chicken broth
a
1. If there is a lot of excess fat, trim it off. (My pork chops were already well-trimmed.)
2. Let the pork chops sit at room temperature for about 30 minutes. When ready to cook, pat them dry with paper towels.
3. Heat the olive oil over medium heat in a small skillet that is just large enough to hold the chops. (My Le Creuset 9-inch skillet was the perfect size.)
4. Generously salt one side of the pork chops. Grind a bit of black pepper on them. Put the chops, salt side down in the hot skillet.

5. Cook for 4 minutes. Generously salt the top side, and grind a bit more pepper. Turn the pork chops over.
6. Cook for 3 more minutes.
7. Remove the pork chops to a warm plate and cover with foil.
8. Add the vermouth or chicken broth to the pan. Turn the heat up and cook, stirring, until the sauce reduces and thickens a bit.
9. Serve the pork chops with some of the pan sauce.
a
Bon appétit!
a
Share this:

Kath’s Clam Chowder
Although clam chowder is best when made with fresh clams, my “pantry” clam chowder, made with canned clams, is pretty darn good. Look for canned clams that are as natural as possible—no MSG, for example. Last night I used 3 cans (6.5 oz. each) of Snow’s Chopped Clams. Sometimes I use 2 (10 oz. each) cans of baby clams instead.
I always use russet potatoes for this clam chowder. They help to thicken the chowder a bit.
A lot of New England style clam chowder recipes call for half and half or cream; I actually prefer clam chowder made with milk.
And, in my humble opinion, celery does not belong in New England clam chowder!

Kath’s Clam Chowder
Serves 4
~~~
3 slices bacon
3 large russet potatoes (about 2 ¼ – 2 ½ pounds total), cut in ¾-inch dice
1 cup chopped onions
3 (6.5 oz each) cans chopped clams, drained; reserve the clam liquid
1 tsp. marjoram (optional—not essential if you don’t have it)
1 clove garlic, pressed with a garlic press
3 cups whole milk
½ teaspoon Tabasco, or to taste
Salt, to taste
~~~
1. Fry the bacon very slowly over low heat in a large kettle. You want to render the fat without getting a bunch of browned bits on the bottom of the pan.
2. While the bacon is cooking, start cutting the onions and potatoes. You can put them both in a large bowl.

3. When the bacon’s done, remove it from the pan. (If you’re not done cutting the onions and potatoes, remove the pan from the heat until you are ready to add them.)
4. Put the onions, potatoes, and marjoram in the pan. Stir well and cook for a couple of minutes.
5. Drain the clams, reserving the clam liquid.

6. Pour the clam liquid into the pot. Stir well; cover and simmer until the potatoes are very done—almost falling apart. This takes about 15 – 20 minutes.
7. Add the milk, garlic, Tabasco and reserved clams. Simmer until hot.
8. Crumble the reserved bacon into the soup.
9. Taste for seasoning. I added ½ teaspoon salt. After tasting again, I decided it needed more, so I added another ½ teaspoon.
Serve with salad and a good crusty bread.
Share this:

Roasted Broccoli…to go with Sautéed Beef Liver with Bacon
Yes, we had liver!
I took no photos of the liver out of respect for the squeamish. Bob was skeptical, but he declared that the liver was pretty tasty.
In case you’d like to know how I made the liver tasty:
(printable recipe for Sautéed Beef Liver with Bacon)
Start with good liver. I got “Country Natural” liver at PCC. It was already conveniently sliced into pieces that were between ¼ and ½ inches thick. Soak the liver in milk for about 20 minutes. The soaking is supposed to make it more mellow. Cook 4 slices of bacon slowly in a cast iron skillet. You want to render the fat for the liver. Remove the cooked bacon from the pan. Do what you want with the bacon. (Bob ate all 4 pieces on the spot.) Increase the heat for the bacon fat to medium. Dredge the liver in flour that has been mixed with about a teaspoon of seasoned salt, like Tony Chachere’s Creole Seasoning or Paul Prudhomme’s Magic Seasoning Salt. Sprinkle the floured pieces of liver with a bit of plain sea salt. When the bacon fat is hot enough to make a bit of flour sizzle, add the liver to the pan, salted side down. Salt the top side of the liver. Cook for about 2 minutes. Turn, and cook for about 2 minutes more. Serve and be amazed at how yummy it is!
Bob, in fact, liked the liver more than he liked the broccoli! He just does not like broccoli unless it’s raw.

Roasted Broccoli
~~~
Broccoli
A few cloves of garlic
Red pepper flakes
Olive oil
~~~
Preheat the oven to 425˚.
Chop up the broccoli into bite-sized pieces. Peel and slice the garlic. Toss the broccoli, garlic, red pepper flakes, and a bit of olive oil together. Put it all on a baking sheet and sprinkle with salt.
Roast for about 25 minutes, stirring once or twice during the roasting time. Read more…
Share this:

Spicy Roast Chicken with Tomatoes and Marjoram
I have made this easy chicken dish many times and it is always perfect. The timing is spot-on, at least with my oven. I usually make it with bone-in, skin-on chicken breasts, but last night I used a whole cut-up chicken.
The recipe is based on one I found on epicurious.com, and they gave credit to the June 2003 issue of Bon Appetit.
Crusty bread is perfect for soaking up the great juices.

(Thanks for taking the great photo, Laura!)
Spicy Roast Chicken with Tomatoes and Marjoram
Serves 4
~~~
24 ounces cherry tomatoes (about 4 cups)
¼ cup olive oil
5 garlic cloves, pressed
1¼ teaspoons red pepper flakes
2 Tablespoons chopped fresh marjoram, or 1 tsp. dried)
4 chicken breast halves with ribs and skin, or 1 cut-up chicken (I cut chicken breast halves that are especially large in half crosswise.)
~~~
1. Preheat oven to 450˚.
2. Toss the tomatoes, olive oil, garlic, red pepper flakes and marjoram together in a large bowl.

3. Put the chicken pieces skin-side up on a large rimmed baking sheet. Pour the tomato mixture over and around the chicken. Generously salt the chicken pieces.
a
This photo actually shows the recipe made with a cut-up chicken instead of chicken breasts. Equally good!

4. Roast for 35 minutes. (Perfect timing for my oven. You can test your chicken to make sure it’s done.)
5. Serve the chicken and tomatoes with a good crusty bread.
Share this:

American Garlic Bread
….because sometimes you just want a good old-fashioned buttery American-style garlic bread!
I was inspired by a recipe that appeared in Cook’s Illustrated a few years ago. Roasting the garlic cloves takes the harshness out of the garlic for a mellower, but still garlicky, flavor.
A small (4 oz) Demi Baguette from La Brea Bakery is the perfect size for 2 or 3 servings.

I found I had more garlic butter than I needed, so I saved the rest and it was a great accompaniment to baked potatoes the next night.
You can double the amount of ingredients for the garlic butter if you want to use a larger loaf of bread. With double the amounts, Cook’s Illustrated suggested a 1 pound loaf.
American Garlic Bread
(Adapted from a Cook’s Illustrated recipe.)
Serves 2 – 3 (double the ingredients for the garlic butter for a 1 pound loaf of bread)
~~~
5 medium garlic cloves, skins left on (I only used 4; should have used 5)
3 Tablespoons unsalted butter, softened
1 Tablespoon grated Parmesan cheese
1/4 teaspoon salt
1 (4 oz) La Brea Bakery Demi Baguette
~~~
1. Heat the oven to 500 degrees.
2. Put the garlic in a small pan and toast, stirring often, until fragrant and the cloves are starting to brown (about 8 minutes). Remove from pan.

3. Mash the butter, cheese, and salt together with a fork.
4. Take the skin off the garlic cloves and use a garlic press to add the garlic to the butter. Mix well.
4. Cut the bread in half and spread the garlic butter on each side. (You’ll probably have too much garlic butter, so save the rest for another use.)
5. Put the bread on a baking sheet and sprinkle with salt. Bake for 8 – 10 minutes, until golden brown and toasted.
Here’s the finished garlic bread, shown with Flat Pasta with Chickpeas.

Share this:

Flat Pasta and Chickpeas (Lagane e Ceci)
Do you still boil old-fashioned lasagna noodles when you make lasagna? I almost always use Barilla no-boil noodles now. They are thinner than regular lasagna; I like the lighter pasta in the finished lasagna.
I wasn’t sure when I’d ever use the box of regular De Cecco lasagna in the cupboard until I came across this recipe in Arthur Schwartz’s The Southern Italian Table.
I have written the recipe exactly as I followed it; I used an immersion blender to mash some of the chickpeas before adding the cooked pasta. I think next time I would skip that step and leave the chickpeas whole.
I served this classic southern Italian dish with a very American Garlic Bread.

Flat Pasta and Chickpeas (Lagane e Ceci)
(Adapted from a recipe in The Southern Italian Table)
Serves 2 – 3, easily doubles
~~~
1 large garlic clove, finely chopped
2 tablespoons olive oil
¼ teaspoon red pepper flakes
1 tablespoon fresh rosemary leaves, chopped
1 (15-16 oz.) can chickpeas
4 ounces broken lasagna
~~~


In a skillet, over low heat, cook the garlic, red pepper flakes and rosemary in the olive oil until the garlic begins to sizzle.

Add the chickpeas and all the liquid from the can. Simmer gently, uncovered, for about 5 minutes.
Cook the lasagna in a large pot with 1 tablespoon salt.
When the lasagna is almost done, use an immersion blender in the pan to blend some of the chickpeas. (Mr. Schwartz suggests you could also use a potato masher or the bottom of a tumbler.)
When the pasta is done, set aside about 1 cup of the cooking liquid, and then drain the pasta.
Add the pasta to the beans, stir to mix. Add some of the reserved cooking liquid, if it seems too dry.
Serve with extra olive oil to drizzle over the top.
Share this:

Oven-Fried Chicken
Oven-fried chicken is easy comfort food. I’ve been making this recipe for over 30 years. It’s based on a recipe I got from the 1971 edition of Betty Crocker’s Good and Easy Cookbook. I don’t know why I’ve kept the book because it’s not one that I use and it’s not one that I’d recommend. A lot of the recipes call for “convenience foods” and Betty Crocker mixes. It is kind of an interesting look at the way people (mostly women) cooked “back in the day” when the food industry was exploding with “new and improved” foods to make our lives easier.
An optional first step is to soak the chicken in buttermilk for a few hours first. I chose to do that, but didn’t have buttermilk. I added 1 tablespoon of vinegar to 1 cup of milk and let it sit for a few minutes. I then used this buttermilk substitute to soak the chicken. You can also make the chicken without soaking it first.
If you’d like baked potatoes with your chicken, just stick them in the oven when you put the chicken in. They’ll be perfect.

~~~~~~~~~~~~~~~~~~~~~~~~~~~~~~~~~~~~~~~~~~~~~~~~~~~~~~~
Oven-Fried Chicken
(Adapted from Betty Crocker’s Good and Easy Cookbook)
~~~
1 cut-up chicken
¼ cup oil
¼ cup butter
1 cup flour
1 teaspoon salt
1 teaspoon paprika
¼ teaspoon cayenne pepper
Optional: 1 cup buttermilk
~~~
1. If using the buttermilk, put it and the chicken in a gallon Ziploc bag. Refrigerate for a few hours, turning the bag over once or twice.
2. Heat the oven to 425˚. Put the oil and butter in a pan and put it in the oven to melt the butter.
3. Put the flour, salt, paprika and cayenne pepper in a large Ziploc or paper bag. Shake well to mix. Put half of the chicken in the bag and shake vigorously to coat. Repeat with the rest of the chicken.

(You’ll note that I have 10 pieces of chicken. I like to cut the breasts in half so I have 4 smaller breast pieces instead of 2 large breast pieces.)
4. Put the chicken, skin side down, in the pan and bake for 30 minutes.
5. Turn the chicken pieces over and bake for another 30 minutes.


