Welcome!
You'll find over 470 of my favorite recipes here, including ideas for Quick meals, Cooking for 2, Feasting on Leftovers, and cooking with 5 Ingredients or Less. I'm adding new posts regularly; you can subscribe by email or RSS feed if you'd like to receive the latest recipes. Bon appétit!
Road trip to California and back…
There are no recipes in this post.
I’ve been out of the kitchen since August 4 because we were on an enjoyable road trip to see friends and family in California. I decided to chronicle our trip in my blog, mostly for myself so I can remember some of the more memorable places for future trips.
If you’re ever traveling on the northern California or Oregon coasts, you may find this post helpful. If you’re just here for the food, I promise I’ll be back in a day or two with a new recipe! 🙂
~~~~~~~~~
We left on August 5. The first leg of our trip was 639 miles to Corning, California. We have always stopped in the Sutherlin/Roseburg area of Oregon for lunch on the way. It’s about halfway. Our regular restaurant had let us down the last few times so I searched for something new. We chose Charley’s BBQ in Roseburg and found a new favorite spot. Everything is smoked over a wood fire and they offer a variety of BBQ sauces. I tried the pork sandwich and Bob had the brisket sandwich. The pork was the better choice; it was delicious! I will always choose the French fries for my side dish because they were possibly the best fries I have ever had! They were homemade, fried perfectly – not at all greasy or soggy. The location of the restaurant is perfect for a road trip. It’s an easy off and back on I-5 at Exit 124. Update July 2019: I’m sad to report that Charley’s has closed.
After about 11 hours we made it to the Southern Cross Ranch in Corning. It’s always fun to visit Mike and Liz on their ranch. They have gorgeous quarter horses and sheep; we had the BEST roast lamb on our first night. I’ve never had lamb as good as the lamb that they raise; it’s always a treat!
After a good night’s sleep we all drove in to Chico, which is a beautiful college town. There are lots of trees and interesting homes. We had a coffee break at Grilla Bites; we weren’t ready for lunch, but they have a fabulous-looking salad bar. It’s a good place to remember.
On Saturday we drove to Dublin to visit Bob’s brother, Mark, and his wife, Erica. We were also glad that we had a chance to see our nephews, Matt and Russ. It had been too long.
Erica is an excellent cook and a gardener extraordinaire so we were treated to some delicious feasts at their house. Erica and Mark made their special grilled salmon, and we enjoyed tomatoes, basil, and green beans fresh from the garden. Erica also made her famous mile-high apple pie. Delicious!
Mark and Erica are avid cyclists; Bob got a lesson about bicycling on a modern bike and went off on a 16.6 mile ride with them while I went for a walk around their lovely neighborhood.
Bob, Mark and Erica: ~
~
A highlight of our visit with Mark and Erica was the opportunity to fly in their Cessna 182 to Columbia, CA.
Mark and Erica and their Cessna 182:
 ~
~
Here I am enjoying the ride:
 ~
~
Columbia is an old gold-mining town; it’s now a California State Park and a well-preserved gold rush town. It was very interesting to see; there’s lots of history, a historic hotel, shops and restaurants. We had an excellent lunch at Bart’s Black Skillet. Bob said his Reuben sandwich may have been the best one he’s ever had.
After seeing Columbia, we took the short hike back to the airport and went off for a San Francisco Bay tour. Mark had checked with the weather, and found out that it was clear at the San Francisco Airport. It was clear at the airport, but most of the city was blanketed in fog. It was still a lovely flight and we loved the experience of flying with Mark and Erica.
The next day we left for Half Moon Bay to see our friends, Jim and Kay. Their lovely home is just a short block to the beach; it’s a beautiful spot for walking. Kay made a fabulous dinner that included barbecued ribs and okra! Kay knows how to cook okra; it’s the first time I have ever enjoyed it. I know that she tossed it with cornmeal and sautéed it, but I didn’t catch any other details. I think it may be difficult for me to find okra as fresh as the okra that she had found at her farmers’ market.
Jim and Kay introduced us to an excellent seafood restaurant, Barbara’s Fish Trap in Half Moon Bay. The scallops I had were very lightly breaded; they were tender and cooked perfectly. They don’t take reservations, but this is definitely a place that is “worth the wait”. They also don’t take credit cards or checks, so you will need to have cash.
From Half Moon Bay we left on a cool and foggy morning to drive up the California and Oregon coasts.
We drove over the Golden Gate Bridge and took California Highway 1.
The Golden Gate Bridge in the fog:

~
It’s a very scenic drive; I had never driven up the Northern California Coast and I highly recommend it. It’s so remote that it’s not at all “touristy”.
The drive from Rockport to Leggett was much twistier than we had expected. It’s a beautiful drive over the mountains (summit 1894 feet) to Leggett where you connect with Highway 101.
From Leggett we headed north on 101 to Eureka, where we stayed at a Super 8. It was a typical Super 8; it was OK. It was only for 1 night. We did find, however, the perfect place for dinner.
Driving through town I spotted an interesting little place called Bless My Soul Café, the home of Sweet Mama Janisse. It is there that we had one of the best meals of our trip.
Bless My Soul Café
~
Marie Janisse’s Creole grandmother taught her how to cook when she was growing up in Louisiana. After a successful catering career in the Los Angeles area (serving dignitaries, and stars and crews of the movie industry), Sweet Mama Janisse moved to Eureka and opened Bless My Soul Café in 2001. We had the pleasure of meeting her and talking with her about her food and her journey from Louisiana to Eureka. It was a very memorable meal. Her soul food is the “real deal” and it was absolutely delicious! We brought home some of her Chili Pepper Paste, and now we’re afraid that it will be gone too quickly.
From Eureka, we headed north up 101. It was still cloudy, cool and, in some areas, foggy, but it was beautiful, nonetheless.
We stopped at Samuel H Boardman State Park, just north of Brookings, Oregon, to enjoy the scenery. It was beautiful, even if it was a bit foggy. 
~
Bob is dwarfed by the big rocks:

~
In Gold Beach, OR, we found a great lunch spot—The Port Hole Café, located on the south side of the mouth of the Rogue River. The building was originally a cannery (you can still buy local canned tuna and salmon in the adjacent shop). The restaurant has a great view of the water and has an interesting menu. I think Bob picked the winner; I tasted his “Blackened Fish San” (grilled Pacific cod with Cajun spice piled on a bun) and it was excellent!
We continued north past the famous Oregon sand dunes; we stopped in Florence to see the old site of Bob’s aunt and uncle’s home and restaurant on the southwest shore of Woahink Lake. There’s a vacant lot where the restaurant once stood, and the area that was a gravel parking area is all grown over. Bob was surprised to notice that there are still a couple of pieces of the dock left that Bob’s dad and uncle built. He has fond memories of the summer he spent visiting when he was 15; he and his cousins, Paul and Carol, had many fun adventures on the lake and in the surrounding woods.
Continuing north, we headed up to Lincoln City.
My AAA book recommended the Nordic Oceanfront Inn; the desk clerk informed us that they had no reasonably priced rooms available.
We checked out The Sea Horse next door and got a great room for only $1 more than we had paid at Super 8! The motel is a couple of blocks off of 101 and perched on a bluff above the beach. Most of the rooms have fabulous views and there are stairs that lead down to the beach. There are a few 2 and 3 bedroom houses available for families, or for 2 or 3 couples to share. The rates are very reasonable; this is a place to know about if you’re ever staying in Lincoln City.
A Viking pointing the way to the Nordic Oceanfront Inn, but we stayed at The Sea Horse right behind him.
~
We had dinner at Kyllo’s which was good, not great. It is, however, located right on the beach, so after dinner we walked on the beach a bit. There were a few bon fires and a couple of fireworks.
On our last day, we headed up 101 to Tillamook; we stopped at the Tillamook Creamery for breakfast and a tour. I have always wanted to see it and was not disappointed. We got there at about 9:30; by the time we left it was getting really crowded. It’s best to go early. They open at 8:00am.
Cutting 40 pound loafs of sharp cheddar into 2 pound loafs at the Tillamook Creamery:
Just before we got to the Creamery, we spotted the Tillamook Air Museum. After our cheese tour we headed back to check it out. It’s housed in a hangar that was built in 1943 for K-class blimps used for anti-submarine coast patrol and convoy escort. Today it’s the home for all kinds of interesting aircraft. I enjoyed seeing a PBY-Catalina; my dad was a PBY Navy Captain in WWII. We spent the better part of an hour at the museum; I highly recommend it if you are in the area.

~
PBY-Catalina:

We continued north along the coast; we found that the northern Oregon coast has a lot more traffic, shops and restaurants than the southern Oregon coast. It feels a bit more “touristy”. Perhaps it’s because of its proximity to Portland and Seattle.
We saw Haystack Rock (the world’s 3rd largest monolith) off Cannon Beach but bypassed the town to continue on to Seaside where we enjoyed razor clams for lunch at The Buoy’s Best Fish House. The weather was beautiful and we sat outside at a wooden bench and table overlooking a small river. The razor clams were available deep fried or “grilled” (they actually seemed lightly sautéed); we opted for the grilled and they were quite good. It was a very pleasant and quick lunch stop.
After lunch we drove on 101 to Astoria and then on Highway 30 to the Lewis and Clark Bridge that crosses the Columbia River at Rainier, OR. It was a short jaunt east to connect with I-5 just south of Kelso, and then it was I-5 all the way to Seattle.
Home again, home again, jiggety jig!
Share this:

Indian-Spiced Rice With Lentils
Indian-Spiced Rice With Lentils is a quick and easy one-pot dish that makes a delicious vegan main course; it would also be a great side dish for grilled meat….perhaps a Tandoori-style Chicken?
I adapted the recipe from one that Carrie found on epicurious.com. The original recipe allowed only 13 minutes to cook the rice, which did not seem sufficient for basmati rice. I adjusted the timing, decreased the salt, omitted the sugar, and increased the ginger and turmeric. Chopped onions and grape tomatoes were welcome additions.
I used “regular” brown lentils, the type found at any supermarket. Red lentils are often used in Indian cooking; they cook much more quickly than other types of lentils. Next time I’ll try the recipe with red lentils. I’ll omit step 6 and add them when I add the rice, so the total cooking time for both will be about 20 minutes.
We both really enjoed the flavors in this recipe. I think the only thing I might do differently would be to add a minced jalapeno or serrano chile when I add the cinnamon, cloves, and cumin; we do like a bit of heat in Indian food.
A sliced mango was the perfect accompaniment with the Lentils and Rice, along with a salad of fresh lettuce from our garden.

~
Brown and red lentils:
Indian-Spiced Rice With Lentils
(Adapted from a recipe on epicurious, attributed to Hema Kundargi, and published in the December 2001 issue of Bon Appétit)
Serves 4 – 6
~
1 cup dried brown lentils
1 cup basmati rice
1 tablespoon vegetable oil
1 cup chopped sweet onion (about ½ large onion)
1 (2-inch) piece of cinnamon stick
2 whole cloves
1 teaspoon cumin seeds
3 cloves garlic, finely chopped
4 teaspoons chopped fresh ginger
½ teaspoon turmeric
4 1/3 cups water
1 teaspoon kosher salt (or ¾ teaspoon table salt)*
1 cup grape tomatoes, washed and cut in half
¼ cup chopped fresh cilantro
2 tablespoons fresh lime juice (juice from 1 large lime)
~
1. Rinse and drain the lentils and place in a bowl; rinse and drain the rice.
2. Heat the oil in a large skillet over medium heat.
3. Add the onion and cook, stirring occasionally, for 6 – 8 minutes, until softened.
4. Add the cinnamon, cloves, and cumin seeds and cook for about 2 minutes.

5. Add the garlic, ginger, and turmeric; cook, stirring for about 30 seconds.
6. Add the water and salt; increase the heat to high to bring the water to a boil. When boiling, reduce heat to medium and add the lentils; cook for about 8 minutes.
7. Increase the heat to high and add the rice. When it comes to a boil, reduce the heat to medium and cook for 5 minutes.
8. Cover the pan and reduce the heat to a simmer; cook for 15 minutes, until the lentils and rice are tender and the water is absorbed.
9. Stir in the tomatoes; cover and remove from heat. Let stand for 5 minutes.
10. Stir in the cilantro and lime juice and it’s ready to serve.
* 1 tablespoon coarse or Kosher salt = 2 teaspoons regular (table) salt
Share this:

Cheese Shortbread
This Cheese Shortbread recipe makes savory puffs that are a great little snack to have with a glass of wine before dinner. Packaged in a pretty container, they would be a welcome little hostess gift.
I had never made the recipe before; I found it in Mark Bittman’s How to Cook Everything Vegetarian. Using a food processor, it is ultra-easy to make; if you don’t have a food processor you can use a pastry blender or a fork.
I used Tillamook medium cheddar, and they have a good cheesy flavor. A sharp cheddar might give even better results.
Mark called for 1/2 teaspoon of cayenne; I used 1/4 teaspoon for just a hint of pepper. Use more if you want it spicier.
 ~
~
Cheese Shortbread
(Adapted from Mark Bittman’s recipe in How to Cook Everything.)
.
.
These can be made a day ahead and stored in an air-tight container.
Makes 30-40 puffs
.
Almost 8 ounces (7 ¾) Tillamook medium cheddar. Close enough!

.
8 tablespoons (1 stick) cold butter, cut in cubes
1½ cups (180g) all purpose flour
1 egg, lightly beaten
2 cups (8 oz) cheddar cheese, grated
½ teaspoon salt
¼ teaspoon cayenne
.
Everything in the food processor:

.
1. Preheat the oven to 400˚.
2. Put everything in the food processor and pulse until it resembles coarse meal. Don’t over-process. (Or combine with a pastry blender or fork.)
3. Lightly grease a baking sheet, or line with parchment paper (which is what I did).
4. Form the dough into 1-inch balls. Flatten them on the baking sheet with your fingers.

5. Bake for 10 minutes, until puffed up a bit and golden brown.
6. Cool thoroughly on a wire rack.


Share this:

Curried Eggplant
By Kath Dedon
Beautiful Indian (aka “baby”) eggplants from our new Seafood City Supermarket were the inspiration for the Curried Eggplant I made last night. (Seafood City is the “home for Filipino Asian Lifestyle” with many stores in California; this is their first in Washington State. Apparently, it’s the place to go if you want beef knee caps. Don’t look for that one any time soon on this blog.)
 eggplants") ~
~
Asian markets often carry these little beauties, but you’ll also find them, and many other interesting eggplants, at farmers’ markets. If you can’t find the Indian eggplants, any eggplant will work for this recipe. Just get about a pound and cut into smaller pieces if it’s a large eggplant.
We love eggplant curry, so that’s what I decided to make. I found a recipe in 660 Curries for Baghara Baingan (Fried Baby Eggplant with a Peanut-Coconut Sauce). Raghavan Iyer’s recipe uses a peanut-coconut-sesame seed base. It sounds delicious and I may try Raghavan’s more complicated recipe someday, but last night I wanted something that was quick and easy. So I didn’t make Baghara Baingan; I made my own version of Curried Eggplant.
My Curried Eggplant uses ingredients that are pretty easy to find at most supermarkets; you could easily make substitutions for products that you can’t find. (Examples: Any kind of milk–soy, almond, dairy–for the coconut milk, any cooking oil for the coconut oil, or a large eggplant for the baby eggplants)
This may not be a classic Indian recipe, but it does deliver authentic Indian flavors in an easy version that can be made quickly. And it was sooo good that I know I’ll be making it again soon!
Update September 25, 2010: I made this again with 1 pound of regular globe eggplants (2 small ones) cut into 1-inch cubes. I left the peel on. It wasn’t as “cute” but was equally tasty.
~

Curried Eggplant
(Inspired by a recipe for Baghara Baingan in 660 Curries)
.
~
Serves 2 as a main dish; serves 4 as part of a multi-course meal
~
cumin, coriander, turmeric, and cayenne:
~
8 – 9 (1 pound) baby eggplants (or 1 pound of any kind of eggplant)
1 teaspoon ground cumin
1 teaspoon ground coriander
1 teaspoon turmeric
½ teaspoon cayenne pepper
2 tablespoons + 1 tablespoon coconut oil
1 cup chopped onions
2 tablespoons minced garlic
2 tablespoons minced ginger
1/2 teaspoon salt
2/3 cup coconut milk (1 small 5.46 oz can)*
Cooked rice, for serving
~
1. Wash the eggplants, cut off the top and then cut them lengthwise in fourths without cutting all the way through.

~
2. Combine the cumin, coriander, turmeric, and cayenne pepper in a small bowl.
3. Heat the 2 tablespoons coconut oil in a large skillet.
4. When the oil is hot, add the eggplants and cook, covered, for 15-20 minutes, stirring occasionally. They will be tender and soft when done.

.
5. Remove the eggplants to a paper towel-lined plate.
6. Add 1 tablespoon coconut oil to the pan and cook the onions until they are softened, about 5 minutes.
7. Add the garlic and ginger to the onions, and cook, stirring, for a minute or so until they are fragrant.
8. Add the salt and spices and cook, stirring, for about a minute.
9. Add the coconut milk.
10. Add the eggplants and cook until everything is hot. Taste and adjust seasoning if necessary. Serve over rice.

.
*In Seattle I can find small 5.46-ounce cans of Thai Kitchen coconut milk at PCC; I find them very handy when I’m cooking for just the two of us.
Share this:

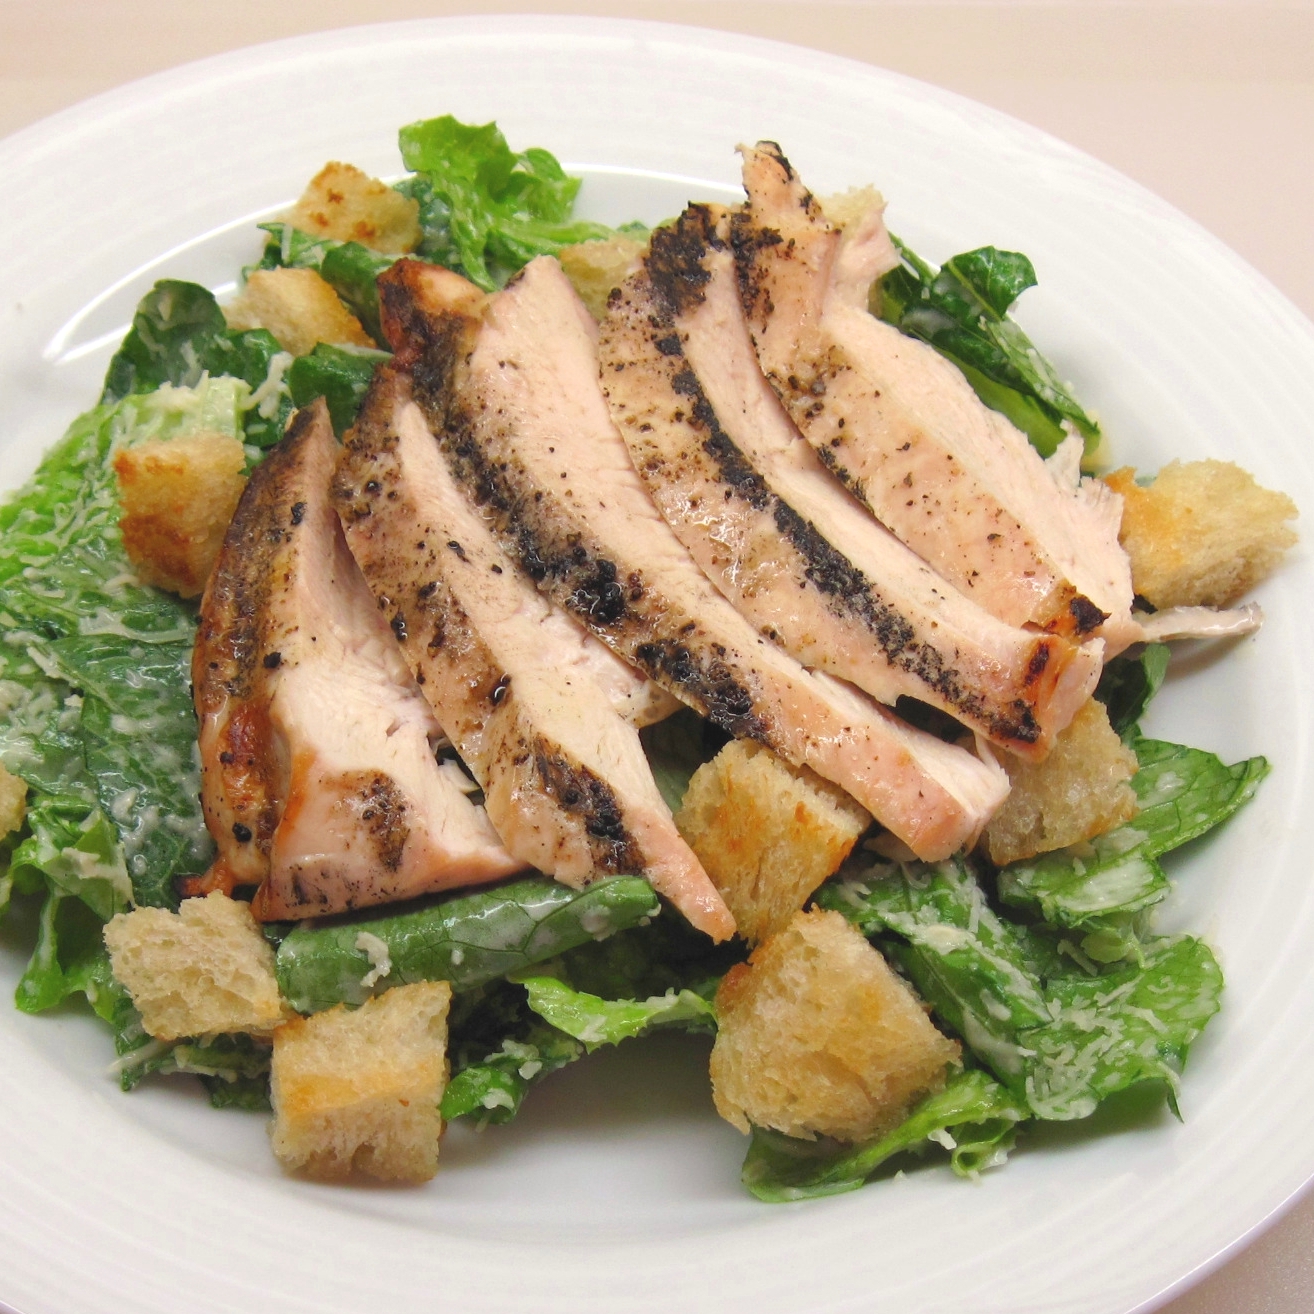
Caesar Salad with Grilled Chicken
By Kath Dedon
Caesar Salad fortified with some kind of protein makes a great summertime dinner. Popular choices to top the salad are grilled salmon, smoked salmon, fried oysters, shrimp or chicken. Last night I made it with grilled chicken.
One could argue that this is not really an authentic Caesar dressing because I don’t use eggs. Well, this version works for me, and I don’t have to worry about making anyone sick with uncooked or under-cooked eggs.
The dressing recipe is adapted from one in Moosewood Restaurant Cooks at Home. Their solution for the egg problem is to use 2 hard-boiled eggs which they blend with the other ingredients. I tried it once and didn’t really like the hard-boiled eggs in it. I replaced them with ¼ cup of mayonnaise, which gives the dressing some extra body.
I like Caesar salads that are garlicky and lemony, so you may want to adjust those ingredients a bit to suit your taste. The dressing recipe makes more than you’ll need for 2 people, but it keeps well in the refrigerator, especially because it doesn’t have eggs in it.
I grilled the chicken, but if you don’t have a barbecue, you could broil it, pan-fry it, or poach it.
 with Grilled Chicken")
~
Caesar Salad with Grilled Chicken
(Dressing adapted from a recipe in Moosewood Restaurant Cooks at Home)
.
~
Serves 2 (Makes more dressing than you’ll need, but it keeps well in the refrigerator.)
~
Caesar Dressing:
¼ cup mayonnaise
3 tablespoons fresh lemon juice
½ teaspoon salt
2 teaspoons Dijon mustard
3 garlic cloves, pressed
Ground pepper, to taste
A few dashes of Tabasco sauce
1/3 cup olive oil
~
1. Combine the mayonnaise, lemon juice, salt, mustard, garlic, pepper, and Tabasco in a bowl. Whisk together so they are well-blended.
2. Slowly drizzle the olive oil in with the other ingredients while whisking constantly. Taste and adjust seasonings.
~
Salad:
About ½ head Romaine lettuce, cleaned, dried and torn into pieces
½ cup freshly grated Parmesan cheese
About ¼ cup Caesar dressing, or to taste
½ – ¾ cup croutons (omit for gluten free version)
¾ pound chicken breast (1 large breast), pounded to about ½-inch thick
.
Chicken breast, pounded and ready for the grill:
~
1. Heat a grill on high for 10 minutes.
2. Lightly salt and pepper the chicken breast; grill the chicken for 3 minutes on each side, until done. Let rest while you toss the salad; then cut into slices.
3. Toss the lettuce, cheese, and Caesar dressing together until the lettuce is well-coated.
4. Divide the salad between 2 plates and top with croutons and chicken.
 ~
~
Dinner on the deck on a beautiful Seattle summer evening:

Share this:

Thomas Keller’s Roast Chicken – on the Grill!
By Kath Dedon
.
Too hot to make Thomas Keller’s famous Roast Chicken? Not if you have a grill! This is a great summertime meal to enjoy on the deck.
I actually had never made Thomas Keller’s Roast Chicken before; my go-to roast chicken of late has been Marcella Hazan’s version. Seeing all the raves about Keller’s chicken, however, made me put it on my “must try” list.
It’s been quite cool in Seattle lately. Yesterday it warmed up and it’s supposed to be warm for the next week or so. (Warm by Seattle standards—sunny with temperatures in the upper 70s to low 80s; not much humidity. 🙂 This is why we put up with the rainy winters!) So I bought a small chicken and thought I’d try Thomas Keller’s roast chicken before my kitchen got too warm.
When I got home, though, I wondered if I really wanted to have the oven on at 450˚ for 50 – 60 minutes. I decided I did not.
So….I thought, why not use my gas grill? Well, it worked perfectly! The chicken was fantastic served over a bed of baby Swiss chard from my garden (sautéed with a bit of garlic in olive oil). With crusty bread and a big salad made with lettuce from the garden, it was a perfect dinner.
.
 ~
~
Thomas Keller’s Roast Chicken on the Grill
(Adapted from his famous recipe which I found on epicurious)
.
.
About Indirect Grilling: I suggest following the directions for indirect grilling for your particular grill. I have a 3-burner Weber grill. If you have a 2-burner grill, you’ll turn one burner off and put the chicken on that side. You’ll want to be sure to rotate the chicken when it’s half done so it will cook evenly. If you use charcoal, put half of the heated coals on one side, and half on the other and put the chicken in the center.
Note: times given are what worked for my 3 pound chicken and my grill; they may vary depending on your grill and the size of your chicken.
~
Serves 2 – 4
~
One 2 – 3 pound chicken
Sea salt and freshly ground black pepper
~
1. Rinse the chicken and dry it off very well, inside and out, with paper towels.
2. Generously salt the interior of the chicken.
3. Truss the chicken (I need to improve my trussing skills. As you can see in my photos, I just sort of tied it up.) and salt and pepper the chicken all over.
4. Heat your grill on high for 10 minutes.
5. Follow the directions for your grill for Indirect Grilling. For a 3- burner gas grill: Turn off the center burner, and place the chicken directly on the grill over the turned off burner.
.

~
6. Close the grill and cook for 10 minutes. (There was quite a bit of smoke during this period, just so you know.)
7. Lower the heat on the side burners to medium and cook for another 15 minutes.
8. Rotate the chicken 180˚ so it’s facing the other way. (There is no way to know if my two burners are generating the same amount of heat; this insures even cooking.)
9. Cook another 20 – 25 minutes, or until done. Internal temperature should be 165˚.
10. Let rest, uncovered for 15 – 20 minutes and then serve.

Share this:

Pasta alla Carbonara
By Kath Dedon
.
Pasta alla Carbonara is an easy dinner that can be ready in just a few minutes, and you may already have everything you need to make it!
The other night it was 6:00, and I suddenly wondered, “What’s for dinner?” Taking a quick inventory of what was on hand, I decided I could make Linguine alla Carbonara.
Pasta alla Carbonara is normally made with guanciale or pancetta. I had bacon, so you might call this Italian-American Pasta alla Carbonara. It may not have been authentic, but it was quite tasty.
I checked out Frank Fariello’s Memorie di Angelina blog about “la carbonara” (after I had already made mine) and learned that linguine is not typically used for this dish. Linguine, he said, is from Campania and Carbonara is from Lazio; apparently, the cuisines of these two regions are quite different.
Spaghetti is the pasta that is usually used; I had linguine in my pantry so that was my pasta of choice.
So using what I had, I made a quick Linguine alla Carbonara for dinner.
Molto buona!
.

~
Pasta alla Carbonara
(adapted from a recipe in How to Cook Everything, by Mark Bittman)
~
Serves 2 (doubles easily)
~
2 ounces chopped bacon (use guanciale or pancetta if you can get them)
1 tablespoon olive oil
1 clove garlic, crushed
1 egg
1/3 cup grated pecorino Romano cheese (plus more for serving, if desired)
½ pound pasta (spaghetti is typically used)
Freshly ground black pepper
~
1. Bring a large pot of water on to boil.
2. Put the oil in a large skillet; add the bacon and the garlic. Cook, stirring, over medium-low heat until the garlic is golden. Remove the garlic clove. Continue cooking the bacon until it is done, but not crisp. Take the pan off of the heat.
3. When the water is boiling, add 2 tablespoons salt and the pasta. Cook according to package directions.
4. While the pasta cooks, beat the egg in a large bowl.
5. Add the cheese to the egg, and grind a generous amount of black pepper in the bowl.

~
6. When the pasta is done, reserve a bit of the pasta water, and then thoroughly drain the pasta.
7. Quickly toss the pasta with the egg and cheese in the bowl. The heat of the pasta will cook the egg. Continue tossing until the pasta is well coated.
8. Add the reserved bacon and drippings and toss again. (If the pasta seems a bit dry at this point, toss in a bit of the reserved pasta water.) Serve immediately with extra cheese, if desired.
Share this:

Berries and Cream
By Kath Dedon
.
When we were visiting our good friends in Oswego, New York a few years ago, Dennis made a wonderful dessert that is just genius in its simplicity.
Dennis had come home from Ontario Orchards (the fabulous farm market and nursery that he and his family own) with fresh blueberries, strawberries, raspberries, pure maple syrup, and whipping cream. Shortly before dinner, he simply stirred them all together. By the time dinner was over, the cream had thickened a bit, and we had a fabulous dessert!
Since that visit, Berries and Cream has been a favorite at our house. I have lightened it up a bit, using less cream and maple syrup, and it’s still delicious.
This is a welcome dessert to serve if you or any of your guests are avoiding grains or need to eat gluten-free.
My recipe serves 4, but you can easily multiply it.
.

~
Berries and Cream
(Recipe adapted from Dennis Ouellette’s version)
.
.
I think this is best made a little bit before you plan to eat it, so put it together just before dinner.
.
Serves 4 (multiplies easily)
~
1 cup raspberries
1 cup strawberries, sliced if they are large
1 cup blueberries
¼ cup heavy whipping cream
¼ cup pure maple syrup
~
1. Stir the whipping cream and maple syrup together so they are well combined.
2. Gently stir the cream and maple syrup into the berries.
3. Let the dessert sit for 45 minutes to an hour. Enjoy!

Share this:

Lemon Rice
By Kath Dedon
.
Do you ever have leftover rice from an Asian takeout meal, or just leftover from having made too much? You can always make fried rice, but here is another idea you might like.
Mark Bittman recently blogged about Lemon Rice. He’s been making it for years. In fact, he has a recipe for it in his first (1998) How to Cook Everything cookbook. I couldn’t find it in his new (“completely revised”) one. (I’m happy to say that I own, and use, both.) In the cookbook version he adds minced garlic.
I decided to go with the version on the blog, without the garlic, this time. This is super-quick to make and was really good with our Grilled Flank Steak! Why hadn’t I thought of doing this a long time ago?
~

~
Lemon Rice
(Adapted from a recipe from Mark Bittman)
~
~
Serves 4
.
2 cups cooked rice that has been in the refrigerator (easier to separate grains)
2 tablespoons butter
Freshly ground pepper
Salt, to taste
2 tablespoons lemon juice
~
1. Using your hands, separate the grains of rice into a bowl.
2. Melt the butter in a skillet.
3. Add the rice. Cook and stir until the rice is warm.

~
4. Generously grind black pepper over the rice.
5. Stir, and salt to taste.
6. Add the lemon juice; stir and serve!
Share this:

Grilled Flank Steak with Teriyaki Marinade
By Kath Dedon
.
Flank steak is a great cut of beef to marinate and put on the grill. This teriyaki-style marinade is very similar to the one my mom loved to use for beef and chicken. I marinated the steak for about 4 hours. It had a subtle teriyaki flavor and was quite good. If you want a more pronounced teriyaki flavor, marinate the steak over night.
Whether marinated or not, the secret to tender flank steak is in the cutting. Always cut across the grain, and make thin, diagonal slices.

~
Grilled Flank Steak with Teriyaki Marinade
.
.
Serves 4 or 5
~
1 (1½ pound) flank steak
¼ cup soy sauce (choose a wheat-free tamari for a gluten-free recipe)
¼ cup honey
2 tablespoons dry sherry (or rice wine vinegar)
1-inch knob of ginger
2 cloves garlic
~
1. Combine the soy sauce, honey and sherry in a bowl.
2. Grate the ginger into the bowl (or mince it and stir in).

~
3. Press the garlic into the bowl (or mince it and stir in).
4. Put the flank steak in a large zip-loc bag and pour the marinade in. Seal the bag and turn it in different directions so the marinade is evenly distributed.
5. Put the bag in a baking dish (in case of leaks) and refrigerate for 4 or more hours. (For full teriyaki flavor, refrigerate overnight.) Turn the steak over now and then so it marinates more evenly.
 ~
~
6. Take the steak out of the refrigerator about an hour before cooking.
7. For a gas grill, heat the burners on high for about 10 minutes. When ready to cook, turn them down to medium.
8. Grill the steak for 3 minutes. Turn and grill for 3 more minutes. (This timing is for medium-rare.)
9. Remove the steak from a grill, and cover with foil to “rest” for 5 minutes.
10. To serve, cut diagonally in thin slices against the grain.
~
Grilled flank steak shown below with Lemon Rice


