Welcome!
You'll find over 470 of my favorite recipes here, including ideas for Quick meals, Cooking for 2, Feasting on Leftovers, and cooking with 5 Ingredients or Less. I'm adding new posts regularly; you can subscribe by email or RSS feed if you'd like to receive the latest recipes. Bon appétit!
Chicken Puttanesca, Fast and Flavorful
By Kath Dedon
.
Legend has it that Pasta Puttanesca was invented by prostitutes trying to lure customers in with the aroma of the spicy sauce. Although no one seems to really know the origin of the recipe, most agree that it first became popular around 50 years ago. I used the main ingredients of the sauce to make Chicken Puttanesca, a fast and flavorful way to serve chicken breasts.
My Chicken Puttanesca was adapted from an idea in Mark Bittman’s Kitchen Express. The book has 404 ideas for quick recipes. Each one is a short paragraph that gives you general directions. Exact measurements and cooking times are not always given. The book is probably not for beginning cooks who would have too many questions about executing the recipes. As an experienced cook, though, I find a lot of inspiration for quick meals in Kitchen Express.
I made a point of buying anchovies for the recipe. We like anchovies and they add a lot of salty goodness. You can leave them out if you prefer; there will still be a lot of flavor from the other ingredients.
Chicken breasts are often too large. My two boneless, skinless breasts were each a half pound. I sliced them in half lengthwise to make four smaller cutlets. To do this, just put the palm of your hand on top of the breast and then slice it into two pieces with a sharp knife. You’ll have a more reasonably sized chicken cutlet and they will cook more quickly.
.

Chicken Puttanesca
(Adapted from a recipe in Mark Bittman’s Kitchen Express)
Serves 4
~
4 small or 2 large boneless, skinless chicken breasts (Cut large ones in half lengthwise to make 4 smaller cutlets.)
6 olive-oil-packed anchovies, diced
½ – 1 teaspoon of the olive oil from the anchovies
1 tablespoon olive oil
2 medium tomatoes, diced (or 1 can diced tomatoes)
1 tablespoon minced garlic
½ cup chopped black olives
3 tablespoons capers
½ teaspoon crushed red chile flakes

~
1. If using 2 large chicken breasts, cut them in half lengthwise to make 4 cutlets
2. Heat the olive oil and the oil from the anchovies in a large skillet.
3. Add the chicken and anchovies and cook for about 3 minutes.
4. Turn the chicken and add the tomatoes, garlic, black olives, capers, and chile flakes.
.

5. Cook until the chicken is thoroughly cooked, about 3 or 4 more minutes.
6. Serve the chicken topped with the sauce.
Share this:

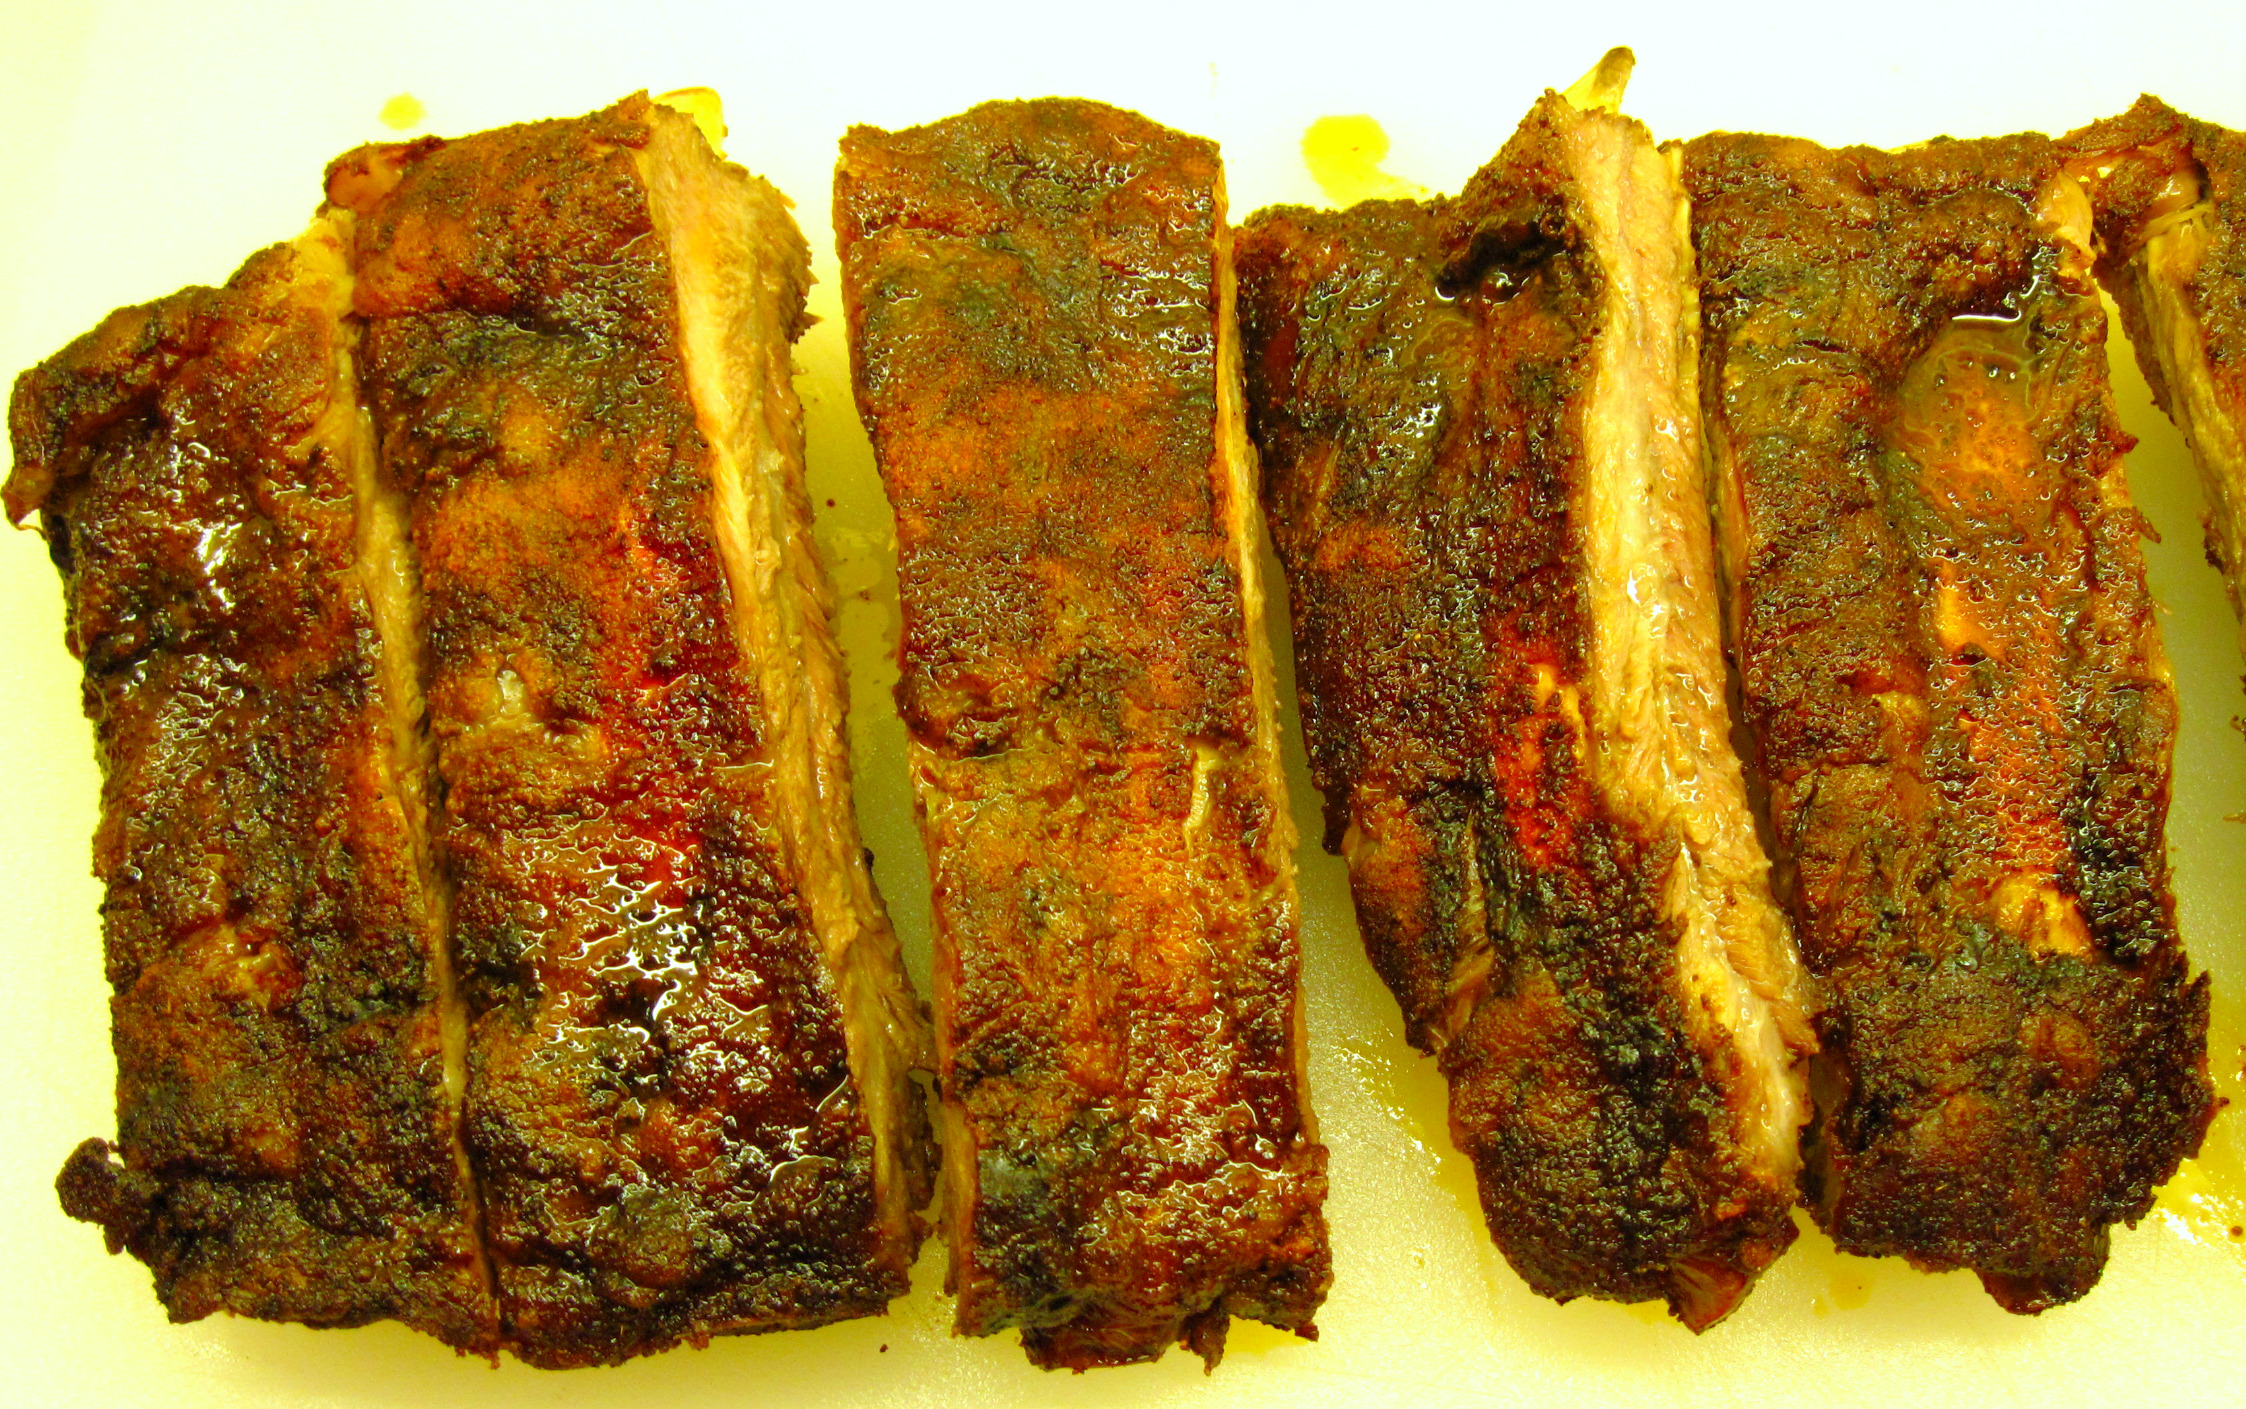
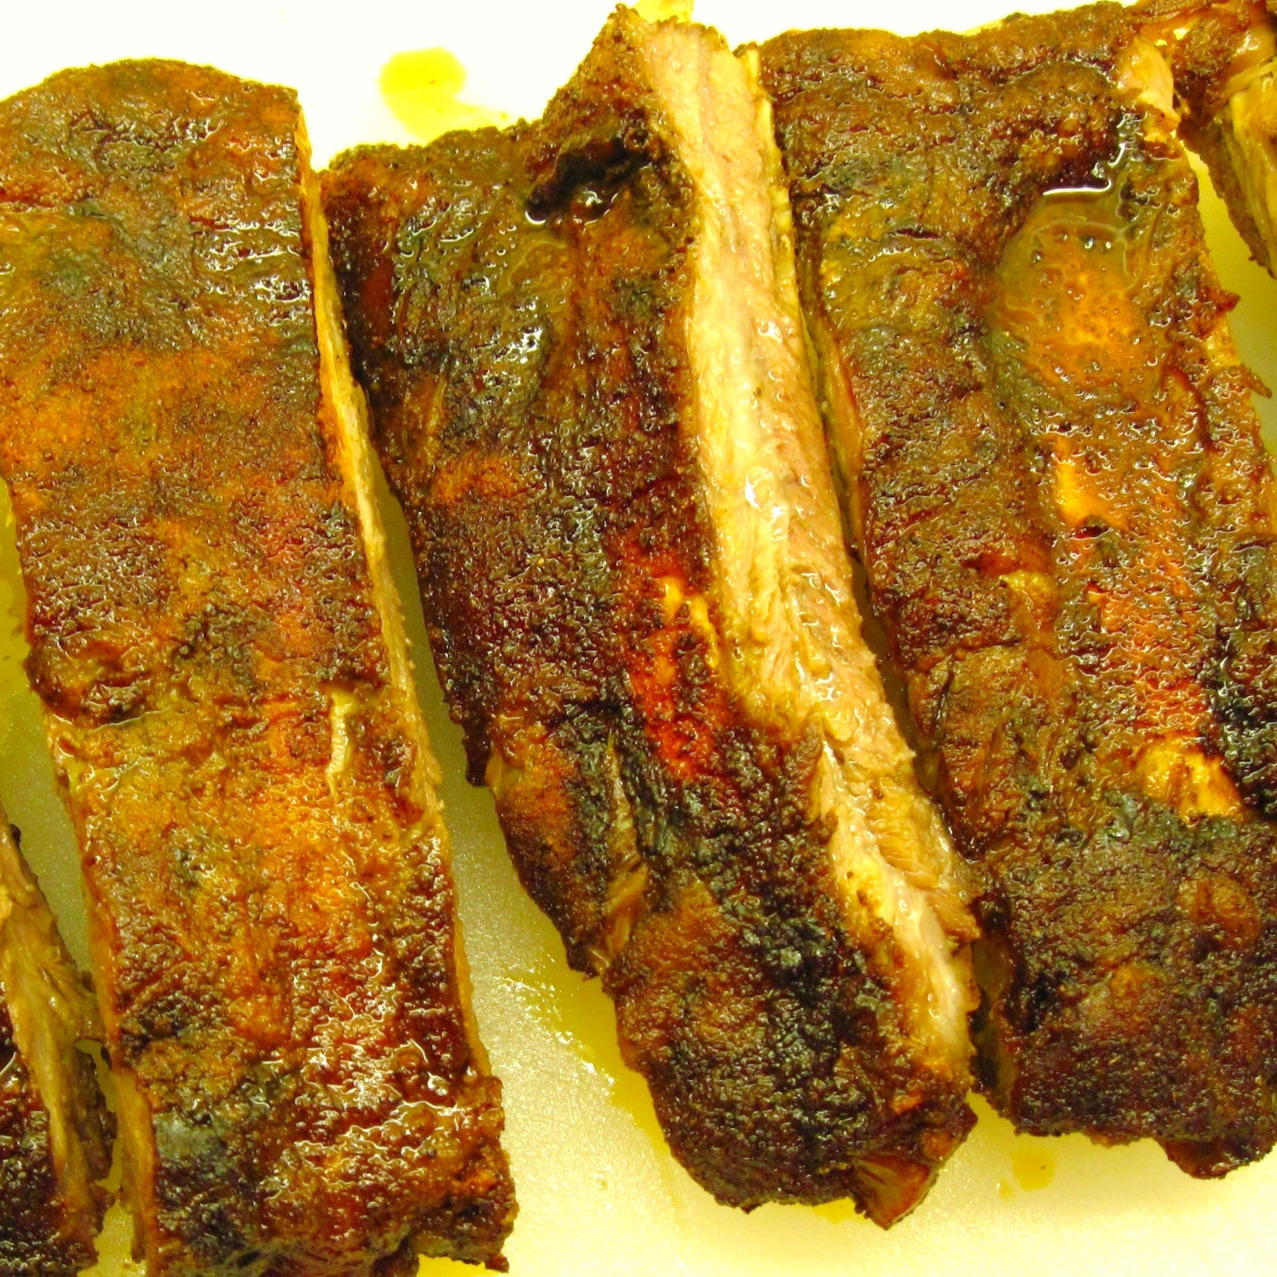
Barbecued Beef Back Ribs
By Kath Dedon
.
It’s Labor Day Weekend, so why not try Barbecued Beef Back Ribs?
For years I have made beef ribs quickly in a hot oven. After reading a recent post on Leite’s Culinaria about doing them “low and slow” on the grill, I decided to try my own version of Barbecued Beef Back Ribs.
.

~
I have “good news” and “bad news” about my experience with Barbecued Beef Back Ribs. First the “bad news” (at least for me, or so I thought): After 1½ hours on my gas grill, I ran out of “gas”. We always keep an extra propane tank for such emergencies and Bob always quickly changes the tanks. Well, Bob wasn’t home. I could have changed it myself, but I chose not to. (That, by the way, is the same philosophy that I have about driving a car with a stick. I can do it, but I choose not to.) So on to plan B, which leads me to my “good news”.
Plan B involved finishing the ribs in the oven. The “good news” is my discovery that these ribs can be made successfully in the oven! Which is very good news for those of you who don’t have grills. They won’t have the smoky taste of a barbecue, but they are still mighty tasty!
The original recipe posted on Leite’s Culinaria is from Ribs, Chops, Steaks & Wings, by Ray Lampe. Ray finishes the ribs by removing them from the foil, covering with barbecue sauce, and finishing them in a hot (400˚) barbecue. I eliminated that step; we thought the ribs were great without the barbecue sauce and without the extra 45 minutes of high heat.
Since I had some on hand, I used the Southern Barbecue Dry Rub from Joy of Cooking. You can try that, or use your favorite rub.
~
Barbecued Beef Back Ribs
(Inspired by a recipe by Ray Lampe in Ribs, Chops, Steaks & Wings and posted on leitesculinaria.com)
.
.
Allow about 1 pound of ribs per person. There’s not much meat on the bones.
~
Serves 2 – 3, doubles easily
~
2 ¾ pounds beef back ribs
Southern Barbecue Dry Rub* (or your favorite barbecue rub)
(About 1 – 1½ cups of your favorite Barbecue sauce, optional)
~
1. Preheat your grill or your oven to 250˚.
2. Remove the membrane from the back of the ribs. Loosen with a sharp knife, grab it with a paper towel, and pull. Don’t worry if you can’t get it all.
3. Rub the Southern Barbecue Dry Rub all over the ribs.
4. If using the oven, put the ribs on a rack in a broiler pan and put them in the preheated oven. If using the grill, use the Indirect Method; leave one burner on and put the ribs directly on the grill over the burners that are turned off. Close the cover. Check the grill frequently (especially at first) and adjust the hot burner as needed to maintain 250˚ – 275˚.
My ribs, covered with rub and started on the grill.
 ~
~
5. Cook the ribs for 2 ½ hours.
6. Remove the ribs from the oven or the grill. Wrap them tightly in 2 layers of heavy duty foil, and put them back in the oven or on the grill.
Wrapping the ribs in foil
 ~
~
Ribs wrapped to go back on the grill (without the pan) or into the oven (with the pan)

7. Cook for an additional hour.
At this point, I decided our ribs were “good to go” and we enjoyed them. This is where you can choose to remove the ribs from the foil, cover with your favorite barbecue sauce, raise the heat of the oven or the grill to 400˚, and cook them for an additional 30 – 40 minutes. Turn them occasionally during this period.
8. Cut the ribs and enjoy!

.
*Southern Barbecue Dry Rub
(adapted from Joy of Cooking)
¼ cup sweet paprika
2 tablespoons chili powder
1 tablespoon cayenne pepper
1 tablespoon ground cumin
2 tablespoons salt
2 tablespoons ground pepper
2 tablespoons brown sugar (optional)
Combine all ingredients in a small bowl. The rub can be used with pork or beef.
.
Share this:

Pan-Roasted Sockeye Salmon
By Kath Dedon
.
The sockeye salmon runs in the Pacific Northwest are the largest they have been in decades! That means prices are very reasonable right now for this delicious fish.
I bought a couple of fresh local sockeye salmon fillets yesterday. The first place I looked for preparation ideas was my Ray’s Boathouse cookbook. Ray’s Boathouse has been a much-loved institution in Seattle for over 70 years. It actually started as a boathouse in 1939–a place to rent small boats and gear to go fishing on Puget Sound. Today it is a nationally recognized restaurant specializing in the finest Northwest seafood. Ray’s Boathouse: Seafood Secrets of the Pacific Northwest is an excellent collection of the restaurant’s recipes.
Since I wanted a very simple preparation, I decided against Ray’s excellent teriyaki salmon….even though it is one of my favorite salmon recipes of all time!
Grilled salmon would have been a great choice, but I was drawn to Ray’s technique for Pan-Roasted Sockeye Salmon. It’s a quick and easy recipe and was perfect for cooking the beautiful fillets. (And if you don’t own a grill, this is a great way to prepare salmon fillets!) Paired with a salad of spinach, small grape tomatoes, and avocado, it was a very satisfying summertime meal.
The recipe recommended using a nonstick ovenproof skillet. I chose to use my well-seasoned cast iron skillet which worked great!
.

Pan-Roasted Sockeye Salmon
(Adapted from a recipe in Ray’s Boathouse)
.
~
Serves 2
~
2 (6-oz.) fillets of sockeye salmon
Salt
Freshly ground pepper
2 tablespoons olive oil

.
1. Preheat the oven to 350˚.
2. Heat a large cast iron (or nonstick) ovenproof skillet over medium-high heat.
3. Salt and pepper the flesh side of the fillets to taste.
4. Add the olive oil to the hot skillet.
5. Put the fillets, flesh-side-down, in the skillet. (Stand aside and do it carefully; the oil will splatter a bit when you put it in.)
6. Cook for 3 minutes.
7. Turn the fillets over; the flesh should have a nice crust.
.

.
8. Put the pan in the preheated oven and cook for 3 – 5 minutes until done. (My fillets took only 3 more minutes.)
9. Serve immediately with the salad or side dish of your choice.
.

Share this:

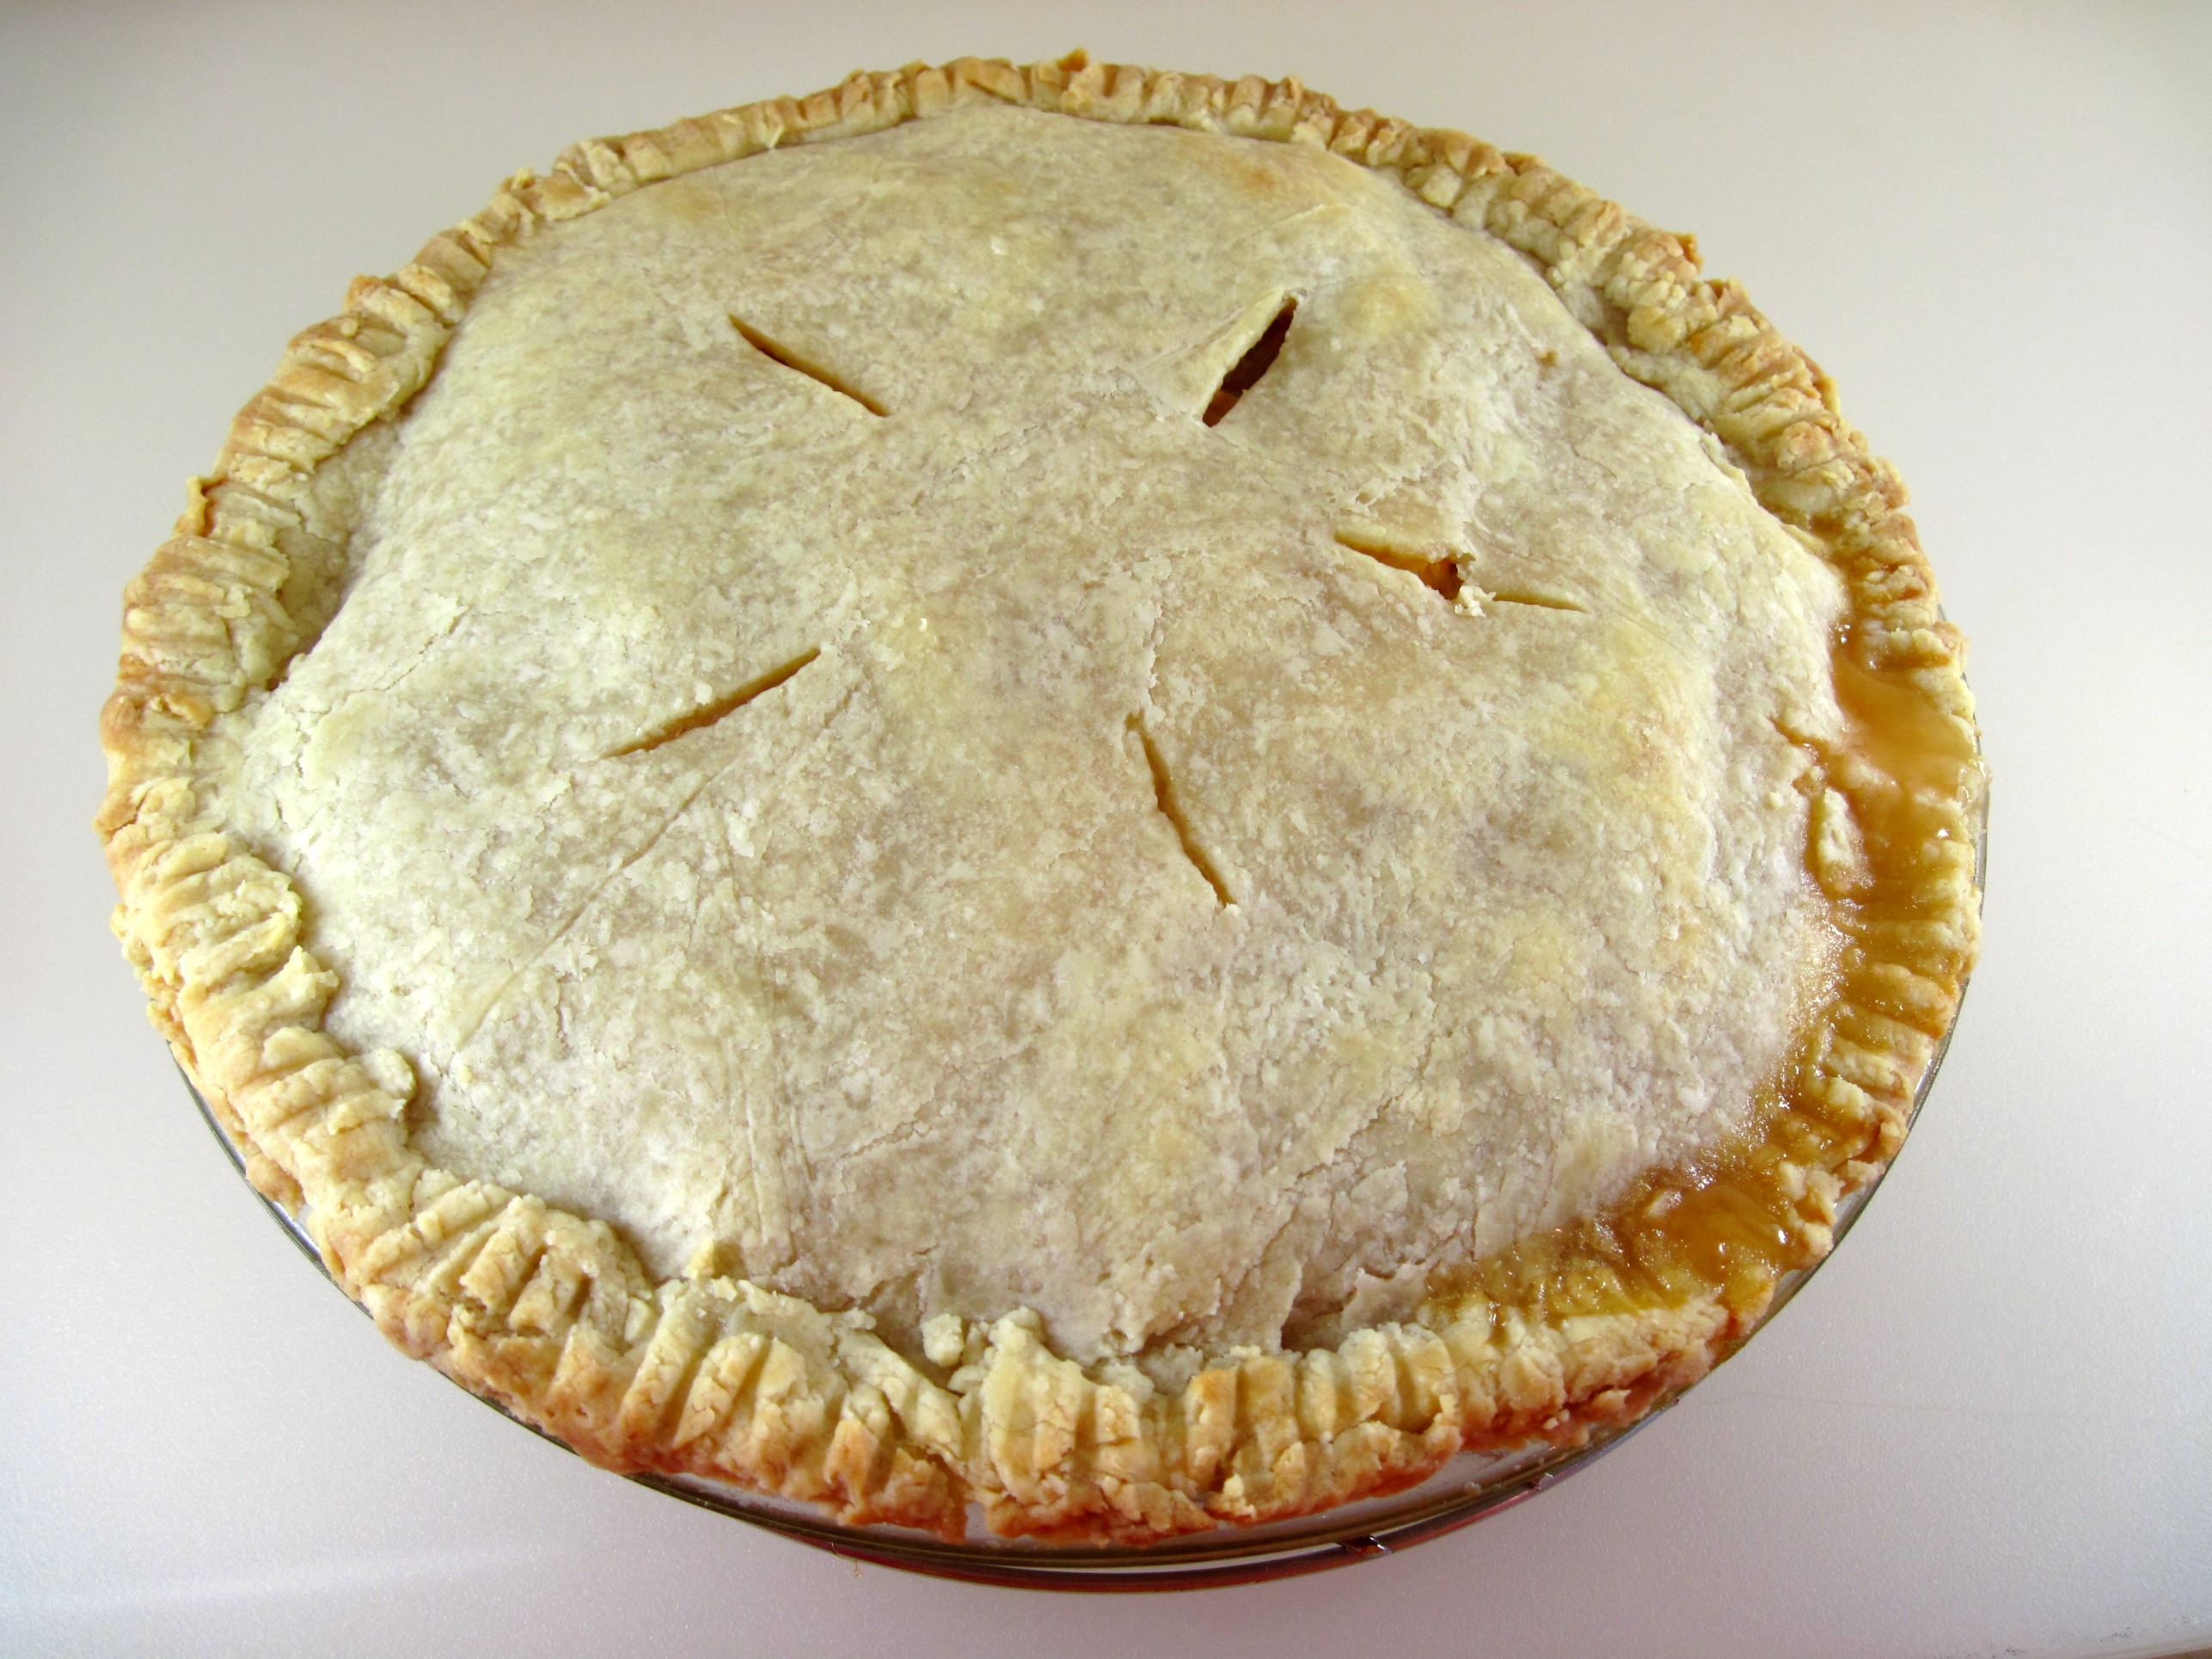
Top 10 Reasons my Happy Apple Pie is Smiling
By Kath Dedon
.
Here are the Top 10 Reasons why my Happy Apple Pie is smiling!
*
(Drum roll, please!)

*
10. He’s made with just-picked Gala apples from our tree.

*
9. His crust is an easy pie crust for anyone to make.
8. His crust is made with heart-healthy olive oil.
7. The sweetener used is 100% honey!
6. This is the first pie my daughters learned to bake. Now they’re experts!
5. This is an extremely popular fellow at all gatherings of friends and family.
4. He knows that it’s not Thanksgiving without him!
3. This All-American was a big hit on the 4th of July this year.
2. When our Gala apples are gone, he can still be made year-round with Granny Smith apples.
And the #1 reason: He loves making children smile when he appears the next morning (especially on a school day) for breakfast! …… (You got your wheat, you got your fruit….just add a glass of milk and you’re good to go!)
.

*
Everyone seems to love apple pie. I developed this recipe years ago because I wanted to make a pie that was totally sweetened with honey. I buy a big container of plain honey for baking. You don’t want a fancy, flavorful honey here. Save the fancy honeys for your morning toast or for drizzling on fancy desserts.
Sometimes I use my food processor to quickly slice the apples. I just peel them, quarter them, take out the core, and put them in the food processor. This time I felt like slicing them by hand.
I have always called this pie my “Happy Apple Pie”. Truth be told, I usually just cut slits in the top crust for steam vents. I thought it would be fun for a change to give this happy pie a happy face!

Happy Apple Pie
*
1 recipe of Easy Pie Crust for a Two Crust Pie
*
About 6 medium, or 5 large, apples (you should have about 6 cups, sliced)
2/3 cup of honey
¼ cup flour
1 teaspoon cinnamon

1. Put a large rimmed baking sheet larger than the pie plate in the oven, and preheat to 375˚. (The baking sheet will catch any juices that boil over.)
2. Make the pie dough and set aside.
3. Wash and peel the apples and cut them into quarters. Cut the core out of each quarter.

4. Cut each quarter into slices and put in a large bowl.

5. Stir together the honey, ¼ cup flour, and cinnamon together.

6. Pour the honey mixture over the apples and gently stir.

*
7. Roll out the bottom crust for the pie and put it in the pie dish. Put the apples in the pie.

*
8. Roll out the top crust and place it on top of the apples.
9. Finish off the edge of the crust the way you like. (I just press the edge with a fork.)
10. Cut steam vents in the top crust.

*
11. Bake for about 50 minutes, until the crust is golden. Cool on a rack.

*
🙂

Share this:

Garden Fresh Green Beans with Tarragon Butter
By Kath Dedon
.
We were thrilled to harvest fresh green beans from our garden yesterday! I made Green Beans with Tarragon Butter to accompany Pork Chops à la Julia.
There won’t be a lot of beans this year. We were a bit late to the party getting them planted, we didn’t plant enough, and it’s been a cool summer in Seattle. Last night’s beans were SO good, though, that we are inspired to plant more next year.
We have two varieties. Blue Lake Bush beans are classic green beans. The Roma II Bush Beans are the flat, lighter green colored beans. They are the kind of beans that “squeak” when you bite into them. Together, with a bit of butter and tarragon, they were fabulous!
I rarely buy green beans at the grocery store because they usually look terrible. When they look like they’ll be alright, I’ll boil them for 5 minutes. With our homegrown fresh beans, I decided that a 4 minute boil would be enough, and they were perfect.
.
 ~
~
Garden Fresh Green Beans with Tarragon Butter
.
.
(1/2 pound Blue Lake Bush Beans and Roma II Bush Beans (the flat ones) just picked!) and Blue Lake beans")
.
Serves 2
.
½ pound fresh green beans, washed, ends trimmed, and sliced into 1½ – 2 inch slices
About 1½ teaspoons salt (I used sea salt.)
2 teaspoons butter
1 heaping teaspoon fresh tarragon, minced
~
1. Bring a pot of water to a boil.
2. Add the salt to the boiling water.
3. Add the beans to the water and boil for 4 minutes. (Maybe 5 minutes if not quite as fresh)

4. Drain the beans; stir in the butter and tarragon and serve.
Share this:

Buttered Potatoes with Parsley
By Kath Dedon
.
Homegrown Potatoes with Homegrown Parsley! 🙂
Potatoes! I love them in all forms. Maybe it’s because I’m 5/8 Irish (my great, great grandparents immigrated from Counties Clare and Cork during the Potato Famine), but I do love potatoes.
Last year, for the first time, we grew our own. It was so much fun digging our potatoes out of the ground and having them for dinner within an hour! We grew russets, Yukon Golds, and some kind of red potato. Our crop was quite successful.
This year Bob just planted Yukon Gold potatoes. He followed the same procedure as last year, and set up the sprinkler system so they would get watered while we were on vacation. When we came home, the plants looked terrible! They actually looked pretty dead, except for one.
I don’t know what happened, but I suspect it may have something to do with the crazy weather this summer. We’ve had foggy days in the 60s and then a couple of hot days, and then back to cooler weather.
Anyway, last night we decided to see if we could harvest some potatoes for dinner. Bob went out and got some, but he said he had to do a lot of digging to get the few that he found. This year we will not be having a great harvest of our potatoes.
We were surprised to have a few russet potatoes in the bunch that Bob dug up. Could they have come from last year’s crop?
.

.
With fresh parsley in our garden, I decided to use Jacques Pepin’s recipe for Buttered Potatoes with Parsley from his Happy Cooking! cookbook. You wouldn’t think a recipe would be necessary for such a simple dish, but he does include a great tip: After you drain the potatoes, put the pan back on the stove over high heat for about 30 seconds. He says this creates potatoes with a creamier texture.
Chef Pepin also says to toss the potatoes with the butter and parsley gently so they don’t break up. Well, my potatoes had already broken up in the pot, so they have a “smashed potatoes” look about them. Not what Jacques Pepin had in mind, but they still tasted delicious!
This recipe works especially well with very small potatoes which are either left whole, or cut in half.
.
My potatoes may not be beautiful, but they were a great treat from our garden!

.
Buttered Potatoes with Parsley
(Adapted from Jacques Pepin’s recipe in Happy Cooking!)
.
.
Serves 4
~
1½ pounds potatoes, cut into 2-inch pieces
1½ tablespoons unsalted butter
¼ teaspoon salt
3 tablespoons chopped fresh parsley

~
1. Put the potatoes in a pot and cover with water. Bring to a boil; reduce heat, cover and simmer for 10 – 15 minutes. (Timing will depend on the size of your potatoes. Jacques’s recipe says 15 – 20 minutes, but my potatoes were falling apart before 15 minutes.)
.

.
2. Drain the potatoes well. Put the pan back on the stove over high heat for about 30 seconds to dry the potatoes.
3. Gently toss with the butter, parsley, and salt.
~

Share this:

Ratatouille
By Kath Dedon
a
Cook’s Illustrated developed a recipe for Ratatouille that involves roasting the eggplant and the zucchini. I found the recipe online. (It can also be found in The New Best Recipe; it’s not in my older edition.) I liked the idea of roasting the vegetables so I decided to give their version a try.
I was halfway through the recipe when I realized that it didn’t call for peppers. Most recipes I’ve seen use red or green peppers. Julia Child used green peppers in her recipe in Mastering the Art of French Cooking. I would have liked to have read why the Cook’s Illustrated experts decided not to use peppers, but my online version didn’t include their usual discussion about the recipe.
So, my Ratatouille had no peppers. The recipe is pretty easy to make, but it does take a bit of time. In the end, though, it was quite tasty and a very satisfying vegetarian main dish. Next time, though, I may try Julia’s recipe and include green peppers.
Cook’s Illustrated suggested using very ripe beefsteak tomatoes for the best flavor. Since good ones weren’t available, I substituted a pound of Roma (plum) tomatoes.
.
Ratatouille garnished with a bit of basil:
~
Ratatouille
(Adapted from a recipe from Cook’s Illustrated)
.
.
Salted eggplant in a colander:
~
Serves 2 as a main course, 3 – 4 as a side dish
.
If you want to double it, you’ll need to use 2 baking sheets for the eggplant and zucchini. Put one oven rack in the upper third of the oven and the other one in the lower third. Rotate the baking sheets from one rack to the other halfway through roasting.
~
1 pound (1 medium) eggplant, cut into 1-inch cubes
1 pound (1 – 2 large) zucchini, cut into 1-inch cubes
¼ cup olive oil, divided
½ pound sliced onions (about 1½ cups)
2 medium cloves garlic, minced
1 pound ripe tomatoes, peeled and cut into 2-inch cubes
1 tablespoon chopped fresh parsley
1 tablespoon chopped fresh basil
1½ teaspoons minced fresh thyme leaves (I omitted, since I didn’t have any)
Salt
Ground black pepper
~
1. Put the eggplant in a colander over a large bowl. Toss it with 1 teaspoon salt. Let it sit for 1 – 3 hours.
2. Spread the eggplant on double layers of paper towels; put another double layer on top. Press to remove any extra moisture.
3. Heat the oven to 500˚.
4. Put the eggplant and zucchini in a large bowl and toss with 2 tablespoons olive oil.
5. Line a large rimmed baking sheet with heavy duty foil. Spread the eggplant and zucchini out on the baking sheet. Sprinkle with salt and put in the preheated oven. Roast for about 30 minutes, stirring every 10 minutes so they will roast evenly.
.


6. Heat 2 tablespoons olive oil in a large skillet or Dutch oven. Add the onion and cook, stirring often, over medium-low heat until the onion is soft and starting to turn golden brown. This takes 15 – 20 minutes.
7. Add the garlic to the onions and cook, stirring, for 30 seconds.
.

.
8. Add the tomatoes; cook for about 5 minutes.
9. Add the roasted eggplant and zucchini to the pan and cook for 5 more minutes. Stir in the parsley, basil, and thyme. Taste for seasoning and add salt, if needed, and freshly ground pepper.
Share this:

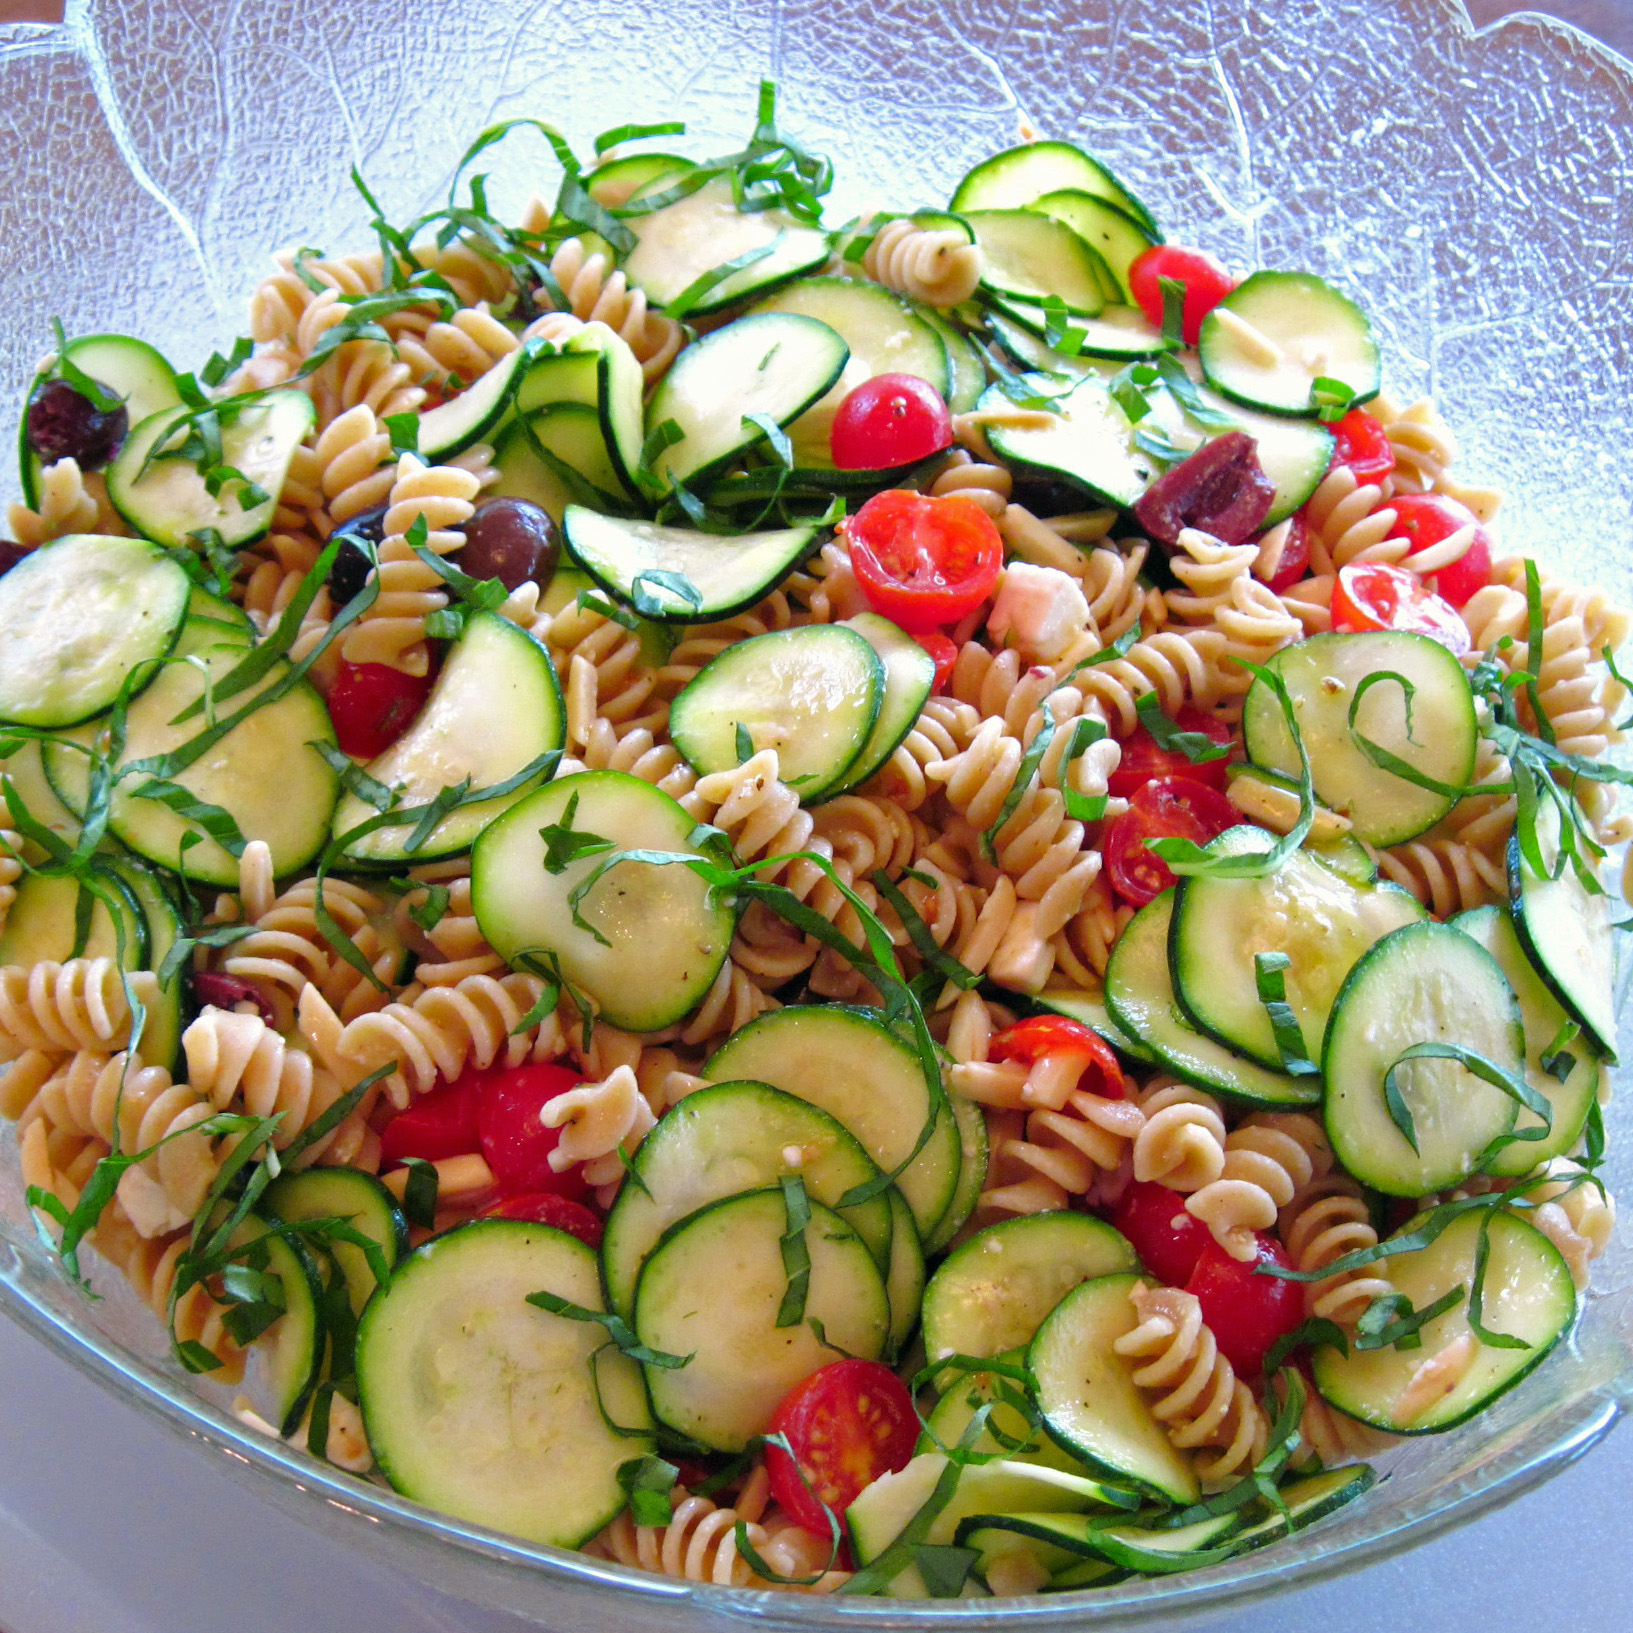
Zucchini and Pasta Salad
By Kath Dedon
.
Inspired by a beautiful Zucchini and Almond Pasta Salad on Smitten Kitchen, I made my version of Zucchini and Pasta Salad to take to a dinner party tonight.
I used French sheep milk’s feta instead of Parmesan cheese, and I added cherry tomatoes, kalamata olives, and just a bit of slivered basil. This is a salad that will keep well, so it’s a great choice when you want to take something to a party or on a picnic.
.
a
Zucchini and Pasta Salad
(Adapted from a recipe on smittenkitchen.com)
a
a
Serves 8
a

.
1½ pounds zucchini (4 small ones), sliced very thinly
1 teaspoon salt
About ¾ pound of pasta (I used a 13.25 ounce box of Barilla whole grain rotini)
2 cups cherry tomatoes, sliced in half
½ cup kalamata olives, cut in half
1 cup (about 5 oz) feta cheese, cut into small cubes
½ cup slivered almonds, toasted and cooled (toast at 300˚ for about 10 minutes)
~
1/3 cup olive oil
3 tablespoons lemon juice
Freshly ground black pepper
¼ teaspoon salt
~
3 large basil leaves, cut into thin strips, for garnish
~
Slicing the zucchini:

1. Put the zucchini in a colander; toss it with the 1 teaspoon of salt and let it sit for 20 minutes. Rinse to remove the salt and drain.

~
2. Cook the pasta according to the package instructions in salted water; drain and cool.

~
3. Whisk the olive oil, lemon juice, black pepper and ¼ teaspoon salt together.
.
Whisking with a Blender Bottle (very useful for quick salad dressings; I’ve seen them at Metropolitan Market in Seattle):

~

4. Put the zucchini, pasta, tomatoes, olives, cheese and almonds in a large bowl. Gently toss with the dressing.
5. Garnish with the basil leaves.

Share this:

Crunchy-Top Peach Pie
By Kath Dedon
.
It’s Peach-O-Rama time at all of the Metropolitan Markets in the Seattle area! Every summer I pass by the flavorless peaches that are shipped from other parts of the country and patiently wait for the spectacular local peaches that are available at Peach-O-Rama.
Last Friday I bought some O’Henry peaches that came from Pence Orchards in the Yakima Valley. I let them ripen up a bit more in a paper bag on my counter. Two days later, they were ready for my Crunchy-Top Peach Pie.
The pie recipe is adapted from one in the original (1977) Moosewood Cookbook, by Mollie Katzen. The crunch in the topping comes from chopped almonds; they’re a good combination with the oats and the peaches.
Boiling the peaches for 1 minute makes it simple to remove the skin!
.

~

Photo above taken by Laura.
.
Crunchy-Top Peach Pie
(Adapted from the recipe in the 1977 edition of Moosewood Cookbook by Mollie Katzen)
.
~
1 Easy Pie Crust for a 9-inch Single Crust Pie
4 – 5 7 large peaches (enough for 4 heaping 6 cups, sliced) or about 3 pounds
¼ cup tapioca flour
2 tablespoons lemon juice
¼ cup honey
1 teaspoon cinnamon
~
For the crunchy topping:
1½ cups rolled oats (not quick-cooking)
5 tablespoons butter
3 tablespoons honey
½ teaspoon cinnamon
½ cup chopped almonds
¼ cup flour
½ teaspoon salt
.

Photo above taken by Laura.
.
1. Make the pie crust and set aside.
2. Preheat the oven to 375˚.
3. Bring a large pot of water to a boil. Add the peaches and boil for 1 minute. Remove them from the water immediately. Remove the skin from the peaches, and slice into thin slices.
.
Removing peach from the water, after boiling for 1 minute:
~
4. Gently toss the peach slices with the tapioca flour and the cinnamon.

~
5. Drizzle the lemon juice and ¼ cup honey over the peaches and gently toss.
6. Melt the 5 tablespoons butter and the 3 tablespoons honey together.
.

~
7. Combine the rolled oats, cinnamon, almonds, flour and salt in a bowl. Pour the butter and honey over the topping and stir well so it is all evenly coated.
.

~
8. Pour the peach filling into the crust. Put the crunchy topping over the peaches and pat gently in place.
9. Bake for 35 minutes.
10. This pie can be enjoyed warm or cold.
.
 .
.

a
Update August 18, 2011
Peach Pie variation: Peach pie can also be made with a 2-crust pie crust instead of the Crunchy-Top. Use the same filling, but omit the crunchy topping and use a 2-crust pie crust. Bake in a 375˚ oven for 35 minutes.
.

Share this:

Chile Relleno Casserole with Chorizo
By Kath Dedon
.
When we were visiting Mike and Liz at their ranch in Corning, they told us about a flea market in Orland. Orland is on I-5, about 14 miles south of Corning.
We left Corning to head to Dublin and stopped at the Orland Flea Market on the way. There were a lot of different fruits and vegetables available; we got some poblano chiles, avocados, radishes, and limes.
The radishes were amaaazing: fresh, very crunchy, and HOT. Bob was in heaven. We bought 2 pounds and we probably could have used more. (We stopped at a grocery store the day after we got home and Bob didn’t want me to buy any radishes. He knew they would be disappointing.)
We ended up carrying 5 poblano chiles five more days on our road trip. Fortunately, they were very fresh when we bought them and they survived the trip just fine.
.

.
Last night I decided to make a Chile Relleno Casserole with Chorizo. I adapted a recipe by Elise Bauer on Simply Recipes. Since Elise lives in the Sacramento area, I figured she would know a thing or two about California peppers!
I had never used fresh poblano chiles before, but Elise gave very simple instructions for charring them to get them ready for the recipe. I used my gas grill, but you could use your broiler if you don’t have a grill.
Elise’s recipe uses 8 chiles. Since I only had 5, I adjusted the amount of the other ingredients and baked it in a 2 quart (7”x11”) baking dish. It was perfect with some fresh Yakima corn which I quickly cooked “Minnesota style”.
.

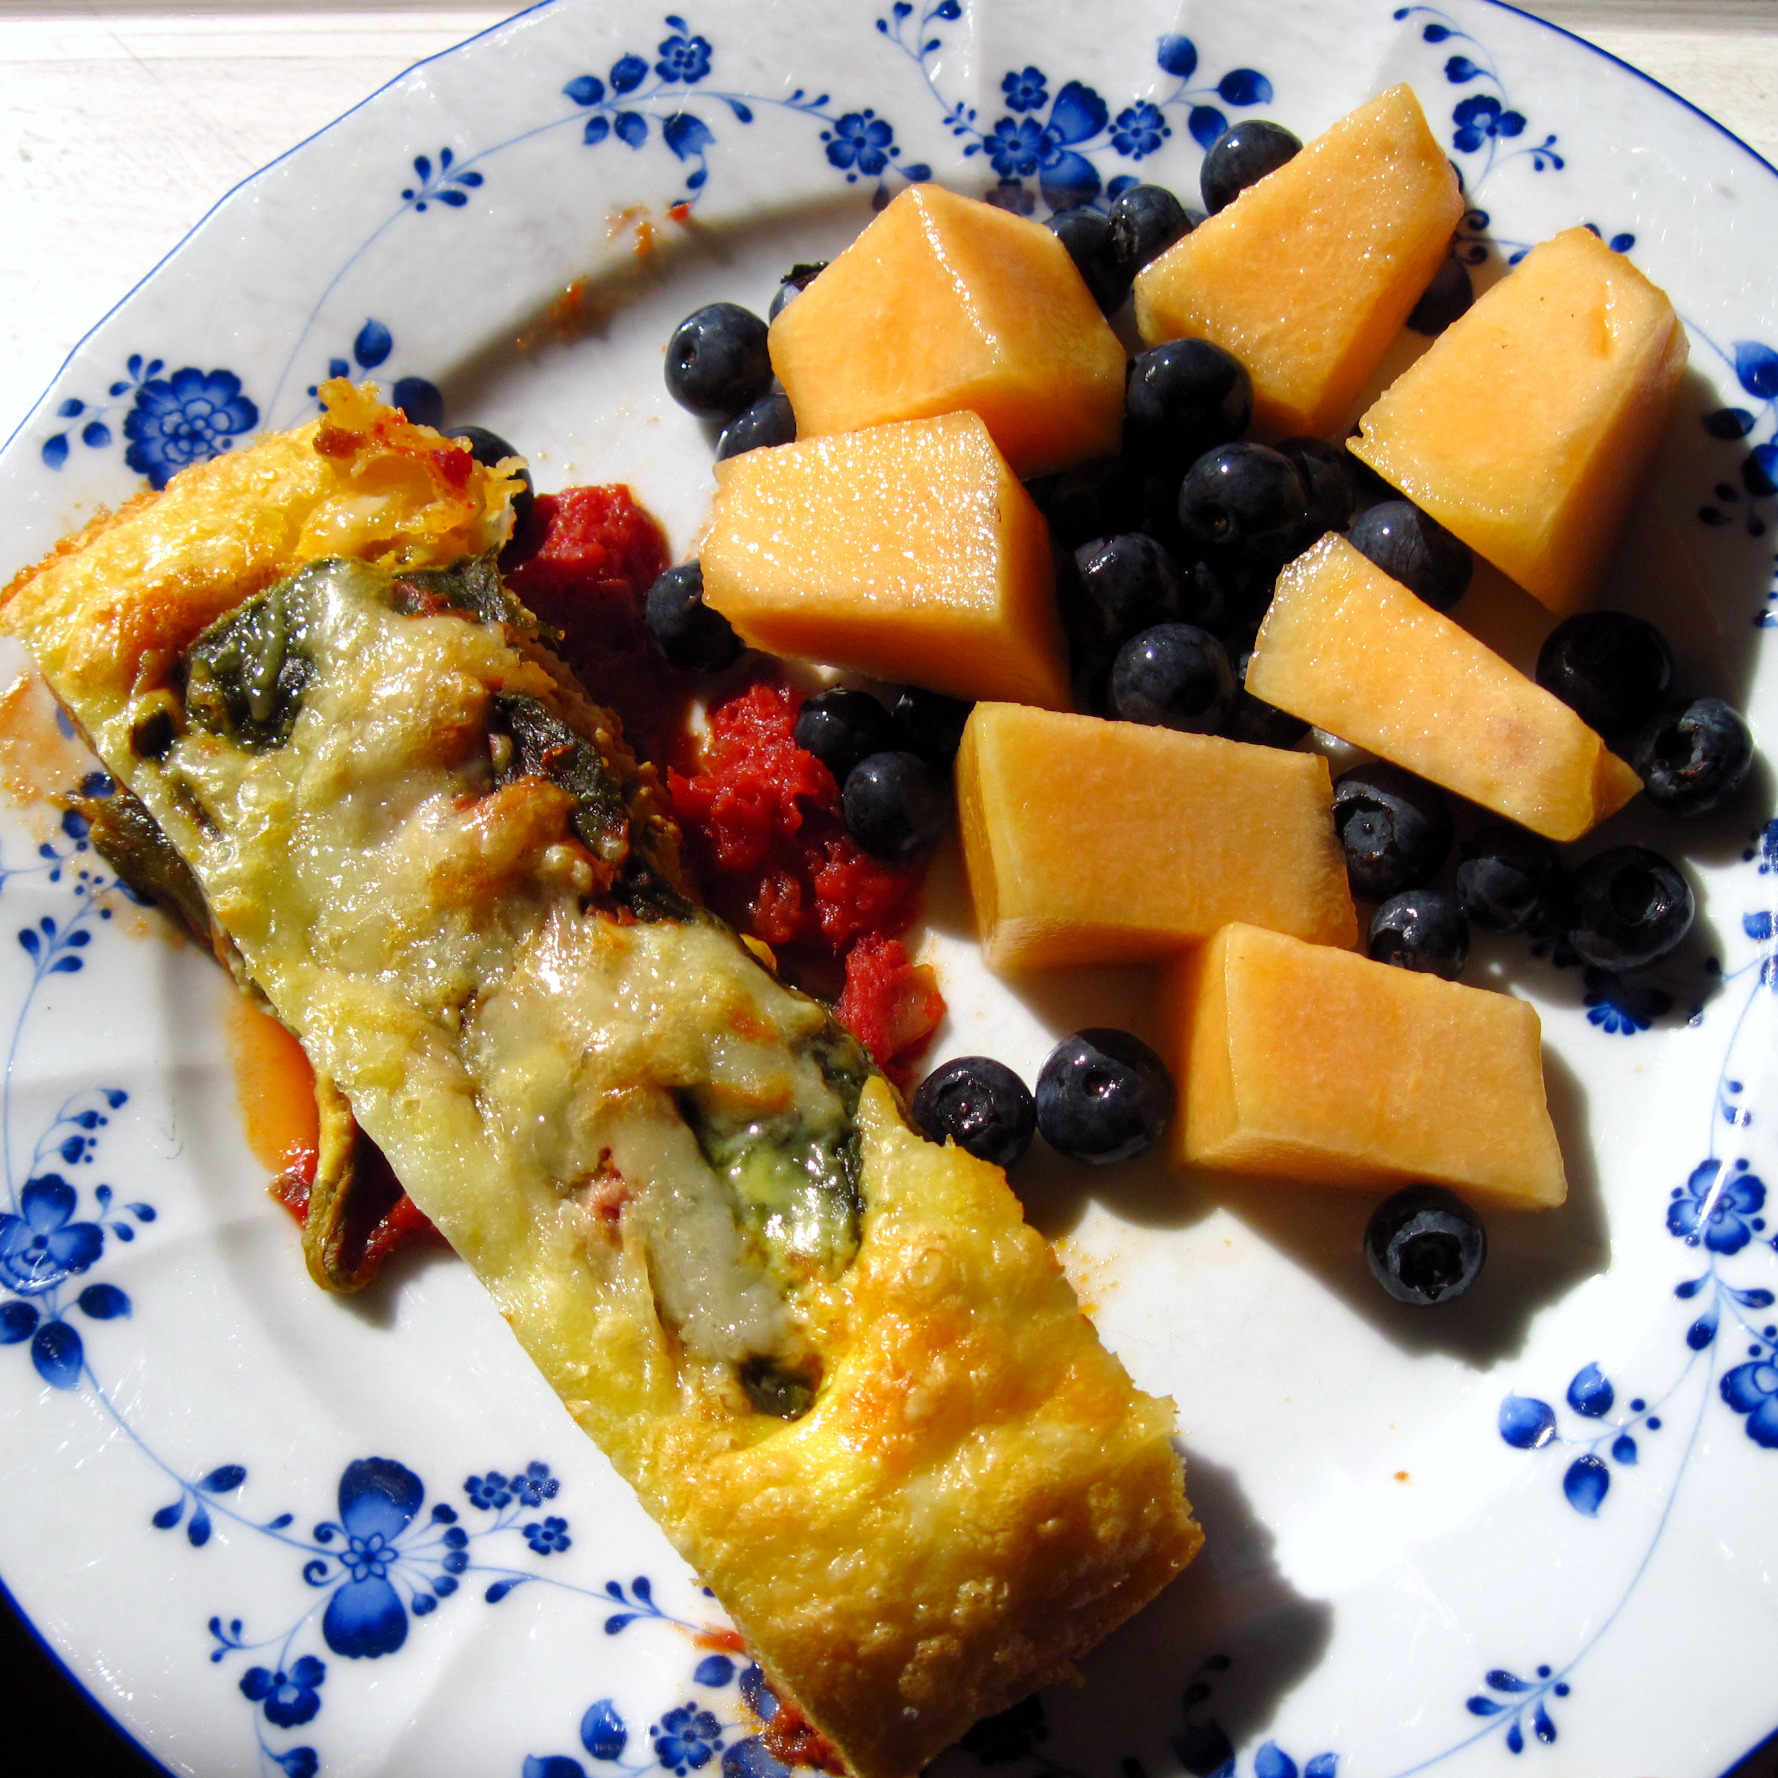
~
This morning I heated up 2 leftover chiles and served them with cantaloupe and blueberries. It was a fantastic breakfast for a hot Sunday morning.

~
Chile Relleno Casserole with Chorizo
(Adapted from a recipe by Elise Bauer that I found on simplyrecipes.com)
.
.
Serves 5
~
5 poblano chiles
2 tablespoons olive oil
1 cup chopped onion
4 cloves garlic, minced
1 28-ounce can tomatoes (I used Cento brand crushed tomatoes, which were unsalted)
Salt
¾ pound Mexican chorizo (or other spicy sausage)
¾ cup shredded Monterrey Jack cheese (or crumbled cotija cheese, as Elise used, if you can find it)
1 teaspoon minced fresh oregano leaves (or ½ teaspoon dried)
9 eggs
3 tablespoons flour
¾ teaspoon baking powder
1 cup Monterey Jack or mild cheddar, shredded
~
1. Heat a gas grill (or broiler) to high.
2. Wash and dry the chiles and place them on the grill. Close the lid to maintain a high heat. Turn the chiles occasionally so they will be blackened and blistered on all sides. (I found it took about 20 minutes on my grill.)

.
3. Put the chiles in a paper bag. Fold the top over and let them cool for at least 15 minutes. (Longer is OK.)
4. Preheat the oven to 375˚.
5. Heat the oil in a large skillet and add the onions. Cook, stirring occasionally, until softened, about 5 minutes.
6. Add the garlic and cook, stirring, for about 1 minute.
7. Add the tomatoes. Break the tomatoes up if they are whole or are in large pieces. Bring to a simmer and simmer for about 15 – 20 minutes. Salt to taste. (Mine needed about ½ teaspoon salt since my tomatoes were unsalted.)
8. Spread a layer of the tomato sauce in the bottom of a baking dish. (I felt there was too much sauce for my 2 quart pan, so I reserved about 1 cup of it for another use.)
9. Peel the blackened skin off of the chiles. Cut the tops off and make a slit down the side so you can open them up. Remove the seeds. Set the chiles aside.
10. Using the same pan that you used for the tomato sauce, cook the chorizo over medium heat. Break it up into small pieces and cook until done, about 4 minutes.
11. In a large bowl, combine the chorizo, ¾ cup Monterrey Jack cheese (or cotija), and the oregano. Stuff the chiles with the sausage and lay them in the casserole.
~
Two chiles stuffed with chorizo and a third one ready to stuff:


.
12. In the bowl that you used for the chorizo, beat the eggs well. Beat in the flour, baking powder, and a pinch of salt until well-blended.
13. Sprinkle half of the remaining cheese on the chiles; pour the egg mixture over all. Sprinkle the top with the rest of the cheese.
14. Bake until done, about 30 minutes. Let it rest for about 5 minutes before cutting.
.


