Welcome!
You'll find over 470 of my favorite recipes here, including ideas for Quick meals, Cooking for 2, Feasting on Leftovers, and cooking with 5 Ingredients or Less. I'm adding new posts regularly; you can subscribe by email or RSS feed if you'd like to receive the latest recipes. Bon appétit!
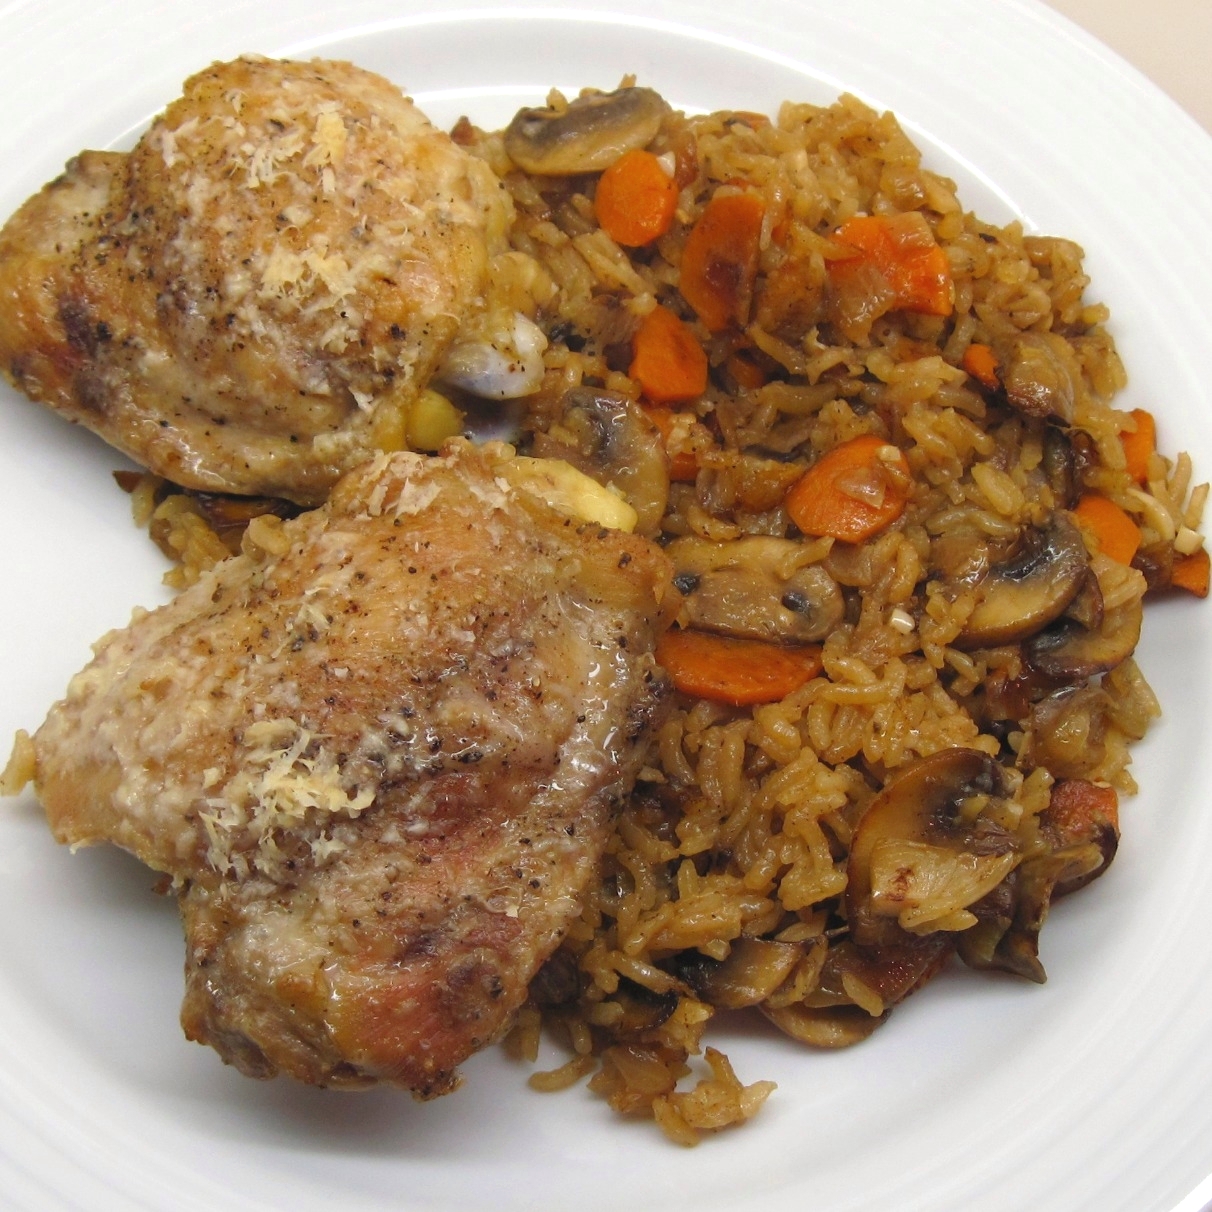
Chicken and Rice (New and Improved!)
By Kath Dedon
.
Chicken and Rice…. (Again?)…. I know…. I’ve already posted Skillet Chicken with Rice and Arroz con Pollo, but this is a slightly different take on the classic combination, and a very tasty one at that.
I found the recipe in the October 2010 issue of Cooking Light and I gave it a try last weekend. We both really liked it, but I felt the recipe needed a bit of “tweaking”. The rice was a bit too dry; it was almost crunchy.
When I made it again last night I increased the chicken broth, and that did the trick! The rice was cooked perfectly.
So here is my New and Improved Chicken and Rice. It’s now my favorite version! At least until the next one comes around.

~
Chicken and Rice
(Adapted from a recipe in the October 2010 issue of Cooking Light)
.
Serves 2
.
The original recipe made 4 servings, but I scaled it down to serve 2. Simply double the ingredients for 4 servings, but brown the chicken in 2 batches. They won’t brown well if the pan is too crowded. Use a 13 x 9-inch baking dish for 4 servings.
~
1 tablespoon olive oil
3 or 4 bone-in chicken thighs , skinned (grab the skin with a paper towel to easily pull it off)
Salt
Pepper
1 cup chopped onion
1 carrot, thinly sliced
4 ounces mushrooms, sliced
4 garlic cloves, minced
½ cup long-grain white rice
Cooking spray
1 cup chicken broth
2 tablespoons whipping cream
About 3 tablespoons (3/4 ounce) grated fresh pecorino Romano cheese
~
1. Preheat the oven to 350˚.
2. Prepare the baking dish. Spray a 7 x 11-inch (or 8 x 8-inch) baking pan with the cooking spray and set aside.
3. Have the ingredients “mise en place” (chef-speak for “assembled and ready to go”).
Onions, mushrooms, chicken broth, rice, carrots, and garlic
~
4. Heat the oil in a large skillet over medium-high heat.
5. Salt and pepper the chicken and add it to the pan. Cook 3 minutes on each side and remove the chicken from the pan.

~
6. Reduce the heat to medium. Add the onion and carrot to the pan, and cook, stirring occasionally, for 4 minutes.

~
7. Add the mushrooms to the pan. Stir well, and cook for 5 minutes, stirring occasionally.
8. Add the garlic and cook for 1 minute, stirring constantly.

~
9. Add the rice and cook, stirring for 1 minute.

~
10. Put the rice mixture in the prepared baking dish.
11. Add the chicken broth and the whipping cream and stir until well-blended.
12. Place the chicken thighs on top of the rice mixture.

~
13. Sprinkle the cheese over the chicken.

~
14. Bake for 45 minutes.

Share this:

Applesauce with Attitude – Apple Chutney!
By Kath Dedon
.
It looks like applesauce…..but one taste tells you that this is applesauce with Attitude! This is Apple Chutney! It’s sweet with just a touch of sour, and spicy. This condiment is a perfect accompaniment for fall meals. (Bob has already requested it for Thanksgiving dinner!)
Since we still have a lot of Gala apples from our tree, I’ve been on the lookout for new ways to use them. I got the idea from Dan of IslandEAT who used his apple chutney on a pork tenderloin sandwich. It sounded like a fabulous combination!
Looking for an easy recipe that did not involve canning, I found the Apple Chutney recipe that Elise posted on Simply Recipes. I used honey instead of brown sugar, but other than that, I thought her ingredients were perfect.
I probably will make this for Thanksgiving dinner…along with my usual Cranberry Chutney, of course. (Stay tuned for that one!)
~

~
Apple Chutney
(Inspired by Dan of IslandEAT, and adapted from Elise’s recipe on simplyrecipes.com)
.
.
Makes about 2 cups
.
 ~
~
2 large, or 3 medium, apples (about 1 pound)
½ cup chopped onion
¼ cup red wine vinegar
¼ cup honey
1 Tbsp. grated orange peel
1 Tbsp. grated ginger
½ teaspoon allspice


1. Peel, core, and chop the apples.
 ~
~
2. Put all of the ingredients in a pan and stir.
 ~
~
3. Bring to a boil. Reduce heat, cover, and simmer for 45 minutes.
4. Remove the cover and continue to cook for a few minutes so the extra liquid can evaporate a bit.
5. Cool, and store in the refrigerator.

Share this:

A Wedding in Chicago!
♫ On State Street, that great street
I just wanna say
They do things there
They don’t do on Broadway, sayThey have the time, the time or their life ♫
I saw a man, he danced with his wife
In Chicago, Chicago, my home home town ♫– Written by Fred Fisher, 1922
78 degrees on October 9!

It’s not my hometown, but I was in Chicago last weekend….and I saw a groom who danced with his bride! I was there for M & M’s wedding. I was only there for two nights, but it was a fabulous weekend. The wedding was so much fun, and I can’t imagine Chicago being any more charming than it was last weekend. With sunny skies and temperatures in the 70s, it was beautiful.
 ~
~
Hotel Allegro, in the heart of downtown Chicago, was the venue for the Friday night wedding. It seemed to me that the hotel did an amazing job, and the bride confirmed that everything had been perfect – just the way she and Mr. T wanted it!
 ~
~
The Lion King was playing next door to Hotel Allegro at the Palace Theatre
 ~
~
The last time I visited downtown Chicago, I was 18 and I flew there with my Mom from Minneapolis to go shopping for clothes for college. I remember that it was a fun mother/daughter trip, but we were really focused on shopping and didn’t really do any other touristy things. This time I loved walking around the city.
One of the many clocks seen around town ~
~
The Chicago Theatre on State Street
 ~
~
 ~
~
On Thursday night, eight of us decided we wanted a real Chicago pizza. The groom, who is from Chicago, recommended Giordano’s. We went there and six of us ordered their “world famous” stuffed pizza with sausage, mushrooms, green peppers, onions. The other two chose the “world famous” veggie thin crust pizza.
I really wanted to try the deep-dish (stuffed) pizza, even though I am a thin crust fan. I have to say that, although I can appreciate that Giordano’s does a fine job with their stuffed pizzas, I remain in the thin crust camp. If you like that style of pizza, you’ll probably love it. I am glad I had the opportunity to experience a Chicago-style pizza. (Sorry, I failed to get a picture of the pizza.)
After dinner we walked to Millennium Park. The Cloud Gate and the Crown Fountain were beautiful at night. (Unfortunately, I only had my cell phone camera, so most of my photos didn’t turn out well.)
The Crown Fountain at night ~
~
The other Chicago taste-treat that I wanted to try was a good Chicago hot dog. The night before Byron had noticed Portillo’s at 100 W. Ontario Street (the corner of W. Ontario and N. Clark Street). The line of people waiting to get hot dogs was going out the door. We took that as a good sign; he, Margaret and I walked there for lunch on Friday, the wedding day.
Portillo’s ~
~
Orders are placed at the counter, but before you get there friendly employees come down the line to write your order on a paper bag. I told the woman that it was my first Chicago hot dog and I wanted the full experience; she grinned and asked if I wanted “everything”. Not knowing what “everything” would be, I said yes because I wanted a real Chicago hot dog.
I turned my paper bag in at the counter and walked to the pick-up counter. Within a minute, I had my bag with my Chicago hot dog ready to go.
 ~
~
So how was it? Well, I must say that it was one of the best hot dogs I’ve ever had! The combination of flavors was so good with no one ingredient over-powering the others. I learned that a hot dog with “everything” means a skin-on all-beef hot dog with mustard, relish, chopped onions, sliced tomatoes, a dill pickle spear and sport peppers on a warm poppy seed bun. (Sport peppers were new to me. They are small medium-hot pickled peppers.)
My third Chicago food discovery was Garrett’s CaramelCrisp® popcorn. I had never heard of it, but it has been a favorite in Chicago since 1949. M & M treated us to this taste treat in the hospitality room at the hotel.
 ~
~
While walking around town, I came across one of the Garrett Popcorn Shops.
 ~
~
 ~
~
Garrett’s caramel corn is fabulous and addictive; I highly recommend it if you are in Chicago. (Or you can order it from their website.)
On Saturday, my last day in Chicago, I returned to Millennium Park to see it in the daylight. It is an amazing gathering place for the people of Chicago as well as for visitors. On such a gloriously beautiful day, it was a great place to spend the afternoon.
The Cloud Gate (aka “the bean”) beautifully reflects the city and the sky. I loved walking around it and under it and viewing the changing reflections.
 ~
~
Chicago, reflected in the Cloud Gate (That’s me in the green shirt.)
 ~
~
The Crown Fountain is a fascinating fountain that consists of two 50-foot towers separated by a shallow reflecting pool. The towers each feature an ever-changing display of the faces of about 1,000 Chicago residents. Each video image is displayed for about 5 minutes. The eyes blink, and eventually the lips pucker and a stream of water flows from the lips. It is mesmerizing. On this particular warm Saturday, there were a lot of people enjoying wading in the water.
 ~
~
 ~
~
The Jay Pritzker Pavilion, designed by Frank Gehry, is a gorgeous outdoor venue for concerts. It has 4,000 fixed seats and an immense grass field that provides seating for an additional 7,000 people. Above it all is a crisscrossing system of steel pipes which support the sound system; apparently, it’s able to deliver the sound of a concert theater. I’d love to hear a concert there some day.
Jay Pritzker Pavilion ~
~
The Great Lawn of the Jay Pritzker Pavilion
 ~
~
My last stop at Millennium Park was The Art Institute of Chicago. I had long wanted to visit this world-class art museum, and it did not disappoint. It’s always amazing to see paintings that I love “in person”. Photos, even in the most beautiful art books, can never fully capture the colors and the light. I spent almost 4 hours there; although I was able to see a lot, it was not enough time to see everything.
The Art Institute of Chicago ~
~
Edward Hopper, Nighthawks, 1942

Van Gogh, The Bedroom, 1889
 ~
~
Roger Brown, The Leaning Tower of Touhy, 1980

While in The Art Institute, I heard a variety of languages spoken by other visitors. I’m sure it’s not unusual for Chicago to attract tourists from around the world, but there may have been a few more last weekend.
Sunday, 10-10-10 was the date for the Chicago Marathon. 45,000 people from around the world competed, including the best man from M & M’s wedding! On Saturday I rode the elevator at the Allegro with a couple who were dressed for a morning run. I asked them if they were running in the marathon on Sunday. They replied that, indeed, they were, and asked me if I were running!….. I think Bob laughed a little too hard when I told him about the encounter.
I’m so glad I went to M & M’s wedding! I love going to weddings, but especially when the couple seems so happy and so perfect for each other. I felt privileged to be able to share their joyous day. Bob and I wish them a lifetime of love and happiness!
M & M, October 8, 2010
Share this:

Coconut Red Lentil Soup
By Kath Dedon
.
I usually don’t think of lentil soups as being “beautiful”, but Coconut Red Lentil Soup is a very pretty bowl of soup, especially when garnished with bright green onions and cilantro. And the taste is amazingly good!
Carrie made the soup last week and recommended it to me, declaring that it is “DELICIOUS!!” She had found it on one of my favorite blogs, Heidi Swanson’s 101cookbooks.com. (Heidi gave credit to the Esalen Cookbook for the recipe.)
Heidi’s recipe uses 1/3 cup of golden raisins, which she adds to the sauté of green onions and ginger in the butter. Since Bob really doesn’t care for raisins in savory dishes, I left them out. It was fabulous without them, but add them if it sounds good to you.
I made one minor change that simplified the recipe a bit. Heidi toasted the curry powder in a dry pan before adding it to the tomato paste mixture. I decided to cook the curry powder in the butter with the green onions and ginger. Since most recipes with curry powder that I have made call for cooking the curry powder in oil or butter (or ghee), this seemed like a reasonable change to me. It worked fine. (Bob appreciated having one less pan to wash.)
Heidi suggested serving it with cooked rice or farro. That would be quite good, I’m sure, but last night I served it on its own. We both loved it!
 ~
~
Coconut Red Lentil Soup
(Adapted from a recipe on 101cookbooks.com)
.
.
Serves 4 (It would probably serve 6 if served with a scoop of cooked rice or farro.)
~
For the soup:
1 cup (7 oz) yellow split peas
1 cup (7 oz) red lentils
7 cups water
1 medium carrot
About 2 tablespoons peeled and minced ginger
2 tablespoons butter (or oil for a vegan version)
4 green onions, sliced
Optional: 1/3 cup golden raisins
2 tablespoons curry powder
1/3 cup tomato paste
1 (14 oz) can coconut milk
2 teaspoons salt
~
For serving:
4 additional green onions, sliced
Small handful of cilantro, chopped
Optional: cooked rice or farro
~
Red lentils and yellow split peas 
~
1. Rinse the yellow split peas and red lentils well in a strainer.
2. Put the split peas, lentils and water in a large pot and bring to a boil.
3. While the soup is coming to a boil, peel and cut the carrot into about ½-inch dice. You should have a little over ½ cup of diced carrots.

~
4. When the soup is boiling, reduce the heat so it is just simmering and add the carrots and about ¼ of the minced ginger. Cover and simmer for 30 minutes. While it’s simmering, prepare the tomato paste mixture.
5. In a small skillet, melt the butter over medium heat. Add the green onions, the rest of the ginger. (And the raisins, if you are using them.) Cook stirring for about 1 minute.

~
6. Add the curry powder to the skillet and cook, stirring, for another minute or so, until it’s fragrant.

~
7. Add the tomato paste and stir so it is well blended. Cook for about another minute.

~
8. When the split peas are soft (after the 30 minutes of simmering), add the tomato paste mixture to the soup.

~
9. Stir in the coconut milk and the salt. Simmer, uncovered, for at least 20 minutes. It will get thicker if you simmer it a bit longer. I let mine simmer for about 35 minutes.

~
10. Serve in a bowl garnished with green onion slices and chopped cilantro. (Serve over a mound of rice or farro, if desired.)
Share this:

Meatballs and Spaghetti
By Kath Dedon
.
When I read a recipe for Meatballs and Spaghetti on Smitten Kitchen, I knew I would have to try it. She said she had never found a meatball recipe that she really liked until she made this one, which is an adaptation of an Ina Garten recipe. Like Deb, I had tried other meatball recipes that were OK, but never quite what I wanted. I am happy to announce that this one is a keeper!
The Smitten Kitchen recipe serves 6 and uses 2 pounds of meat: a mixture of ground beef, ground pork, and ground veal. I wanted to scale the recipe down to serve 4 and decided that 1 pound of meat would be sufficient. I used ½ pound ground beef and ½ pound ground pork. The ground veal may have added another dimension, but I didn’t want to buy a pound of veal just for the ¼ pound I would need for the recipe.
I took a look at Ina Garten’s recipe and noticed that there were many comments about how it was way too salty. Perhaps Ina had intended the recipe to be made with unsalted tomatoes? I added salt to my sauce because the tomatoes I used were unsalted. If you use salted tomatoes, I suggest omitting the salt until you have tasted the sauce; then season to taste.
My Meatballs and Spaghetti was terrific for dinner last night and perhaps even better leftover for today’s lunch!
Mmmm…..my lunch today:

~
Note about canned tomatoes:
Frank Fariello (Memorie di Angelina) wrote an interesting post about the best canned tomatoes to use for Italian tomato sauces. Apparently, American manufacturers add calcium chloride to canned tomatoes so they will stay firm, which is not what you want when making a tomato sauce. You want tomatoes that will “melt” into the sauce. He suggests using crushed tomatoes if you can’t find Italian tomatoes without calcium chloride.
I did find a 28-oz can of Carmelina® tomatoes at my grocery store; they contain just peeled tomatoes and tomato puree. There is no salt added. I was impressed by the way they actually did melt into the sauce! (I crushed them a bit with the back of a spoon to help them out a bit.)

Meatballs and Spaghetti
(Adapted from a smittenkitchen.com recipe)
.
.
Serves 4
~
For the meatballs:
½ pound ground beef
½ pound ground pork
¾ cup fresh white bread crumbs
1 tablespoon chopped fresh flat-leaf (Italian) parsley
¼ cup freshly grated Parmesan cheese
¾ teaspoon kosher salt
¼ teaspoon freshly ground pepper
1 large egg, beaten
½ cup warm water
Oil for frying (I used extra-light olive oil)
~
For the sauce:
1 cup chopped onion
1½ teaspoons minced garlic
Pinch of red pepper flakes
½ cup red wine
1 (28 – 32 ounce) can diced tomatoes in puree without calcium chloride, or crushed tomatoes
1 tablespoon chopped fresh flat-leaf (Italian) parsley
1 teaspoon kosher salt (omit if your tomatoes are salted)
½ teaspoon freshly ground black pepper
~
For serving:
12 ounces spaghetti, cooked according to package directions
Freshly grated Parmesan
~
I used part of a French baguette, with crust cut off, to quickly make bread crumbs in my small food processor:
~
Parmesan cheese
 ~
~
1. Put the ground meats, bread crumbs, parsley, Parmesan, salt, pepper, egg, and water in a bowl. Mix together (using your hands works best), and then use your hands to lightly form 8 meatballs without compressing them.
 ~
~
2. Heat about 1/8 inch of oil in a large skillet over medium heat.
3. When the oil’s hot, add the meatballs to brown on all sides. Turn them gently with a spatula. It will take 10 – 15 minutes to brown them.

~
4. Put the meatballs on a paper towel on a plate.
(Clearly, some of my meatballs browned better than others, but all were good!)
 ~
~
5. Pour off almost all of the oil in the pan, leaving the browned bits and about 1 tablespoon of oil.
6. Add the onion and cook, stirring occasionally for about 10 minutes, until softened.
7. Add the garlic and red pepper flakes and cook, stirring, for 1 minute.
8. Add the wine and turn the heat to medium high to bring to a boil. Scrape up the bits on the bottom of the pan and cook until almost all of the wine is evaporated, 2 – 3 minutes.
9. Turn the heat back down and add the tomatoes, parsley, salt (if you’re using unsalted tomatoes), and pepper. (If you’re using salted tomatoes, taste to see if the sauce needs any more salt; season to taste.)
10. Carefully put the meatballs in the sauce and spoon a bit of sauce over them.

~
11. Cover and turn the heat down to low so the sauce is barely simmering and not boiling. Cook for about 15 minutes.
12. Turn the meatballs over and cook for an additional 15 minutes, or until the meatballs are done. (I used a meat thermometer to make sure the temperature was 160˚. If in doubt, you can cut open a meatball to see if it’s done.)
13. While the meatballs and sauce are simmering, heat a large pot of water for the spaghetti.
14. Cook the spaghetti according to the package directions. Drain and put it back in the pot.
15. Use a small amount (about ¼ cup) of the tomato sauce to toss with the pasta.
16. Serve the pasta, and top with a bit of sauce and a couple of meatballs. Pass the Parmesan at the table.

Share this:

Italian Apple Cake (Torta di Mele)
By Kath Dedon
Torta di Mele is my latest favorite way to use our Gala apples! It’s an Italian apple cake that is very easy to make and it’s an impressive dessert for fall entertaining. It is so simple, and yet there’s a certain elegance to it. Must be because it’s Italian!
I found the recipe on Chef Dennis Littley’s blog, More Than A Mount Full. Chef Dennis serves his recipes with delightful stories that I enjoy reading. I’ve bookmarked many of his recipes; this is the first one I have tried and it’s a “keeper”!
Chef Dennis uses granulated sugar for the cake. I replaced it with maple sugar which worked really well. (Long story made short: most sweeteners make Bob’s knees ache. He’s fine with honey and maple. Go figure.) Just use regular sugar if you want. It will be fantastic either way.
I used my food processor to make the apple slices extra thin, but you can certainly cut them by hand.
This Torta di Mele is going in my “A+ Favorite Recipes” category; I know it won’t be long until I make it again.
.

~
Torta di Mele (Italian Apple Cake)
(Adapted from Chef Dennis Littley’s recipe on morethanamountfull.blogspot.com)
.
.
Gala apples from our tree
.
Serves 8 – 10
~
½ cup (1 stick) unsalted butter, plus more for the pan
3 medium apples
2/3 cup (80 g) flour
½ teaspoon baking powder
½ teaspoon salt
2 whole eggs plus 1 egg yolk
1 teaspoon vanilla extract
1 cup granulated sugar (or maple sugar)
½ teaspoon lemon zest
Powdered sugar for dusting
~
1. Preheat the oven to 375˚ and butter a 9” round cake pan.
2. Peel, core, and slice the apples into thin slices, by hand or with a food processor.
.

~

~
3. Melt 6 tablespoons (3/4 of the stick) of butter in a large skillet. Pour into a glass measuring cup and set aside. (Or just melt 6 tablespoons of butter in the microwave and set aside.)
4. Melt the remaining 2 tablespoons of butter in the skillet.
5. Add the apple slices to the skillet and cook, stirring occasionally, until soft. This takes about 10 minutes.
.

~
6. Combine the flour, baking powder, and salt in a small bowl.
7. Beat the eggs and egg yolk well in a large bowl.
8. Add the sugar, vanilla, lemon zest, and 6 tablespoons melted butter and mix well.
9. Stir in the flour mixture.
10. If your apples seem a little watery (as mine did), put them in a strainer and then stir them into the cake batter.
11. Spoon the cake batter into the buttered cake pan and smooth the top.

12. Bake for 30 – 35 minutes, until it is browned.
13. Put the pan on a wire rack for 5 minutes.

14. After 5 minutes, put a second wire rake on top of the cake and invert it so the cake is on the wire rack. Leave the cake on the wire rack until it is completely cooled.

15. Just before serving, dust the cake with powdered sugar. (You could make it extra fancy if you put a stencil on top and then dusted it with the powdered sugar!)
~

Share this:

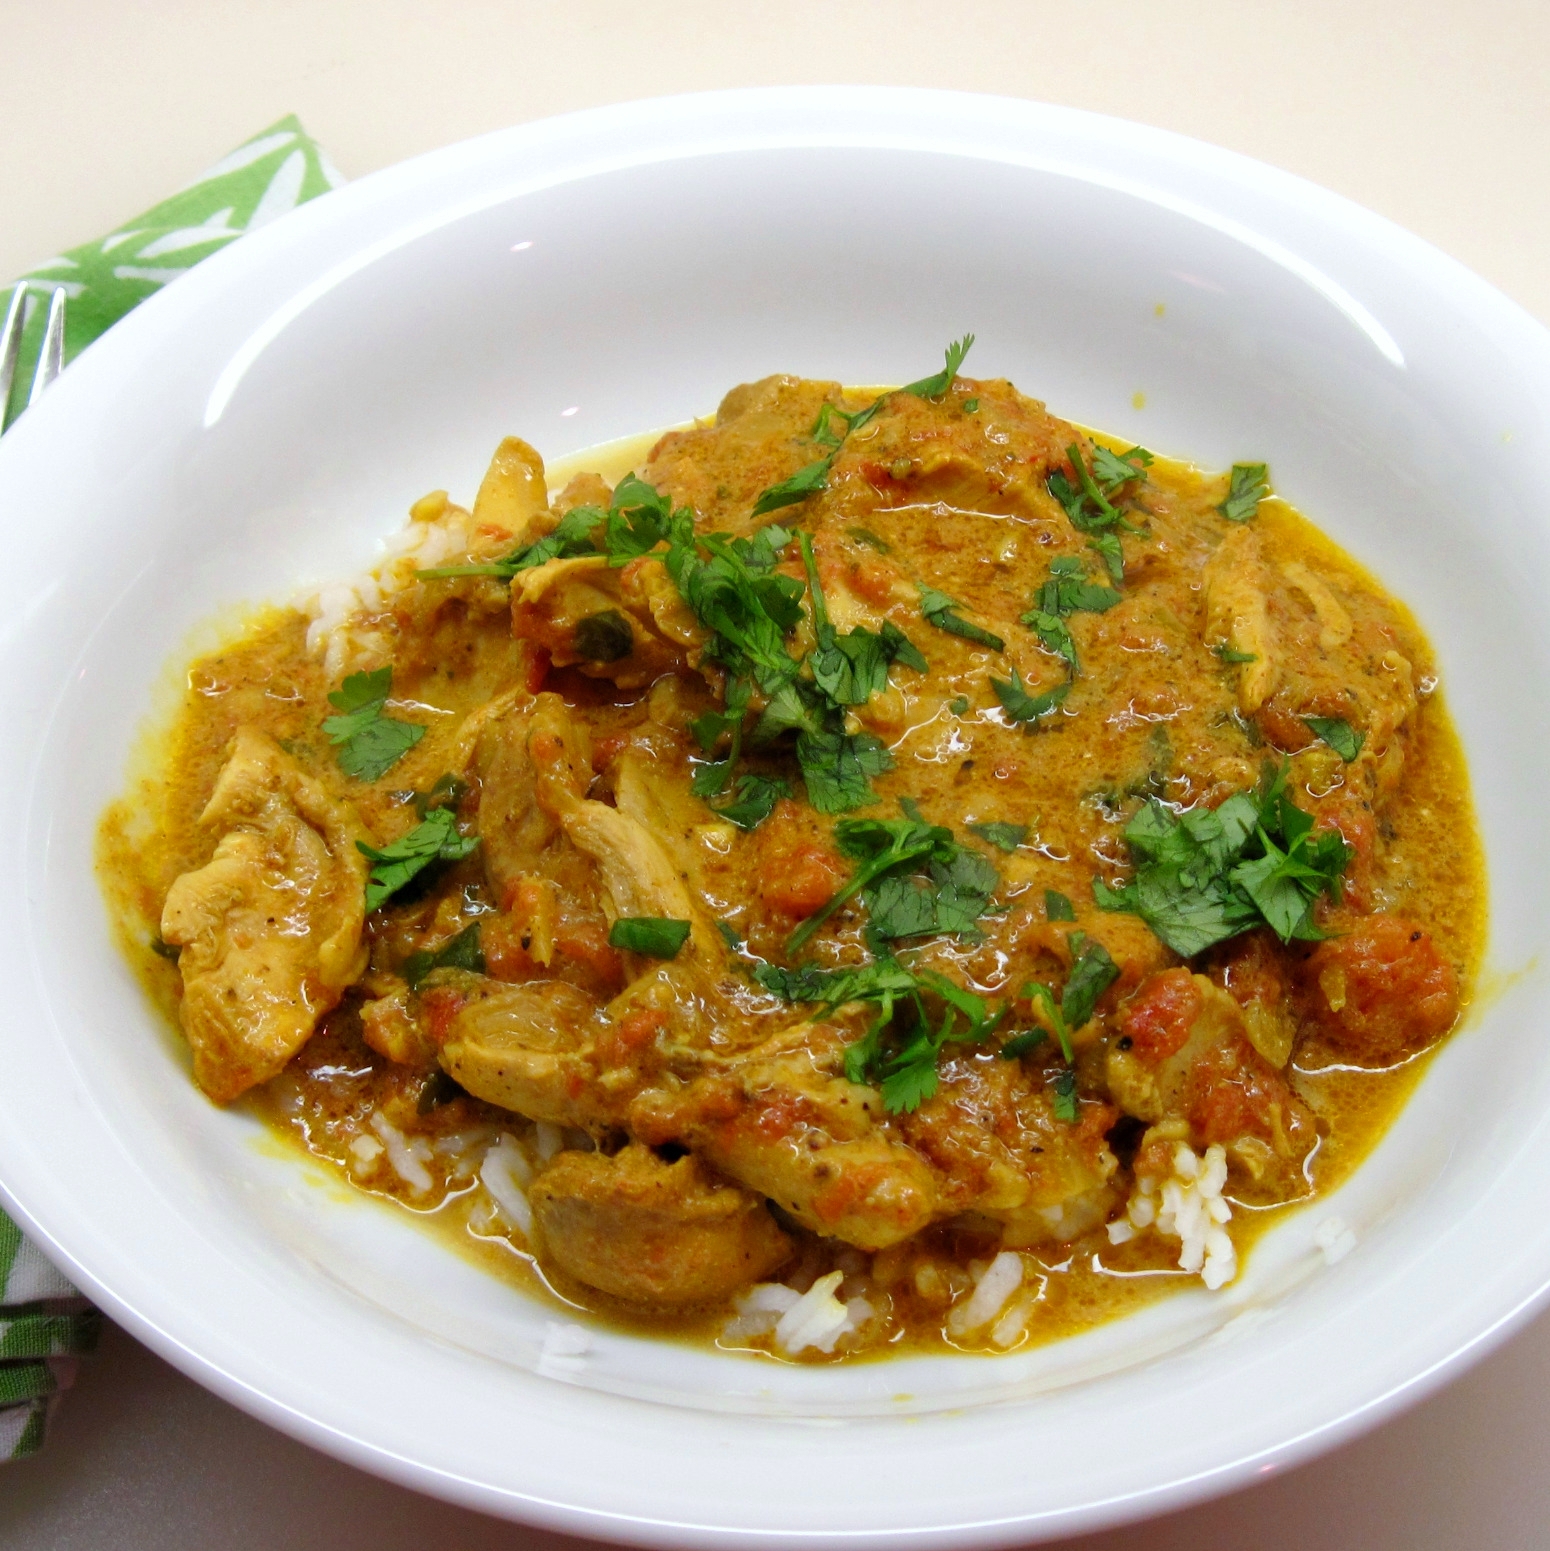
Vij’s Family’s Chicken Curry
By Kath Dedon
.
Vij Family’s Chicken Curry is the recipe that Vikram Vij’s mom made for his new Vancouver café in 1994. Today, Vij’s restaurant occupies a larger space and it has been hailed as the finest Indian restaurant in North America. I know it’s one of my favorite restaurants of all time and I can’t imagine visiting Vancouver without a dinner at Vij’s!
If you can’t make it to the restaurant, you can still sample the fabulous recipes in Vij’s: Elegant & Inspired Indian Cuisine, the 2006 book written by Vikram Vij and his wife, Meeru Dhalwala. My adaptation of Vij’s Family’s Chicken Curry is from this beautiful cookbook.
I’m still learning about Indian cooking and I’m a little intimidated by some of the ingredients. This recipe is great for people new to this delicious cuisine; most of the ingredients are available at a well-stocked supermarket.
I used a store-bought garam masala. Vij’s has a recipe for his favorite garam masala, but I haven’t tried it. You roast the spices first and then grind them. The recipe says the aroma of the roasting spices will be “quite strong” so you should be sure to have adequate ventilation (which we don’t have) and close all of the bedroom and bathroom doors. Although I’m sure the freshly roasted spices would take the recipe to a whole new level, it is still very good indeed made with the store-bought garam masala.
Vij’s Family’s Chicken Curry would work perfectly for a make-ahead dish for entertaining. Just refrigerate it and gently reheat it when it’s time for dinner. Serve it over steamed rice and/or with some naan so you can enjoy all of the sauce.

~
Vij’s Family’s Chicken Curry
(Adapted from Vij’s: Elegant & Inspired Indian Cuisine)
,
.
Serves 6
~
½ cup canola oil (I actually used light olive oil)
2 cups finely chopped onions
One 3-inch stick of cinnamon
3 tablespoons finely chopped garlic
2 tablespoons finely chopped ginger
2 cups chopped tomatoes (2 large) or 1 (28-ounce) can chopped tomatoes, drained
1 tablespoon salt*
*(If you are using salted canned tomatoes, decrease the salt to 1½ teaspoons.)
½ teaspoon ground black pepper
1 teaspoon turmeric
1 tablespoon ground cumin
1 tablespoon ground coriander
1 tablespoon garam masala
½ teaspoon ground cayenne pepper
3 pounds chicken thighs, bone in
1 cup sour cream, stirred
2 cups water
½ cup chopped cilantro (including stems)
~
1. Put the onions and cinnamon stick in one bowl. Have the garlic and ginger chopped and ready to go. Measure the salt, pepper, turmeric, cumin, coriander, garam masala and cayenne into a separate bowl.
.
Clockwise: onions and cinnamon, ginger, garlic, spices
~
2. Drain the tomatoes, if you’re using canned.
3. Heat the oil in a large skillet for 1 minute.
4. Add the onions and cinnamon to the oil and cook, stirring occasionally, until the onions are starting to turn golden, about 10 minutes.

.
5. Add the garlic and cook for 4 minutes.
6. Add the ginger, tomatoes, and the spices to the skillet.

~
7. Cook for about 5 minutes, until the oil separates from the masala.
.
You can see the oil separated from the masala here:

.
8. While the masala is cooking, remove the skin from the chicken thighs. Grab an end of it with a paper towel and pull it off. (The paper towel gives you a better grip.)
9. Add the chicken thighs to the masala and stir well. Cook for about 10 minutes, turning them over after about 5 minutes.

~
10. Stir in the sour cream and the water and increase heat to bring it to a boil.
.
Stirring in the sour cream
~
Water added

.
11. Once it is boiling, reduce the heat to a simmer, cover and cook for 15 minutes, stirring 2 or 3 times.
12. Check the chicken with a meat thermometer, or cut into a thigh to see if it’s done. If it’s not done, cook for about another 5 minutes. (Mine was done after the 15 minutes simmer.)
13. Remove the cinnamon stick, and let the curry cool for at least 30 minutes.
14. Remove the chicken from the masala. Using latex gloves, tear the meat from the bones and put the meat back in the sauce. (At this point the curry could be refrigerated to serve later or the next day.)
.
 ~
~
15. When ready to serve, gently heat the curry until it is hot. Stir in the cilantro.

Share this:

Thai Coconut Chicken Soup (Tom Kha Gai)
This Thai Coconut Chicken Soup would not be considered an authentic recipe for Tom Kha Gai, but I think it succeeds in delivering the flavors of the Thai soup using ingredients that are readily available for most people.
The inspiration for this recipe came from one that I found on epicurious.com; it is credited to Sue Ellison and originally appeared in Bon Appétit.
I decided not to use curry powder and I added ginger, garlic, mushrooms, and fish sauce (nam pla). I was aiming for a soup that would be similar to one we used to get at Thai Thai, our favorite Thai restaurant which, sadly, closed last year.
I used chicken breasts, but I think you could use boneless skinless chicken thighs for this recipe if you prefer.
Bob and I agreed that this turned out pretty darn good. It’s definitely something I would make again, but I may play around with it some more.
~

~
Thai Coconut Chicken Soup
(Inspired by a Bon Appétit recipe found on epicurious.com)
.
.
4 Main dish servings
.
Note: If you can get galangal root, use it instead of the ginger for a more authentic Tom Kha Gai. (“Tom Kha” means galangal, and “Gai” means chicken.) Use a piece that is about 1½ inches long and slice it into thin discs. This was quite tasty, though, made with the ginger.
~
2 (14.5 ounce) cans chicken broth
1 (13.5 ounce) can coconut milk
1 jalapeno pepper, seeded and minced
1 tablespoon minced ginger
1 large or 2 small cloves garlic, minced
1½ pounds boneless skinless chicken breasts (or thighs)
1½ cups sliced mushrooms
3 tablespoons fresh lime juice (from 1 large or 2 small limes)
4 tablespoons fish sauce (less if your fish sauce is particularly pungent)
Salt, if necessary (will depend on the saltiness of the fish sauce and the broth)
~
Garnishes:
2 – 3 chopped green onions
¼ cup chopped fresh cilantro
1 – 2 jalapeno peppers, sliced
~
One jalapeno pepper sliced for garnish. (This was the right amount for Bob.)
1. Bring the chicken broth, coconut milk, minced jalapeno pepper, ginger, and garlic to a boil. Simmer for about 10 minutes.

~
2. Cut the chicken into small pieces.

~
3. Add the chicken and mushrooms to the simmering broth. Bring back to a boil, and then reduce the heat so it’s at a low simmer. Simmer for about 10 minutes, until the chicken is done.
4. Add the lime juice and fish sauce. Simmer for about a minute more. Taste for seasoning; add a bit of salt, if necessary. (I added about ½ teaspoon.)
5. Garnish with green onions and cilantro.
6. Serve sliced jalapeno peppers separately for those who want to add them to their soup.
Share this:

Southwestern Pulled Brisket
By Kath Dedon
.
This recipe for Southwestern Pulled Brisket may be the best thing that’s ever come out of my slow cooker! I used Thundering Hooves grass fed beef and adapted a recipe I found on Smitten Kitchen. It was mouth-wateringly juicy with just the right amount of spice. This is perfect for Fall entertaining!
Deb’s recipe called for a 3-pound brisket, but mine was only 1 pound. I didn’t really alter the amount of the other ingredients, although I did use a bit less water. (Deb called for 1½ cups and I used 1 cup.) So I’d say you can use a brisket that is anywhere from 1 to 3 pounds without altering the recipe in any other way.
This reheats beautifully; if you’re entertaining, you can definitely make it the day before and reheat it for your party.
Since I already had some leftover hamburger buns, I used the Southwestern Pulled Brisket for sandwiches. The sauce is so tasty; a few thin slices of onion are all that is needed to complete the sandwiches.
The brisket would also make an excellent taco filling, which is how Deb used it. As a taco filling, it would stretch even further if you’re feeding a crowd. Just heat up some corn tortillas, put out a few of your favorite taco condiments (maybe some grated cheese, cilantro, and pickled jalapenos?) and let people put together their own tacos.
I can think of lots of ways to serve this fabulous brisket. It would be great served over mashed potatoes or polenta! I know I’ll be making this recipe again before too long!
~

~
Southwestern Pulled Brisket
(Adapted from a recipe on smittenkitchen.com)
.
.
Serves 4 (simply choose a larger brisket for more servings)
~
1 pound beef brisket
Salt
Freshly ground pepper
2 tablespoons olive oil
5 cloves garlic, peeled and smashed
About 1 cup sliced onions
1 tablespoon chili powder
2 teaspoons ground coriander
2 teaspoons ground cumin
¼ cup apple cider vinegar
1 cup water
1 (14½ ounce) can whole peeled tomatoes, with their juice
1-2 canned chipotle chiles in adobo sauce (Use just 1 or 2 chiles from the can—the rest can be kept refrigerated for quite a while. I used 1 chile; for a 3 pound brisket, I might use 2)
1 bay leaf
¼ cup honey
.

~
1. Heat a skillet over medium-high heat.
2. Salt and pepper the brisket.
3. Add the oil to the skillet and when it’s hot, put the brisket in the pan. Cook for about 5 minutes, until it’s nicely browned on the first side. Then turn it over to brown it on the other side for about 5 minutes.
.

~
4. Put the brisket in the slow cooker.
5. Put the garlic, onion slices, chili powder, coriander, and cumin in the skillet and cook, stirring, for about 1 minute.
6. Pour the vinegar in and cook, stirring, until the vinegar is almost gone. (Stand to the side so you don’t breathe in the vinegar fumes.)
7. Pour the water into the pan. Stir and then pour everything from the pan into the slow cooker.
~
You can see I have plenty of room for a larger brisket in my slow cooker:

~
8. Using your hands, break the tomatoes up into the slow cooker and then pour in the juice.
9. Add the chipotle chile(s), bay leaf and honey.
10. Cook on Low for 9 – 10 hours.
11. Remove the brisket from the slow cooker and pour the sauce into a pan. (It is quite “watery” at this point.) Bring the sauce to a boil and cook it until it is reduced quite a bit and is a lot thicker.
.
 ~
~
12. While the sauce is reducing, shred the beef using two forks.

~
13. When the sauce is cooked down, stir the beef into the sauce and cook for a few minutes to reheat the beef, and it’s ready to eat!
~
Optional: If you’re using buns, you may want to butter them and grill them.

Share this:

Melt-in-your-mouth Homemade Cheese Crackers!
By Kath Dedon
a
Cheese crackers! Who doesn’t love them? I had some Tillamook Extra Sharp Cheddar and decided I’d try to make my own. I adapted Smitten Kitchen’s recipe for Cheese Straws (which Deb adapted from The Lee Bros. Southern Cookbook). I decided to cut the dough into little bite-sized squares. (Kind of like the crackers that come in the red box.)
Well, I now have a new favorite homemade cheese snack! These cheese crackers have a terrific cheesy, tangy flavor. They’re not as crisp as commercial crackers; they have a flaky tenderness similar to what you’d get if you baked little squares of pie crust. The amount of red pepper flakes is just right to give them a bit of a tang without adding heat.
This recipe is super-simple if you have a food processor. If you don’t, you could probably use a pastry blender to mix it together.
Deb advises that these will keep in the refrigerator in a sealed container for 2 days. The recipe doesn’t really make very many, so I can’t imagine they would last 2 days.
I had fun staging the photo with the martinis , but we’re not eating the crackers tonight. I’m packing them up in a plastic container; they’ll make a terrific snack for tomorrow’s hike!
.
 ~
~
Cheese Crackers
(Adapted from a recipe on smittenkitchen.com, which was credited to a recipe in The Lee Bros. Southern Cookbook)
.
~
Makes about 70 (1-inch square) crackers
~
1½ cups (6 oz) grated extra-sharp Cheddar cheese
4 tablespoons (56 grams or 1/2 stick) unsalted butter, softened and cut into pieces
¾ cup (90 g) flour, plus more for dusting
½ teaspoon salt
½ teaspoon crushed red pepper flakes
1 tablespoon milk
~
A little over 6 ounces of cheese – close enough!
 ~
~
1. Preheat oven to 350˚.
2. Put everything except the milk in a food processor. Pulse the processor, 5 seconds at a time, for about 5 or 6 times, until the dough is in coarse crumbs.
3. Add the milk and process until the dough gathers together in a ball.

~
4. Roll the dough out on a floured board with a rolling pin that has been floured until it is about 1/8 inch thick. (Deb suggested an 8×10 rectangle.)
I don’t know why I couldn’t roll my dough into a neat 8×10 rectangle. It still worked.
~
5. Cut the dough into 1-inch squares with a sharp knife or pizza cutter. You can put a bit of flour on the blade of the knife to keep it from sticking.Use the flat end of a wooden skewer to poke a hole in the center of each cracker.

6. Place the crackers at least ¼ inch apart on parchment paper on a baking sheet.

~
7. Bake for 12 – 15 minutes until the edges are just starting to brown. (Mine took 13 minutes.)
8. Put the baking sheet on a rack and let the crackers cool completely.
9. Eat! Or store in a covered container to eat within a day or two.

🙂


