Welcome!
You'll find over 470 of my favorite recipes here, including ideas for Quick meals, Cooking for 2, Feasting on Leftovers, and cooking with 5 Ingredients or Less. I'm adding new posts regularly; you can subscribe by email or RSS feed if you'd like to receive the latest recipes. Bon appétit!
Special Sauce for Burgers
The July 3 email newsletter from Bon Appétit caught my eye with its article on How to Build a Better Burger, and its recipe for Special Sauce. Who doesn’t love a good “Special Sauce” on their burgers?
The timing was perfect for Anna’s birthday party we attended today. The menu included grilled hamburgers (beef and veggie burgers) and hot dogs. Guests were asked to bring condiments and/or side dishes. I brought a double batch of the Special Sauce and slices of American cheese.
It has been many, many years since I last purchased American cheese; I actually can’t remember ever buying it. But Bon Appétit insisted that it was the only cheese to use for a proper cheeseburger.
Mikie and Byron did an excellent job manning the grill, so it wasn’t long before everyone was building their burgers or dogs just the way they liked them.
Mary had a bun with melted American cheese, lettuce, tomato, and Special Sauce. She declared that the sauce made it just like her favorite veggie option at In-N-Out Burger!
Laura loved it on her veggie burger, and Byron said it was also fantastic on his hot dog.
And the American cheese? It was perfect! Who knew? It worked especially well with the Special Sauce, a slice of onion, a tomato slice, and iceberg lettuce.
I have always been a big fan of good “special sauces” on burgers. This Special Sauce is truly as good as any I have had. I probably won’t be able to make burgers again without making a batch of this now Not-So-Secret Special Sauce! It’s so easy to make; I highly recommend that you try it on a summer burger soon!
a

a

a
Special Sauce
(Adapted from a Bon Appétit recipe)
a
a
Makes about 1¾ cups (Halve the ingredients for a smaller batch.)
a
1 cup of mayonnaise
¼ cup ketchup
2 tablespoons finely minced onion
2 tablespoons dill pickle relish
4 teaspoons adobo sauce from canned chipotle chiles in adobo*
¼ teaspoon celery salt
¼ teaspoon kosher salt
a
*Leftover chiles can be frozen for future use.
a
Minced onion

a
1. Put all of the ingredients in a bowl.
Adding the adobo sauce

a
Everything in the bowl

a
2. Whisk or stir until it is all well-blended.

a
3. Put in a jar or bowl and refrigerate until ready to use.
Special Sauce in a pint jar

Share this:

Summer Berry Buttermilk Bundt Cake
Summer Berry Buttermilk Bundt Cake is a great dessert to share at a party. I find people usually don’t want a huge piece of cake after indulging in all of the savory offerings at a potluck party, especially if there’s more than one dessert available. A Bundt cake, cut in thin slices can easily serve 18 – 20 people. This cake was especially good on the 4th of July served with our friends’ delicious homemade vanilla ice cream!
I first saw the recipe for Triple Berry Summer Buttermilk Bundt on Smitten Kitchen, where Deb Perelman said she had adapted it from a recipe in Rustic Fruit Desserts, by Cory Schreiber and Julie Richardson. Schreiber and Richardson use 3 cups of sliced rhubarb in their recipe. Deb substituted blackberries, raspberries, and blueberries for the rhubarb (1 cup of each), but she suggested that 4 cups of fruit would be even better.
I used 4 cups of berries and substituted lemon extract for the vanilla extract that Deb used. (The recipe in Rustic Fruit Desserts uses lemon oil, which is a new ingredient to me. Apparently it’s more intense than lemon extract. I’d love to try it!)
I’d say Summer Berry Buttermilk Bundt Cake was well-received, but I have a confession to make. I inadvertently made another major change to the recipe. The recipe calls for 1 cup (8 ounces) of butter. That means two sticks of butter. For some reason, though, I was thinking it was 8 tablespoons of butter, which is only one stick of butter. So I only used 1 stick of butter.
The cake was still very, very good. If you want a reduced fat version, try making it with just one stick of butter. However, I recommend that you splurge and use two sticks of butter. I don’t think I need to test it to know that it would be even better! And, after all, a cake like this is meant to be shared for a special occasion! 🙂
a

a
Summer Berry Buttermilk Bundt Cake
(Adapted from a recipe on Deb Perelman’s Smitten Kitchen blog and one in Rustic Fruit Desserts, by Cory Schreiber and Julie Richardson)
a
a
Several people making comments on Deb’s blog mentioned that they had trouble with the cake sticking to the pan. I love using Baker’s Joy on my nonstick Bundt pan. I have never had any trouble with cakes sticking when I use it. You’ll find it on your store’s shelf near other cooking sprays.
Look! It even has a picture of a Bundt cake on the can!

Cake
2½ cups (300g) plus 2 tablespoons (30g) flour
2 teaspoons baking powder
1 teaspoon salt
1 cup (8 ounces, or 2 sticks) unsalted butter, at room temperature (I used just 1 stick with satisfactory results.)
1¾ cups sugar
Zest of 1 lemon
3 large eggs
½ teaspoon lemon extract
¾ cup buttermilk
4 cups berries (I used 2 cups blueberries, 1 cup raspberries, and 1 cup of cut up strawberries.)
 a
a
Glaze
2 cups (240g) powdered sugar
Juice of 1 lemon (Have an extra lemon handy in case you need a bit more juice.)
1 tablespoon unsalted butter, very soft
300g flour in the large bowl, plus 3og more a

a
1. Preheat the oven to 350˚.
2. Generously spray a Bundt pan with Baker’s Joy. (Or generously grease.)
a
My pan sprayed with Baker’s Joy. 
a
3. Whisk the 2 ½ cups flour, baking powder, and salt together in a medium bowl.
4. Beat the butter, sugar, and lemon zest together on medium speed for 3 – 5 minutes, or until light and fluffy.
5. Add the eggs, one at a time, beating on low speed to combine after adding each one.
6. Mix in the lemon extract.
7. Add 1/3 of the flour mixture and beat until just blended. Mix in half of the buttermilk. Blend in the next third of the flour, and then the rest of the buttermilk. Blend in the last third of flour. Don’t over-mix.
8. Add the berries and the remaining 2 tablespoons of flour to the bowl that the flour mixture was in. Toss gently until the berries are well-covered with flour.
a

a
9. Gently stir the berries into the cake batter.
10. Spoon the batter into the prepared pan.

a
11. Spread the top with a spatula so it’s more even.

a
12. Bake for 30 minutes. Rotate the pan 180˚ and bake an additional 27 – 30 minutes, or until a cake tester comes out clean.

a
13. Cool the cake on a rack for 30 minutes.

a
14. Turn the cake out on a rack to finish cooling.

a
15. When the cake is totally cool, whisk together the powdered sugar, lemon juice, and butter for the glaze. (If your lemon isn’t very juicy, you may need to add just a little bit more to get the consistency that you want.)
I like to put the powdered sugar through a fine mesh strainer to get the lumps out.

a
16. Drizzle the glaze over the top of the cake and let it run down the sides.

a
17. Keep cake at room temperature in a covered cake keeper until ready to serve.
a

a

Share this:

Blueberry Cobbler
Laura and Byron brought the best Blueberry Cobbler to our house for Father’s Day brunch. They actually baked it in our oven so we could enjoy it warm. Well, Bob kept talking about how much he liked it. Of course, I had to make another one!
The recipe is so simple! It’s from Mark Bittman’s How to Cook Everything The Basics: All You Need to Make Great Food – With 1,000 Photos. (I do really like this book!)
One change that Laura made was to add lemon zest to the blueberries and a bit to the cobbler batter. I’ve always added lemon zest to blueberry pie, so it makes sense to add it here, too. I also added zest to the blueberries, but not the batter.
I used my food processor to make the batter, but Laura said she had no trouble just blending it with her pastry blender. This really is a simple recipe!
The Blueberry Cobbler is great served warm with a bit of ice cream. Bob liked it with a bit of cream poured over it.
a
Photo by Laura

a
Blueberry Cobbler
(Adapted from Mark Bittman’s recipe in How to Cook Everything The Basics)
a(
Edited August 14, 2013: I made this again yesterday and added tapioca flour to the blueberry mixture to thicken it a bit. I was pleased with the results. It’s optional; you can leave it out if you wish.
a
a
Serves 6 – 8
a
2 of the 4+ half pints of blueberries I used

a
8 tablespoons (1 stick) cold butter, plus more for greasing the pan
About 6 cups blueberries, rinsed and well drained (4 – 5 half pints)
1 cup sugar, divided (We used maple sugar.)
(Optional) 1/3 cup tapioca flour (or all-purpose flour)
Zest of 1 small lemon
½ cup flour
½ teaspoon baking powder
Pinch of salt
1 egg
½ teaspoon vanilla
a
1. Heat the oven to 375˚.
2. Grease a square pan with butter.
3. Toss the blueberries, ½ cup of the sugar, tapioca flour, and lemon zest together and put them in the buttered pan.
a
This photo shows the blueberries without the tapioca flour.

a
4. Process the flour, the other ½ cup sugar, baking powder, and the pinch of salt together in a food processor. (Or just stir them together, if you don’t have a food processor.)
5. Cut the stick of butter into small pieces and add them to the food processor. Process for just about 10 seconds until it is just mixed. Over-processing can make it tough. It’s OK if there are still bits of butter. (Without a food processor, blend with a pastry blender or even a fork.)

6. If using a food processor, remove the batter to a bowl. Add the egg and vanilla in with a fork.
7. Drop spoonfuls of batter on the blueberries.
Photo taken by Laura 🙂

a
8. Bake for 35 – 45 minutes, or until it is lightly browned and the berries are bubbling.
a
Another photo by Laura!

Aa
This cobbler, made without the tapioca flour, had a lot of blueberry juice. Delicious, but I think I prefer the one I made later that was thickened with the tapioca flour.

Share this:

Lentil Soup with Chorizo
This Lentil Soup with Chorizo couldn’t be easier! I checked out Mark Bittman’s recipe for Lentil Soup in his How to Cook Everything the Basics and noticed his variation for Meaty Lentil Soup. He suggests adding ½ pound of raw sausage chunks, ground meat, or chopped bacon. I remembered that I had ½ pound of bulk chorizo sausage and decided to use that.
We loved the spiciness that the chorizo added! It was just so flavorful! Plain ground meat would not have been nearly as good.
Lentil Soup with Chorizo is a simple soup that is quick to make. I know I’ll be making this one again!
a
For this quick and simple soup, I snapped quick and simple photos with my iPhone.

a
Lentil Soup with Chorizo
(Adapted from a recipe in Mark Bittman’s How to Cook Everything the Basics)
a
a
Serves 4
a
1 tablespoon oil
½ pound bulk chorizo sausage
1 cup chopped onion
1 medium carrot, chopped
1 medium celery stalk, chopped
1 cup dried lentils, rinsed and picked over
3 bay leaves
6 cups water
Salt and freshly ground black pepper, to taste (I did not add salt because I found the chorizo added enough salt.)
a
1. Put the oil in a large pot. When it’s hot, add the chorizo and cook, stirring occasionally, until it is cooked.
2. Add the onion and cook, stirring occasionally for a couple of minutes.
Chorizo and onion

a
3. Add the carrot and celery and cook for 2 or 3 minutes more.

a
4. Add the lentils, bay leaves, and the 6 cups of water. Bring to a boil; cover and reduce heat so it is simmering. Cook for 25 – 35 minutes, until the lentils are cooked.

a
Water added

a
5. Remove bay leaves, taste to see if it needs salt and/or pepper, and serve.
Vegetarian variation: Omit the chorizo. Increase the oil to 2 tablespoons and start with Step 2. Use water, or you could use vegetable or mushroom broth for more flavor.
Share this:

Sushi Roll Salad
I love sushi, so I was naturally drawn to a Gourmet recipe on epicurious for “California Roll” Salad. I made a few changes and came up with this Sushi Roll Salad to take to a potluck party.
The original recipe uses long grain rice. I used a Japanese brand of medium grain (sushi) rice because I thought it would be more authentic. It was very good, and it is the rice used in sushi, but I think I would use long grain rice next time. The texture of long grain rice might be a bit better in a salad. Many of the reviewers raved about their results with Jasmine rice, so that may be the way to go.
“California Rolls” typically are made with cucumber, avocado, and surimi. Surimi is also known as “imitation crab”, “mock crab”, or sometimes “Krab”. It’s made from white fish, often pollock, and quite a list of additives to make an inexpensive substitute for crab. The Gourmet recipe included the option of adding surimi to the salad, but pointed out that the recipe can be successfully made without the surimi for a vegetarian version.
I thought about making a vegetarian version since I don’t like using surimi, but I liked the idea of using some kind of seafood. I chose fresh Oregon shrimp meat and I think it worked really well!
I used 50% more wasabi and ginger juice in the dressing, and I’m glad I did. As one who likes the spicy Maki rolls, I thought it was mild but the flavors were still distinct. A couple of people told me that they liked the fact that it wasn’t “too spicy”. If I make it again for a party, I will probably make it with the same dressing, but have some extra wasabi and ginger on the side for people to add to their servings if they like it spicier.
Despite the fact that I would try a different type of rice next time, I really liked this Sushi Roll Salad. Several people at the party told me how much they enjoyed it.
Bob, my ever-willing in-house taste tester, said he didn’t think it was good enough to be “blog-worthy”. I disagreed, suggesting that perhaps he felt that way because he’s not that crazy about sushi. He admitted that his indifference towards sushi could have influenced his opinion. Well, I amcrazy about sushi, and I loved this salad! If you’re crazy about sushi, you may love it, too!
a

a
Sushi Roll Salad
(Adapted from a July 1994 Gourmet recipe on epicurious.com)
a
a
Serves 8 as a side dish (Cut the recipe in half for fewer servings because it won’t keep too well.)
a
I used, and photographed, medium grain sushi rice. I suggest that you try the recipe with long grain rice, perhaps the Jasmine variety.
a
1½ cups long grain rice
¼ cup plus 3 tablespoons rice vinegar (not seasoned)
¼ cup sugar
1½ teaspoons salt
1 tablespoon sesame seeds
2 tablespoons oil (I used grapeseed)
2 tablespoons finely chopped pickled ginger
2 tablespoons thinly sliced green onions (1 or 2 green onions)
½ cup finely shredded carrot
1 large seedless cucumber (about 1 pound), quartered lengthwise, cored, and sliced
2 sheets roasted nori
1 avocado
Juice from a couple of wedges of a lime
(Optional) 8 ounces cooked shrimp (Oregon shrimp meat, if you’re on the West Coast)
a
Dressing
3 teaspoons wasabi (Japanese green horseradish) powder
1 tablespoon hot water
2 tablespoons cold water
2 tablespoons soy sauce
3 teaspoons ginger juice (I used the juice from the jar of pickled ginger.)
a
Pickled ginger

W
Wasabi powder (Mix with water to make wasabi paste to serve with the salad.)a

a
1. Wash the rice in several rinses of cold water to remove some of the starch. The water will be quite cloudy at first and become clearer as you continue to rinse it.
2. Cook the rice using your favorite method. I used my rice cooker with 1½ cups plus 2 tablespoons water.
3. While the rice is cooking, put the 1/4 cup of rice vinegar, sugar, and salt in a small saucepan. Bring to a boil and cook just until the sugar is dissolved. Remove from the heat.
4. Toast the sesame seeds in a small pan, stirring often, until they are golden brown. Remove the seeds from the pan and set aside.


a
5. When the rice is done, put it in a large bowl and stir the vinegar/sugar/salt mixture into it. Allow it to cool.
6. Gently stir, using kind of a folding motion so you don’t break up the rice too much, the sesame seeds, oil, ginger, green onions, carrot, cucumber, and the remaining 3 tablespoons of rice vinegar into the salad.


a
(The salad can be covered and refrigerated at this point for up to a day. Bring to room temperature before continuing with the recipe.)
a
7. Make the dressing. Stir all of the dressing ingredients together in a small bowl until well-combined.
8. Cut the nori into thin strips and then cut the strips into small pieces, about 1½ – 2 inches long. Kitchen scissors probably work best for this.


a
9. Stir 2/3 of the nori strips into the salad.

a
10. Cut the avocado into small cubes and gently toss them with the lime juice. (This helps to keep the avocado from turning brown.)
11. Gently toss the avocado, shrimp, and the dressing into the salad.
Folding in the shrimp

a
12. Put the salad in a serving bowl and garnish with the remaining nori strips. Serve with extra wasabi and pickled ginger, if desired.
aa
This photo was chosen as one of the Foodbuzz Top 9 for June 13! 🙂

Share this:

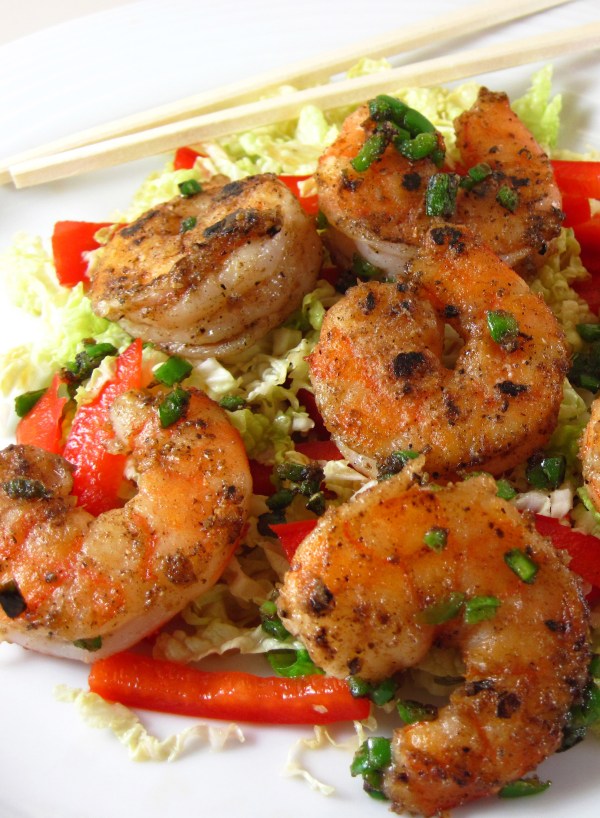
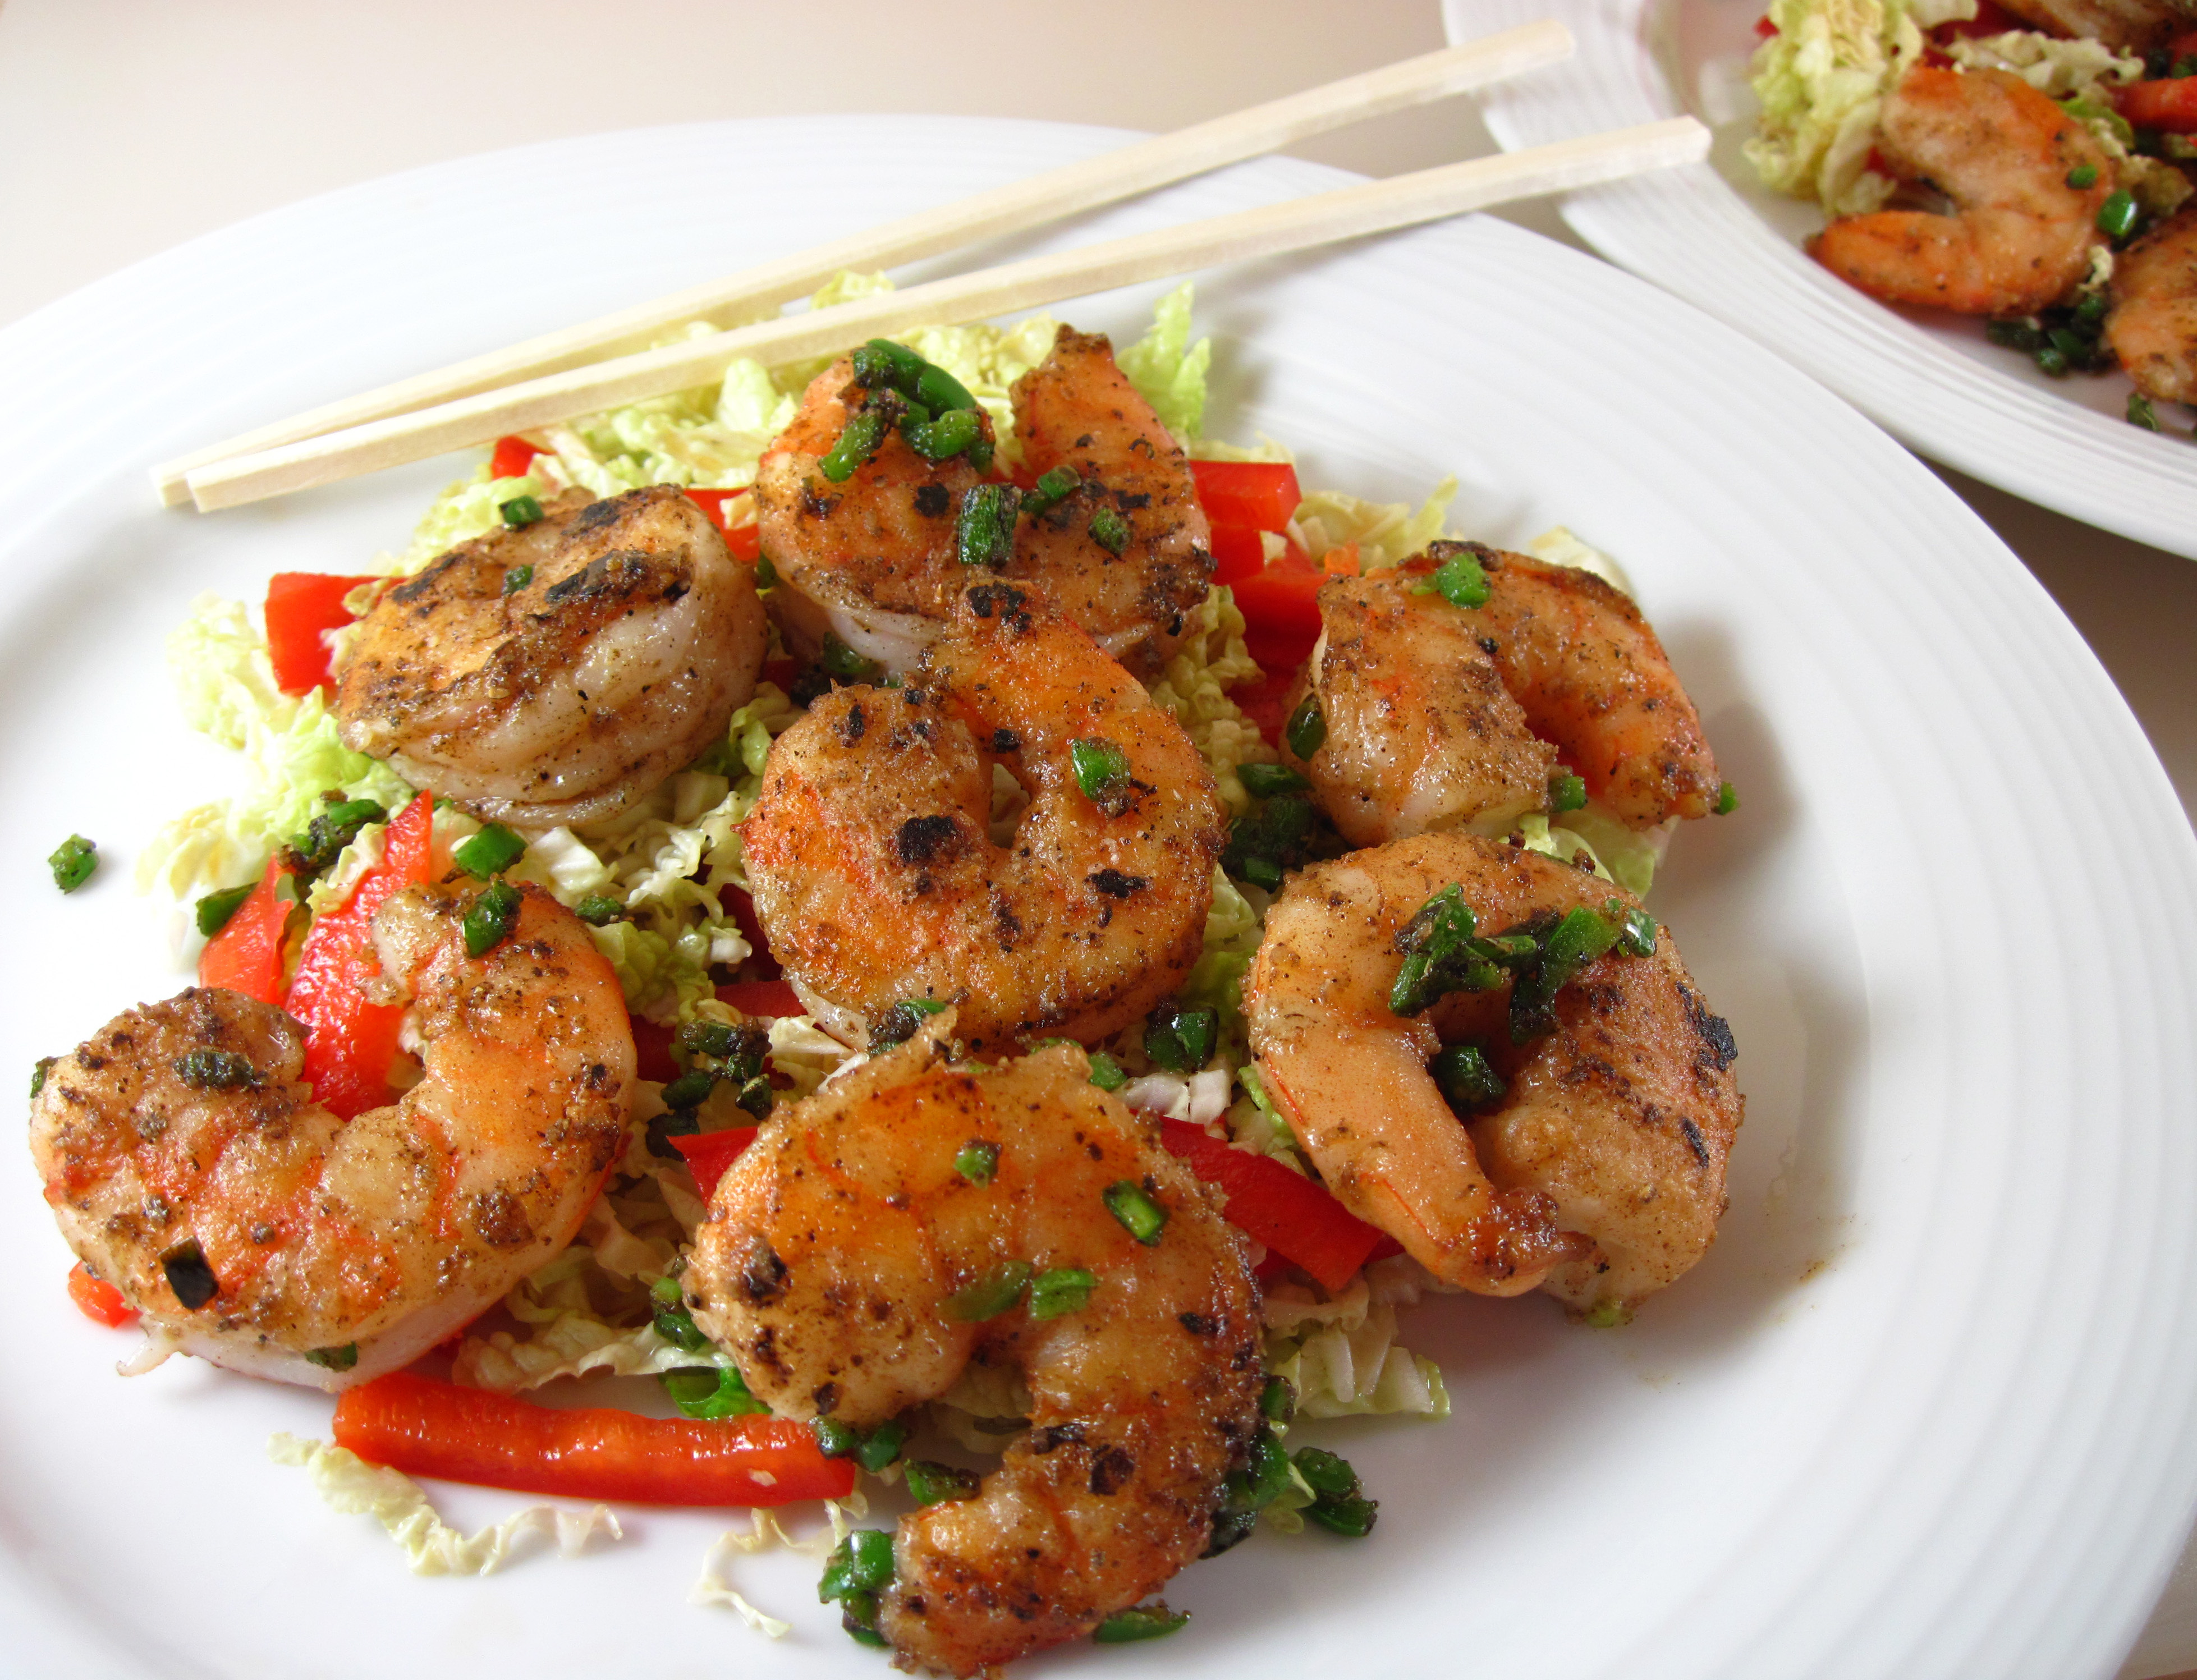
Salt and Pepper Shrimp
We occasionally go to Sea Garden in the International District when we’re in the mood for good Chinese seafood. I almost always order one of their “salt and pepper” dishes, usually squid or prawns. I never thought about making something like it at home until I saw Eating Well’s recipe for Salt and Pepper Shrimp in Eating Well Serves Two: 150 Healthy in a Hurry Suppers. It looked simple enough, so we gave it a try last night.
Chef Jim Romanoff, from the Eating Well test kitchens, suggests using rice flour. He calls it the “secret ingredient”, but says you can substitute cornstarch. If you have rice flour, give it a try. I used cornstarch.
If I were to have a taste test between Eating Well’s Salt and Pepper Shrimp and Sea Garden’s version, I’d probably pick Sea Garden’s. But I have to say that this lightened up, less salty version is very good! I’m sure I’ll be making it again.
a
This photo was on the Foodbuzz Top 9 for June 8! 😀

Salt and Pepper Shrimp
(Adapted, barely, from the recipe in Eating Well Serves Two)
a
a
Serves 2
a
2 tablespoons lime juice
2 teaspoons reduced-sodium soy sauce
2 teaspoons toasted sesame oil
½ teaspoon sugar
3 cups thinly sliced napa cabbage
1 small red pepper, very thinly sliced
2 tablespoons cornstarch (or rice flour)
¼ teaspoon kosher salt
½ teaspoon freshly ground black pepper
½ teaspoon five-spice powder
10 ounces (.62 pound) raw shrimp, peeled and deveined
1 tablespoon oil (I used grapeseed oil)
1 jalapeno pepper, seeded and minced
a
Wild shrimp, peeled and deveined

a
1. Stir the lime juice, soy sauce, sesame oil, and sugar together in a large bowl.
a
I got enough juice from 1 lime; you might need 2 if your limes aren’t very juicy.

a
2. Add the red pepper and cabbage to the bowl. Stir, and set aside.
a

a

a

a
3. Stir the cornstarch, salt, black pepper, and five-spice powder together in a medium bowl.
a

a
4. Add the shrimp to the cornstarch mixture, and stir until it is well-coated.
a

a
5. Heat the oil in a large skillet over medium-high heat. (The recipe suggests using a nonstick pan; I used my well-seasoned cast iron skillet, which worked great.)
6. While the skillet is heating, divide the cabbage mixture between two plates.
7. Add the shrimp to the hot skillet. Cook, stirring, for 2 – 3 minutes, until the shrimp turn pink and curl.
8. Add the minced jalapeno pepper to the skillet. Stir and cook for about one more minute.
9. Serve the shrimp on top of the cabbage slaw.
a
Nutritional Info Per Serving:
347 calories; 15 g fat; 20 g carbohydrate; 3 g fiber; 34 g protein; 558 mg sodium; 408 mg potassium
a
Delicious dinner for 2!

l
Share this:

Dry Spice-Rubbed Baby Back Ribs
I realize my last post was for Barbecued Baby Back Ribs in the Oven and we really enjoyed that saucy version. But when I saw Lynda Balslev’s recipe for Dry Spice Rubbed Baby Back Pork Ribs, I couldn’t wait to try this non-saucy version!
This recipe is every bit as easy as the last one. It has the extra step of grilling the ribs to give them a bit of a crunchy char. I did grill mine in the end; if you don’t have a grill, I think it would still be fantastic with just a bit more oven time.
I heard no complaints from Bob about making pork ribs too often! We both thought this version was excellent. The spice level was perfect, and the sugar gave it a nice balance without being too sweet.
We thought the ribs were perfectly flavorful, but if you like saucy ribs, you could brush them with your favorite sauce for the last 20 – 30 minutes.

a
Dry Spice-Rubbed Baby Back Ribs
(Adapted from Lynda Balslev’s recipe on her Taste Food blog)
a
a
Generously serves 2 – 3
a
Feel free to substitute 3 tablespoons of regular or brown sugar for the maple sugar. If you don’t have a gas grill, you can just raise the heat in the oven and roast for an additional 20 – 30 minutes.
a
Spice rub
3 tablespoons maple sugar (or brown sugar)
2 teaspoons kosher salt
2 teaspoons freshly ground black pepper
2 teaspoons smoked paprika
2 teaspoons chili powder
2 teaspoons ground cumin
1 teaspoon cayenne
a
1 rack baby back pork ribs
a
1. Preheat the oven to 250˚.
2. Combine all of the spice rub ingredients together in a small bowl.
a

a
3. Place the rack of ribs on a rimmed baking sheet and rub it all over with the spice rub. (I used all of the spice rub.) Leave the rack bone-side down on the baking sheet.
a

a
4. Roast at 250˚ for 3½ hours. (To finish in the oven instead of on the grill, raise the oven temperature to 400˚ and continue to roast for an additional 20 – 30 minutes.)
5. Turn a gas grill on High to preheat.
6. After the grill is hot, follow your grill’s instructions for indirect grilling. For my 3-burner grill, I turned one burner down to Medium, and turned the other two off.
7. Place the rack ribs over the burners that are turned off and cook with the lid down for about 10 minutes.
8. Turn the rack over. Close the lid and cook for another 10 minutes.
a

a
9. Cut between the bones into individual ribs and serve.

Share this:

Barbecued Baby Back Ribs in the Oven
You don’t need to own a barbecue to make some pretty great “barbecued” ribs. Barbecued Baby Back Ribs in the Oven, adapted from Mark Bittman’s recipe in How to Cook Everything the Basics are remarkably finger-lickin’ good!
I made Bittman’s Barbecued Spareribs in the Oven about a month ago, using one large rack of pork spareribs. The barbecue sauce was great, and the ribs were quite good. However, I felt they needed to roast quite a bit longer at 250˚ than the 2 – 3 hours suggested. I roasted them for 3½ hours. Next time I would probably try 4 – 4½ hours for regular spareribs before coating them with the barbecue sauce.
a
Barbecued Spareribs in the Oven – good, but could have roasted a bit longer

a
a
I made the easy barbecue sauce using Westbrae Natural Unsweetened Ketchup because I wanted a sugar-free sauce. We thought it was just right, after I added some Tabasco to heat it up a bit.
If sugar is not an issue for you, by all means, use regular (and easier to find and less expensive) ketchup. The sauce will be sweeter, but I don’t think it will be overly sweet because there is no additional sweetener in the recipe.
If you want to make this really easy, use about 1½ – 1¾ cups of your favorite commercial barbecue sauce instead of making your own. It doesn’t get any easier than that!
Barbecued Spareribs or Baby Back Ribs in the Oven would be a great choice for Memorial Day Weekend, especially if you don’t have a barbecue!
a
The second time I roasted baby back ribs for 3 1/2 hours and they were perfect!

a
Barbecued Baby Back Ribs in the Oven
(Adapted from a recipe in Mark Bittman’s How to Cook Everything the Basics)
a
a
Serves 3 – 4 (Doubles easily to serve 6 – 8)
a
1 rack pork baby back ribs (mine was 2½ pounds)
Salt and freshly ground black pepper
a
Barbecue sauce
1 teaspoon ground cumin
1 teaspoon paprika
1 cup ketchup
¼ cup water
2 tablespoons rice vinegar
1½ teaspoons Worcestershire sauce
1½ teaspoons chili powder
1/3 cup finely chopped onion
2 cloves garlic, pressed
Tabasco sauce, optional
Barbecue sauce ingredients

a a
1. Preheat the oven to 250˚.
2. Generously salt and pepper both sides of the ribs, and put them bone-side down on a large rimmed baking sheet.
a

a
3. Roast for 3½ hours.
a

4. Make the barbecue sauce while the ribs are roasting. Combine all of the barbecue sauce ingredients in a saucepan. Bring to a boil, and then reduce the heat to simmer for about 20 minutes. Taste, and adjust the seasoning with salt, pepper, and/or Tabasco sauce to your taste. Set the sauce aside until the ribs are done.

a
5. When the ribs are done, put them on a cutting board. Cut them into individual ribs.
a

a

a
6. Increase the oven temperature to 400˚.
7. Pour off most of the fat on the baking sheet and return the ribs to the pan.
8. Brush the ribs on all sides with the barbecue sauce.
9. Roast at 400˚ for 5 minutes. Turn the ribs and roast for another 10 minutes. Turn them one last time and roast for an additional 5 minutes.
Enjoy!
a

Share this:

Steamed Fish with Ratatouille
I have made Steamed Fish with Ratatouille three times in the last few weeks. I just love it! The recipe is adapted from one in Mark Bittman’s terrific new cookbook, How to Cook Everything the Basics.
Mr. Bittman says you can use any thick fish fillets or steaks. I have made it with “true cod” (a Pacific cod from Alaska) which I really liked. I have also made it with black cod, aka sablefish, which was wonderful. (“Black cod” is actually not a cod; perhaps that is why the fish markets label cod as “true cod”.) The dish was equally delicious with both types of fish. Halibut or salmon would also be good.
I omitted the olives, but you could add them when you add the tomato, thyme, and garlic if you want. I’m sure they would be a great addition.
This is truly a fool-proof way to prepare fish, and the bold flavors of the Ratatouille are very complimentary to most types of fish. I know I will be making Steamed Fish with Ratatouille again!
a

a
Steamed Fish with Ratatouille
(Adapted from Mark Bittman’s recipe in How to Cook Everything the Basics)
a
a
Serves 2 (double for 4 servings)
a
1 tablespoons olive oil, plus 2 more teaspoons for serving
3/4 cup chopped onion
1 medium zucchini, cut into 1-inch pieces
1 small eggplant, cut into 1-inch pieces
½ red pepper, cut into 1-inch squares
Salt and freshly ground black pepper
1 medium tomato, cored and chopped (or 6 – 8 cherry tomatoes, halved)
1½ teaspoons fresh thyme leaves
2 cloves garlic, pressed
¼ cup pitted Nicoise or kalamata olives (optional)
¾ pound thick fish fillets or steaks
¼ cup roughly chopped fresh basil leaves
a
1. Heat the 1 tablespoon olive oil in a large skillet over medium heat. Add the onion and cook, stirring occasionally for about 5 minutes.

a
2. Add the zucchini, eggplant, and pepper to the skillet. Sprinkle with salt and pepper. Cook, stirring occasionally, for about 15 minutes.

3. Add the tomato, thyme, pressed garlic (and olives, if you’re using them) and then cook for another 5 – 10 minutes. If it seems to be a little dry, add a bit of water.

a
4. Sprinkle the fish with salt and put it on top of the vegetables.

a
5. Cover and cook until the fish is done. Timing will depend on the thickness of the fish. Plan on about 10 minutes per inch of thickness.

6. Stir in the basil, and serve immediately. Drizzle the fish with the 2 extra teaspoons of olive oil.
a
True Cod

a
a
Black Cod, or Sablefish

Share this:

Black Cod (aka Sablefish) in Sake Kasu
Whenever I am lucky enough to eat at Ray’s Boathouse in Seattle, I almost always order their Chatham Strait Sablefish in Sake Kasu. Sablefish, also known as Black Cod, has a rich, oily flesh with as much healthy Omega 3’s as salmon. And it tastes terrific!
Black Cod can be prepared simply, perhaps grilled or broiled, but Laura requested Black Cod in Sake Kasu for her birthday so I decided to give it a try.
I happen to have a copy of Ray’s Boathouse: Seafood Secrets of the Pacific Northwest and it has the restaurant’s recipe. Reading it, I realized why I had never made it before. It takes 48 hours to allow time for marinating. So you have to plan ahead. Fortunately, Laura requested it with plenty of time to make it work.
The recipe is not at all difficult, but if you don’t have a Japanese market nearby, it may be hard to find the Kasuzuke Paste. I found it at Uwajimaya, a large Japanese grocery and gift store in Seattle.
When it was time to make the marinade, the recipe suggested mixing it an electric mixer. I found that difficult to do because the paste is quite dense. I was pressed for time, so I finally decided it was mixed well enough and proceeded with the recipe. Next time, I will definitely try mixing it in my food processor, which I think will work much better.
Grilled on my gas grill, and served with basmati rice and a cucumber salad, the Black Cod in Sake Kasu was a big hit with almost everyone. Bob thought it was too salty, but no one else agreed with him. So there you go.
Would I make it again? I have quite a bit of Kasuzuke Paste left; I froze it, so I probably will make it again.
However, after I had already purchased the black cod and the Kasuzuke Paste, I learned via blogger Matt Wright that Uwajimaya and Mutual Fish both carry marinated Black Cod in Sake Kasu! It’s nice to know that it can be a last-minute dinner decision in the future!
Or maybe we’ll just go to Ray’s Boathouse or Ray’s Café! 🙂
a
Photo courtesy of Laura

a
Black Cod in Sake Kasu
(Adapted from the recipe by Executive Chef Charles Ramseyer in Ray’s Boathouse: Seafood Secrets of the Pacific Northwest)
a
Allow 48 hours to prepare
a
Serves 5 or 6
a
2 pounds black cod fillet, skin on, cut into 5 or 6 serving pieces
1/3 cup kosher salt
a
6 ounces (3/4 cup) sake kasu paste (Kasuzuke Paste)
1/3 cup sugar
¾ cup water

a
Day one:
1. Put the cod pieces in a single layer, skin-side down in a large glass baking pan.
2. Sprinkle the salt all over the fish. Cover, and refrigerate for 24 hours.
a
Covered with salt

a
Day two:
1. Rinse the cod well and dry with paper towels. Wash and dry the glass baking pan and put the cod, skin-side down, back in the clean pan.
2. With a food processor (a smaller one should work well), combine the Kasuzuke paste, the sugar, and the water, until well-blended. (This can be down with an electric mixer, if you don’t have a food processor.)
3. Cover the cod with the mixture, turning the pieces over so they are completely covered. Leave them skin-side down. Cover with plastic wrap and refrigerate for another 24 hours.
a
 a
a
Day three:
1. Scrape most of the Kasuzuke mixture off of the fillets, leaving a bit on to caramelize.
2. Heat your grill. Grill flesh-side down for about 5 minutes. Turn the fillets and grill for an additional 5 minutes. Enjoy!


