Welcome!
You'll find over 470 of my favorite recipes here, including ideas for Quick meals, Cooking for 2, Feasting on Leftovers, and cooking with 5 Ingredients or Less. I'm adding new posts regularly; you can subscribe by email or RSS feed if you'd like to receive the latest recipes. Bon appétit!
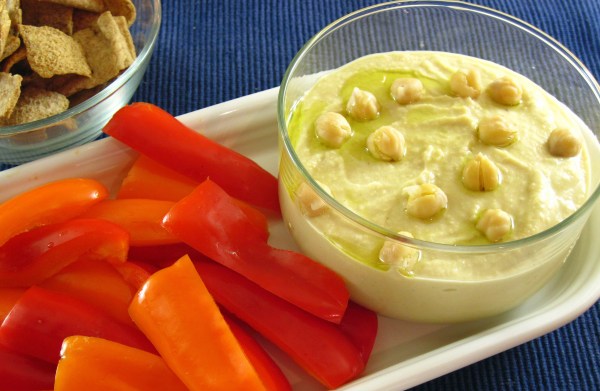
Silky Smooth Hummus with No Tahini
By Kath Dedon
.
Don’t want to use tahini? You can still make fabulous Silky Smooth Hummus with No Tahini. Maybe you’re out of tahini. Maybe you’re serving the hummus to someone who has a sesame seed allergy. Maybe you just don’t like tahini. You can still make great hummus.
On Martha Stewart’s site I learned that you don’t need to use any substitutions; you can just make your favorite hummus recipe and omit the tahini. That’s pretty much what I did. I omitted the 6 tablespoons of tahini that were in the original Classic Hummus recipe in America’s Test Kitchen’s The Complete Vegetarian Cookbook. I added a tablespoon of creamy peanut butter to give it a hint of flavor.
ATK’s method produces the creamiest texture! And you don’t need to remove the skins to achieve it. You grind the chickpeas and the dry ingredients in the food processor. Then, with the motor running, you slowly add the lemon juice and water blend and then the olive oil and peanut butter. The result? Silky smooth hummus goodness!
I highly recommend this method to make Silky Smooth Hummus with No Tahini. If you want to use tahini, just substitute 6 tablespoons of tahini for the peanut butter for a delicious Classic Hummus.
.
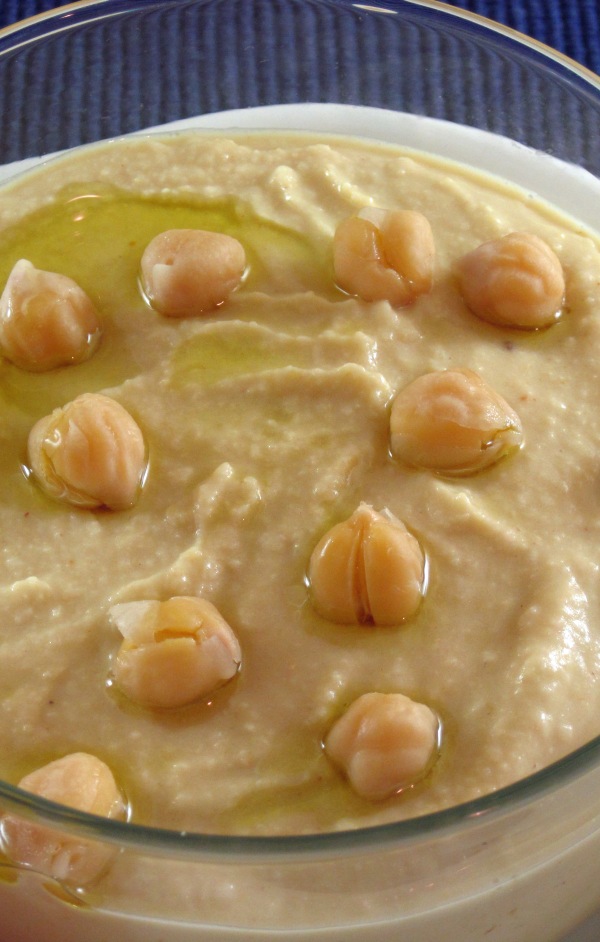
Silky Smooth Hummus with No Tahini served with mini pepper strips and pita chips
.
Silky Smooth Hummus with No Tahini
Adapted from a recipe in ATK’s The Complete Vegetarian Cookbook using advice from Martha Stewart’s site
.
.
Makes about 1¾ cups
.
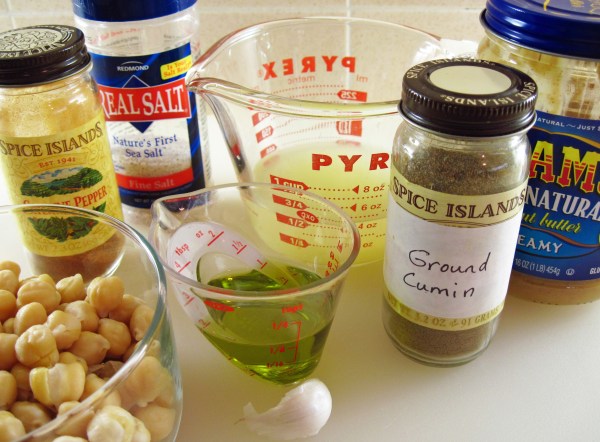
.
¼ cup water
3 tablespoons lemon juice
1 tablespoon peanut butter (I used natural peanut butter. The peanut butter is optional. Omit, if you want.)
2 tablespoons extra-virgin olive oil, plus extra for drizzling
1½ cups cooked chickpeas (or one can, rinsed and drained)
1 small clove garlic, minced
½ teaspoon sea salt
¼ teaspoon ground cumin
Pinch cayenne pepper
1 tablespoon minced fresh cilantro or parsley (optional), for garnish
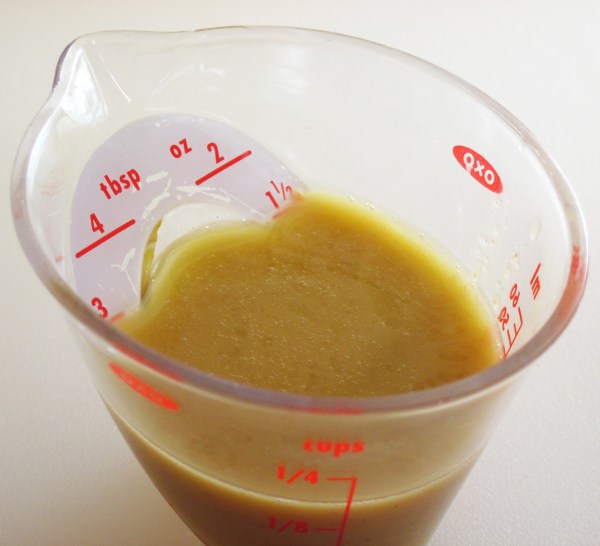
1. Stir the water and lemon juice together in a measuring cup.
2. Stir the peanut butter and olive oil together so it’s blended well.
.
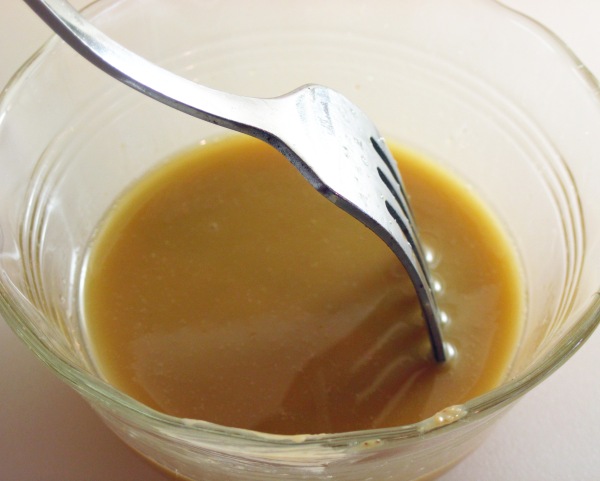
I put the peanut butter/oil mixture in a small measuring cup for easy pouring.
3. .Set aside about 1½ – 2 tablespoons of the chickpeas aside to use as a garnish.
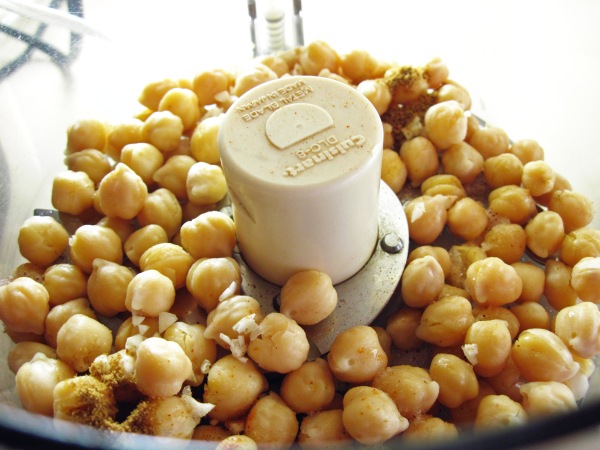
4. Put the rest of the chickpeas, garlic, salt, cumin, and cayenne in a food processor and process until it’s ground up well, about 15 – 20 seconds.
.
.
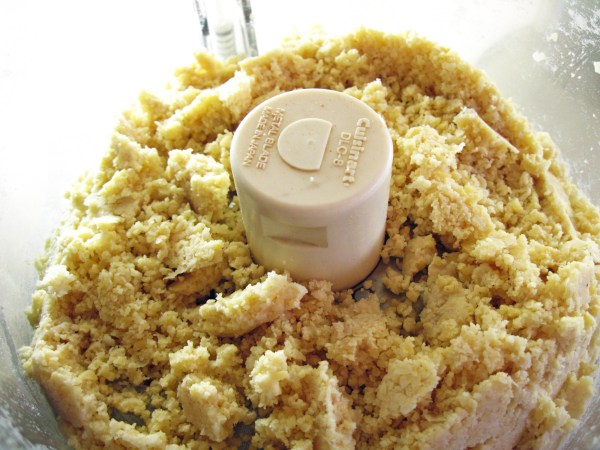
5. Scrape the mixture down with a spatula. Turn the motor on and slowly stream the water and lemon juice into the chickpeas. Scrape the mixture down again and then process for 1 minute.
6. With the motor running, slowly stream the peanut butter and olive oil mixture into the food processor. Process for about 15 more seconds.
7. Put the hummus in a serving bowl. Garnish with the reserved chickpeas, a drizzle of olive oil, and, if using, the cilantro or parsley.
.
.
Share this:

Small Batch Chewy Chocolate Chip Cookies
By Kath Dedon
.
Small Batch Chewy Chocolate Chip Cookies are just what you need when you want homemade chocolate chip cookies but don’t want to make a huge batch. The recipe makes just 12 – 14 cookies. It’s quick to make, and it can be mixed in a bowl with a whisk or a fork. There’s no need to use a mixer!
The recipe was developed by America’s Test Kitchen for The Complete Cooking for Two Cookbook (a great cookbook, by the way). They found that you can simply stir in melted butter, eliminating the need to cream the butter and sugar with a mixer. Talk about easy!
The recipe is supposed to yield 12 cookies, but it actually made 14 cookies for me. I baked the extra two in my new convection toaster oven, but I found that the ones baked in my regular oven turned out better.
The next time you just need to have a few chocolate chip cookies, I highly recommend that you try Small Batch Chewy Chocolate Chip Cookies. They’re quick, easy, and loaded with chocolate chips! You can be pulling them out of your oven in no time to satisfy your craving!
.

Small Batch Chewy Chocolate Chip Cookies
(Adapted from the recipe in The Complete Cooking for Two Cookbook by ATK)
.
.
Makes 12 – 14 cookies
.
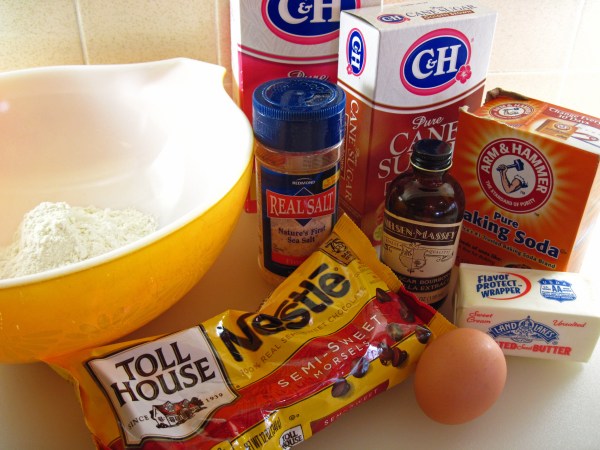
5 tablespoons (2.5 ounces, or 71g) unsalted butter
1 cup (5 ounces) all-purpose flour
½ teaspoon baking soda
¼ teaspoon salt
½ cup packed (3½ ounces) light brown sugar
¼ cup (1¾ ounces) granulated sugar
1 large egg, lightly beaten
1½ teaspoons vanilla extract
1 cup (6 ounces) semisweet chocolate chips
.
Ingredients for the cookies (flour is in the bowl)
.
1. Preheat the oven to 350° with the rack in the middle position. Line a baking sheet with parchment paper or a Silpat baking mat.
2. Melt the butter and set it aside to cool a bit while you prepare the other ingredients.
3. Whisk the flour, baking soda, and salt together in a small bowl.
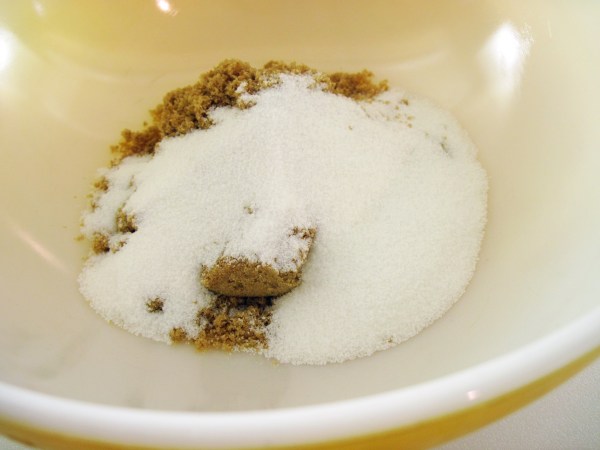
4. Whisk the light brown sugar and granulated sugar together in a medium bowl.
.
5. Pour the melted butter into the sugar and stir until it’s well combined.
.
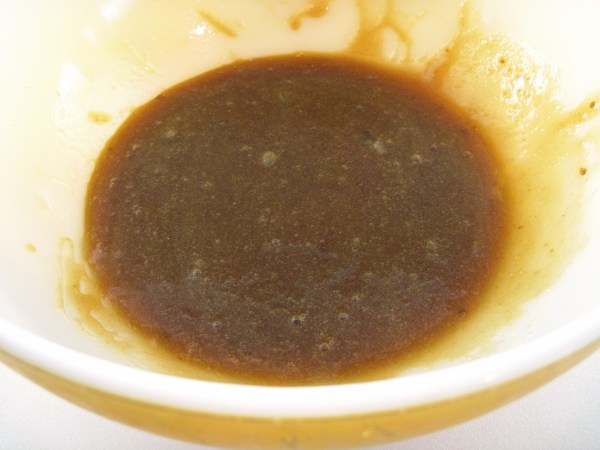
6. Add the egg and vanilla and stir until combined.
7. Use a spatula to gently blend the flour mixture into the sugar mixture.

.
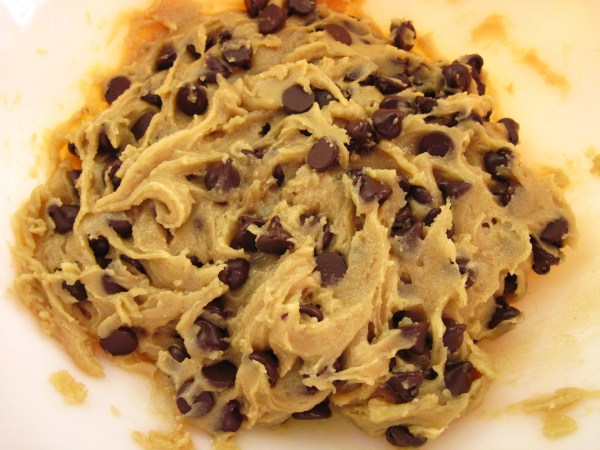
8. Fold the chocolate chips into the dough.
.
9. Using about 2 tablespoons of dough for each cookie, roll the dough into 12 or so balls and place them about 2 inches apart on the prepared baking sheet.
10. Bake for 7 minutes. Rotate the pan and bake for another 7 minutes, until the edges are set but the center is still soft and puffy.

.
11. Cool for a few minutes on the cookie sheet before removing. Enjoy the cookies warm or at room temperature!
.


.
Share this:

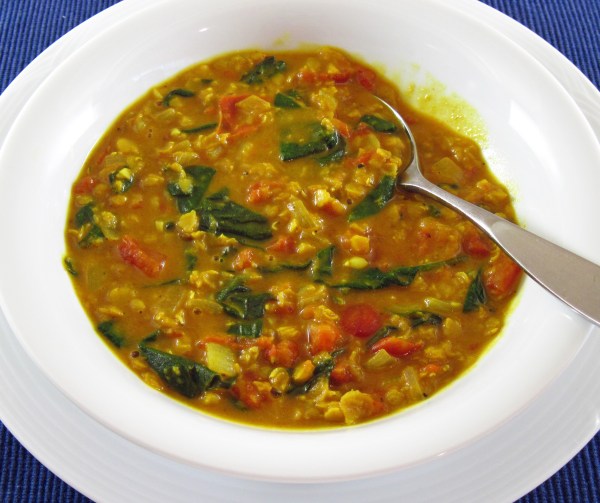
Spiced Lentil Soup
By Kath Dedon
.
This Spiced Lentil Soup may be the best lentil soup I’ve ever had! The recipe is from Angela Liddon’s Oh She Glows blog. Her blog and book, The Oh She Glows Cookbook, both focus on healthy vegan recipes, many of which are gluten-free. Now I am pretty sure I will never become a vegan, but I do enjoy a good vegetarian meal. I find that I’m eager to try more of Angela’s recipes. I recommend that you hop on over to Oh She Glows to see Angela’s gorgeous photos.
The soup is quick and easy to put together and the spices are perfect. It’s very flavorful without being overly spicy. The coconut milk makes it rich and creamy. Angela said she has tried it with light coconut milk but she really prefers it made with the full-fat coconut milk.
I’m sorry that I didn’t take photos of the process, but I still wanted to share this Spiced Lentil Soup with you. At the first taste Bob and I both declared this a blog-worthy recipe. I know I’ll be making it again.
.

.
Spiced Lentil Soup
(Adapted, barely, from Angela Liddon’s recipe on ohsheglows.com)
.
.
Serves 4
.
1½ tablespoons olive oil
2 cups diced onion (1 medium/large)
2 large garlic cloves, minced
2 teaspoons ground turmeric
1½ teaspoons ground cumin
½ teaspoon cinnamon
¼ teaspoon ground cardamom
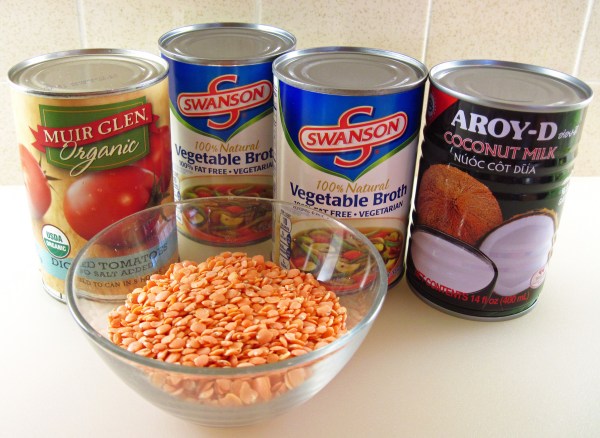
1 (15-ounce) can unsalted diced tomatoes, with juices
1 (15-ounce) can full-fat coconut milk
¾ cup uncooked red lentils, rinsed and drained
2 cans (3 ½ – 4 cups total) vegetable broth
½ teaspoon fine sea salt, or to taste
Freshly ground black pepper, to taste
5 ounces baby spinach
2 teaspoons fresh lime juice
.
.
- In a large pot, heat the olive oil. Add the onion and cook over medium heat for 4 – 5 minutes, until it softens.
- Add the garlic to the onions and cook, stirring, for about a minute.
- Add the turmeric, cumin, cinnamon, and cardamom. Stir for about a minute.
- Stir in the tomatoes, coconut milk, lentils, vegetable broth, salt, and pepper. Bring to a boil and then reduce heat to medium and simmer, uncovered, for 18 – 22 minutes, or until the lentils are done.
- Remove the pot from the burner and stir in the spinach until it has wilted. Add the lime juice and taste for seasoning. (If your broth is salty, you probably won’t need any more salt.) Enjoy!
.
.

.
Share this:

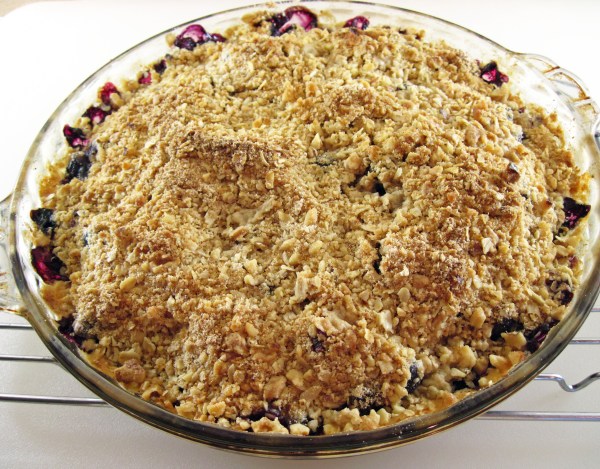
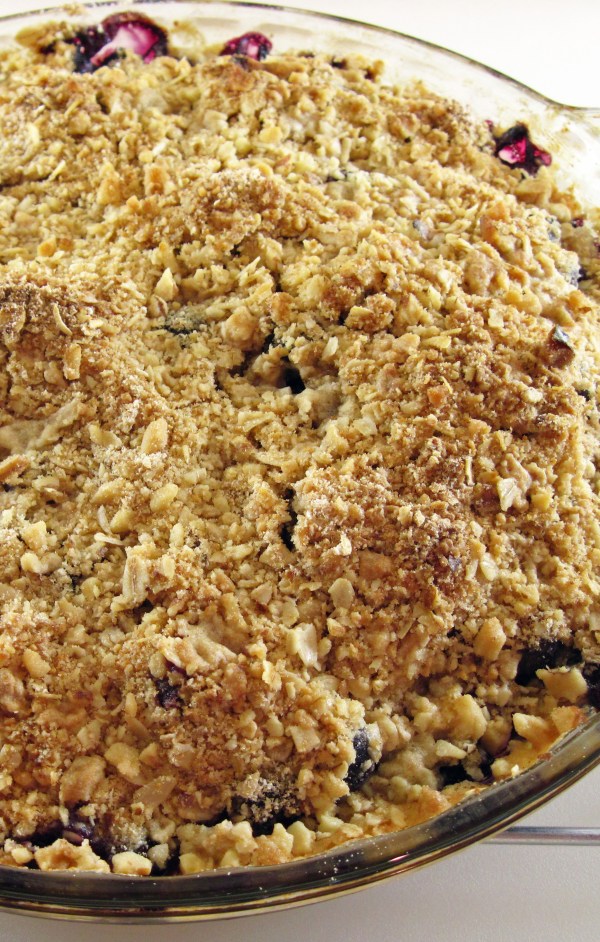
Gluten-Free Blueberry Crisp
By Kath Dedon
.
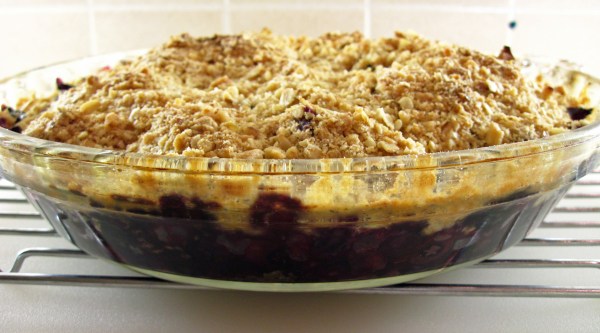
Blueberry Crisp was the dessert Laura requested for her birthday. It’s a quick and easy recipe to make and delicious plain or with a bit of ice cream.
I combined some of the ingredients and methods from two other recipes, Blueberry Pie and Peach Crisp. The blueberry filling was adapted from the out-of-print 1981 Better Homes and Gardens New Cook Book. The crisp is an adaptation of Mark Bittman’s recipe in How to Cook Everything The Basics.
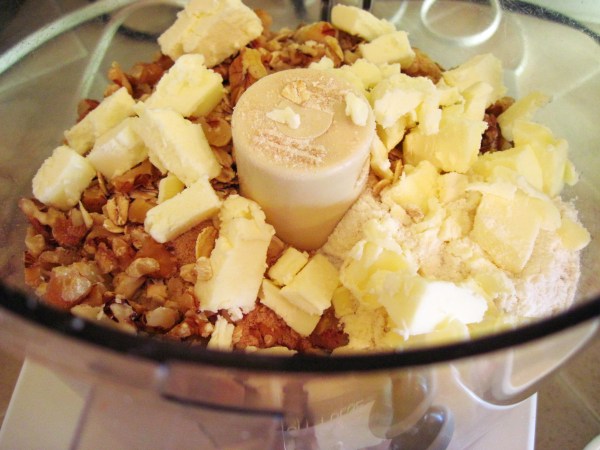
This time I used pecans in the crisp and I chopped them as the original recipe suggested. I would definitely chop them if you’re mixing the crisp mixture by hand. I, however, used my food processor and the chopped nuts were chopped up a bit too much. Next time I would add the nuts whole to the food processor.
If you love blueberries, I definitely recommend this Blueberry Crisp! It’s quick to put together and easy (much easier than a blueberry pie) and it makes a festive dessert that serves 6 – 8 people.
.
.
Blueberry Crisp
(Adapted from recipes in the 1981 Better Homes and Gardens New Cook Book and Mark Bittman’s How to Cook Everything The Basics)
Serves 6 – 8
I like to use my food processor to make the crisp but you can definitely do it by hand. Just chop the nuts, if you use them, into pieces that seem to be the right size. Then put all of the ingredients in a bowl and mash it together with your fingers until they are pretty well combined.
If you don’t need to make it gluten-free, just substitute all-purpose flour for the tapioca flour and the gluten-free flour blend for the crisp.
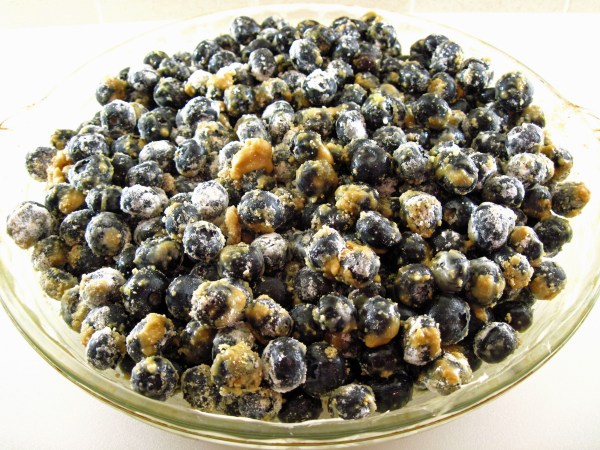
The blueberry filling
About 6 cups blueberries, picked over to remove any stems, rinsed and well-drained (4 – 5 half pints or 1½ – 1¾ pounds)
½ cup sugar (I used maple sugar.)
1/3 cup tapioca flour
Zest of 1 lemon
Crisp topping
5 tablespoons cold butter, plus more for greasing the pan.
½ cup packed brown sugar (I used maple sugar.)
½ cup gluten-free rolled oats (not instant oats)
½ cup of your favorite gluten-free flour blend (I like this one)
¼ cup nuts, optional (I used pecans. Chop them if you’re mixing by hand.)
Pinch of salt
Vanilla ice cream for serving, optional
1. Preheat the oven to 400°. Put a rimmed baking sheet in the oven to catch any drips that might occur.
2. Use a bit of butter to grease an 8×8 square baking pan or a 9-inch pie plate.
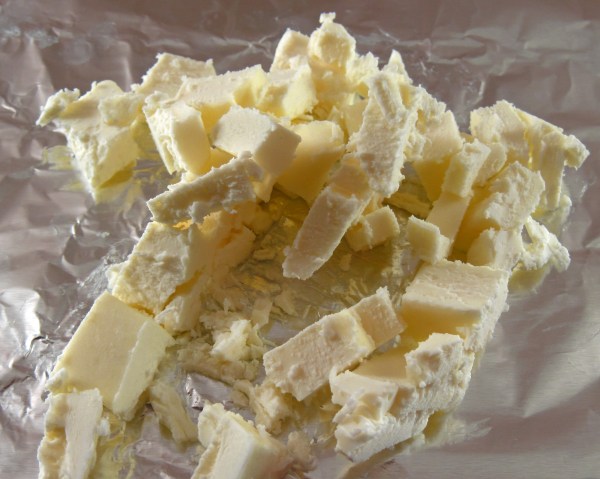
3. Cut the 5 tablespoons of butter for the crisp topping into small pieces and put them in the refrigerator or freezer for a few minutes while you prepare the blueberries.
.
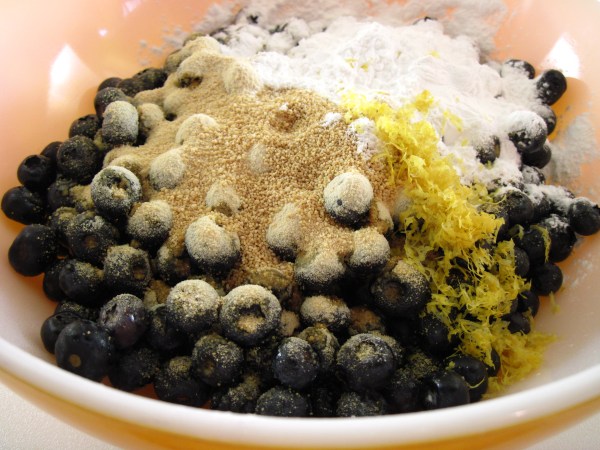
4. Toss the blueberry filling ingredients (the blueberries, ½ cup sugar, tapioca flour, and lemon zest) together and put them in the prepared pan.
.
.
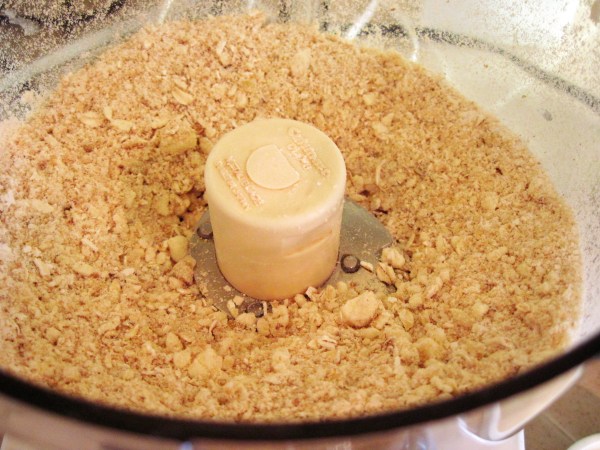
5. Put the topping ingredients in a food processor. Pulse a few times until everything is mixed but still has some texture.
.
.
6. Sprinkle the topping over the blueberries. Put the crisp on the baking sheet in the oven and bake for about 30 minutes, until the blueberries are bubbling and the top is browned a bit.
.
7. Serve warm or at room temperature.
.
.
Share this:

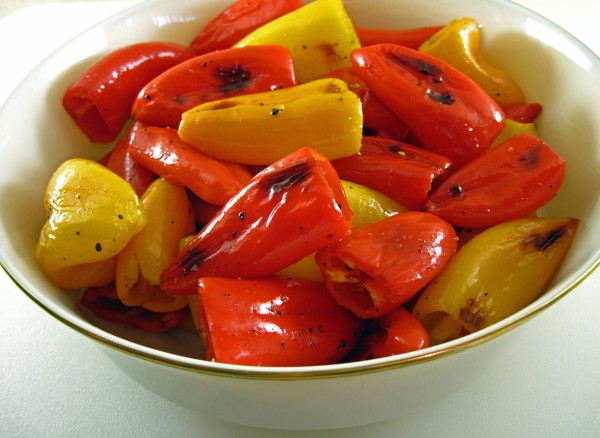
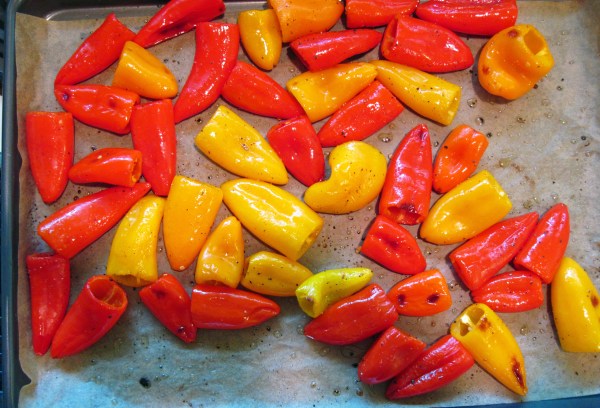
Oven-Roasted Mini Sweet Peppers
By Kath Dedon
.
Oven-Roasted Mini Sweet Peppers make such a colorful side dish! I have cooked the peppers on the grill, but more often than not I have roasted them in the oven. It’s super easy and can be made ahead of time and eaten at room temperature.
When I serve them as an appetizer I leave the stems on. They have very few seeds; I just wash them and grill them or roast them and serve them whole.
As a side dish, however, I like to take the stems off and I remove most of the seeds. I recently served them with Gemelli with Sausage, Grapes and Red Wine. The peppers added great color to the plate and were delicious with the pasta.
I hesitate to even call Oven-Roasted Mini Sweet Peppers a recipe, but I found that every time I made them I turned to the Internet for oven temperature recommendations and timing. I figured other people would also like go-to instructions, so here’s how I did it.
.
.
Oven-Roasted Mini Sweet Peppers
(Inspired by the recipe on a blog, Lady Behind the Curtain )
Serves 6 – 8
2 pounds mini sweet peppers
1 tablespoon avocado oil (olive oil is also good)
Sea salt
Freshly ground black pepper
- Preheat the oven to 400°.
- Wash the peppers. Cut off the stem end and pull out most of the seeds.
- Line a large rimmed baking sheet with parchment paper or heavy duty foil.
- Put the peppers in the center of the baking sheet. Drizzle the avocado oil over the peppers. Toss them with your hands to distribute the oil.
- Spread the peppers out. Sprinkle with a bit of sea salt and ground pepper.
- Roast for about 10 minutes.
.
.
7. Stir the peppers and then return to the oven.
8. Roast for an additional 5 minutes.
9. Put the peppers in a serving bowl. Serve immediately, or cover and serve at room temperature later.
.

.
.
Share this:

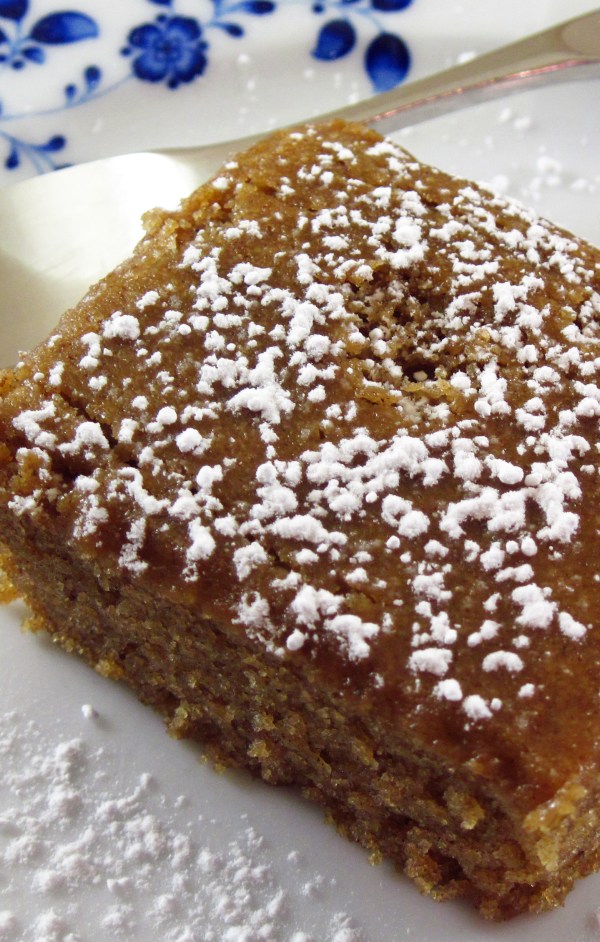
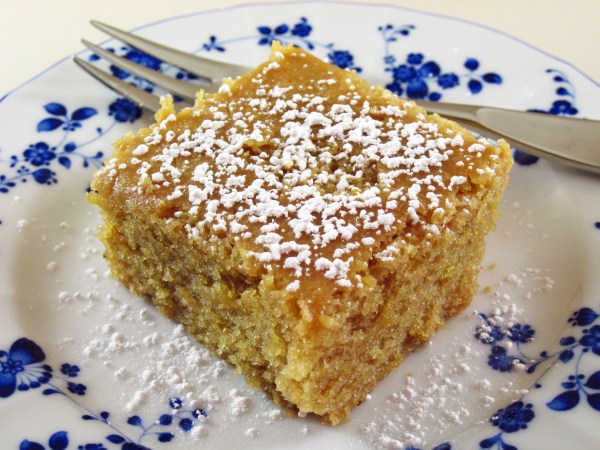
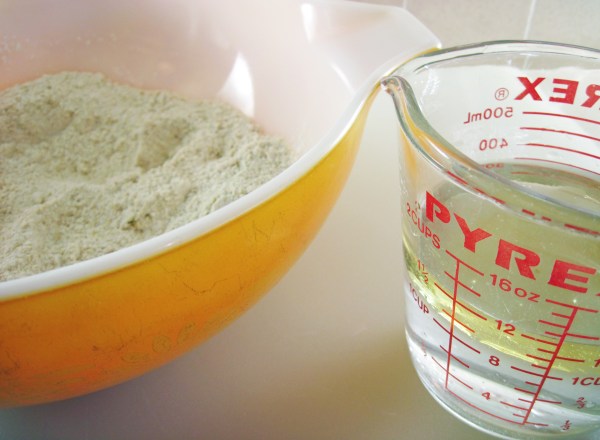
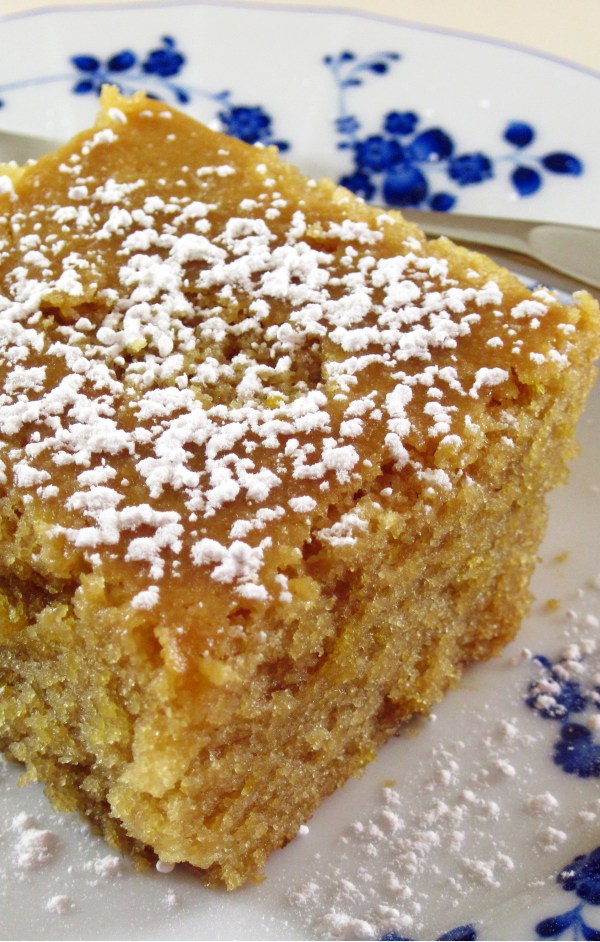
Crazy Spice Cake
By Kath Dedon
.
My latest “crazy” cake is this Crazy Spice Cake. I used the basic cake recipe that I used for the Vegan Lemon “Crazy” Cake, omitting the lemon zest and lemon extract. Then I searched for the right combination of spices.
Using Eat Your Books (an online tool that I really appreciate), I noticed Walter Waltuck and Melicia Phillips’ recipe for Spiced-Up Honey Cake. I pulled their Staffmeals from Chanterelle cookbook from the shelf to look up the recipe. Their combination of equal parts cinnamon and ginger with smaller amounts of nutmeg and coriander sounded perfect.
For my 8-inch square cake, I halved the amounts of spices and I really liked this combination of spices!
The Crazy Spice Cake can be sprinkled with powdered sugar, as you see here. But next time I make it, I’m going to try Waltuck and Phillips’ glaze. I’m actually wondering why I didn’t do that yesterday. That just gives me a good excuse to make it again, I think! (I guess I’m just crazy for crazy cakes! 🙂 )
.

.
Crazy Spice Cake
(Adapted from recipes from the Sweet Little Bluebird and the Art of Gluten Free Baking blogs, and Walter Waltuck and Melicia Phillips’ recipe in Staffmeals from Chanterelle)
.
.
Serves 9, one 8 x 8-inch square cake
,
If you don’t have any issues with wheat or gluten, you can definitely substitute 1 1/2 cups + 3 tablespoons of all-purpose flour for the gluten-free blend. To measure by weight, if your brand of all-purpose flour weighs 30g per 1/4 cup, you’ll need 202g for this cake.
.
Dry ingredients
1½ cups + 3 tablespoons gluten-free flour (236g, if you’re using Jeanne Sauvage’s blend*)
1 cup sugar (I used maple sugar.)
1 teaspoon baking soda
1 teaspoon cinnamon
1 teaspoon ginger
½ teaspoon nutmeg
½ teaspoon coriander
½ teaspoon salt
.
Liquid ingredients
1 cup cold water
1 Tablespoon white vinegar
½ teaspoon vanilla
5 tablespoons oil
.
Glaze (optional)
2 tablespoons honey (Substitute agave syrup for a vegan cake.)
1 tablespoons sugar
1 tablespoons unsalted butter (Substitute vegan margarine for a vegan cake.)
.
For serving if you don’t use the Glaze
Powdered sugar to sprinkle on the cooled cake (optional)
.
1. Preheat oven to 350°.
2. Stir the dry ingredients together in a bowl.
3. Measure the liquid ingredients into a 2-cup measuring cup.
4. Add the liquid ingredients to the dry ingredients and stir quickly to blend it together. (It’s OK if there are still a few streaks of flour in the batter.) Quickly pour the batter into an ungreased 8×8-inch square cake pan and get it into the oven.
5. Bake for 30 minutes. Cool completely in the pan before cutting.
6. If using the Glaze, heat the honey, sugar, and butter together in a small saucepan, stirring constantly until it is hot and the sugar is dissolved. Poke holes all over the cooled cake with a fork and brush the hot glaze over the cake.
.
*Jeanne’s Gluten-Free Flour Mix (found on her excellent Art of Gluten-Free Baking Blog)
Jeanne says that 1 cup of her blend is 140g. So if you use this blend for the cake, you need 236g if you want to measure the blend by weight. Be sure to stir the blend together before measuring.
Mix together and store in the refrigerator:
1 1/4 cups (170g) brown rice flour
1 1/4 cups (205 g) white rice flour
1 cup (120g) tapioca flour
1 cup (165g) sweet rice flour (Mochiko)
2 scant teaspoons xanthan gum
.
.
Share this:

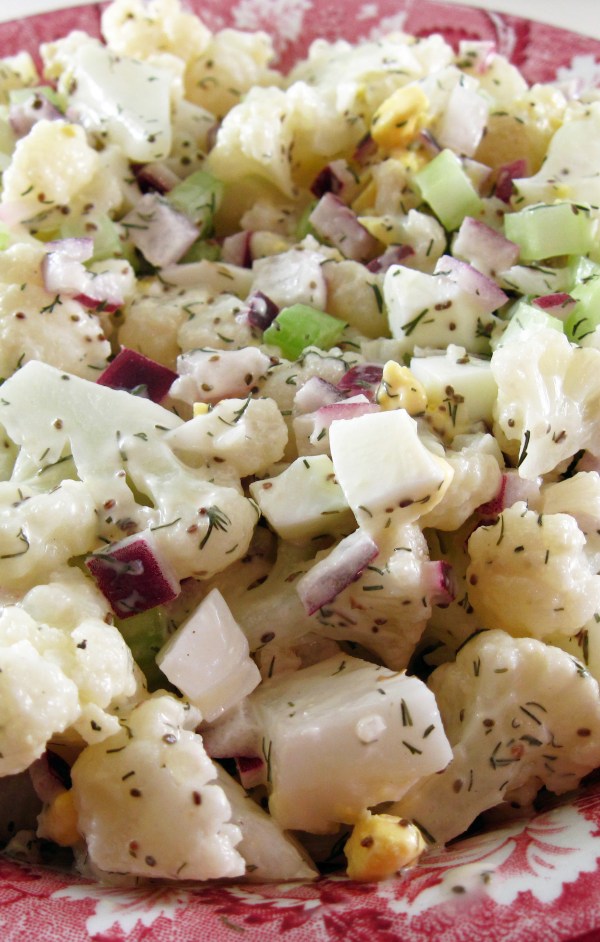
Faux Potato Salad
By Kath Dedon
.
I don’t have anything against potatoes. In fact, I love potatoes and I eat potatoes. Often. But I was intrigued when I saw Elana’s recipe for No Potato Salad. She uses cauliflower florets instead of potatoes and makes a salad that looks irresistible. (Click on the link for No Potato Salad to see Elana’s irresistible photo.)
Inspired by Elana, I made what I call Faux Potato Salad. I based the dressing on the one I use for All-American Potato Salad for Two.
I admit that I was skeptical about this one, and I kind of expected Bob to dislike it because I didn’t use potatoes. However, we both loved it! It has some of the same flavors of my favorite potato salad, but it’s much lighter. It was perfect served with grilled Polish Kielbasa.
Faux Potato Salad is much lower in carbs (12g per serving) than potato salad (100g per serving). It’s lower in calories (171 for Faux, 234 for potato). It qualifies as a serving of vegetables. And it tastes great!
I’m not going to give up potato salad, but I know I will be making Faux Potato Salad again because it’s just really delicious! Leftovers taste great the next day; I’d be very happy to pack some leftover salad in my lunch.
.

Faux Potato Salad
(Inspired by elanaspantry.com and the potato salad in ATK’s The Complete Cooking for Two Cookbook)
.
Be sure to allow the time to let the cooked cauliflower cool and drain so it’s dry. I cooked it about 1½ hours before I tossed it in the dressing.
.
.
Serves 4
.
1 medium head of cauliflower (about 2 pounds)
1 stalk celery, diced
1/4 cup finely chopped red onion
1 tablespoon finely chopped parsley
¼ cup mayonnaise
1 tablespoon brine from a dill pickle jar (optional, but we always have pickles and I like to use it.)
1 tablespoon white distilled vinegar
½ teaspoon dry mustard
½ teaspoon celery seeds
½ teaspoon dried dill weed
½ teaspoon sea salt
1 or 2 large hard-boiled eggs, diced (I used one when I first made this, as shown in the photos, but lately I have been adding two eggs. 🙂 )
.
1. Cut the cauliflower into small florets and put it in a steamer basket.

.
2. Steam the cauliflower about 4 minutes, until it is just tender.
3. Put the steamed cauliflower in a colander and let it cool and drain. (It’s best if it can drain for 45 minutes to an hour so it will be dry.)
4. Put the celery, onion, parsley, mayonnaise, pickle brine, vinegar, dry mustard, celery seeds, dried dill weed, and sea salt in a bowl large enough to hold the cauliflower.

.
5. Whisk the dressing ingredients together and then add the cauliflower. Gently stir until the dressing is well distributed.
6. Stir in the diced egg and serve.
.

.
.
Share this:

By Kath Dedon
.
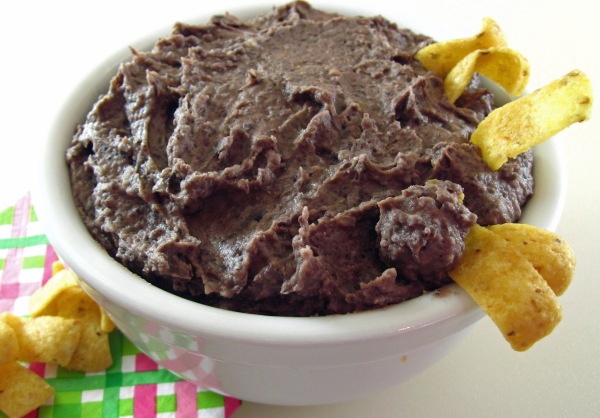
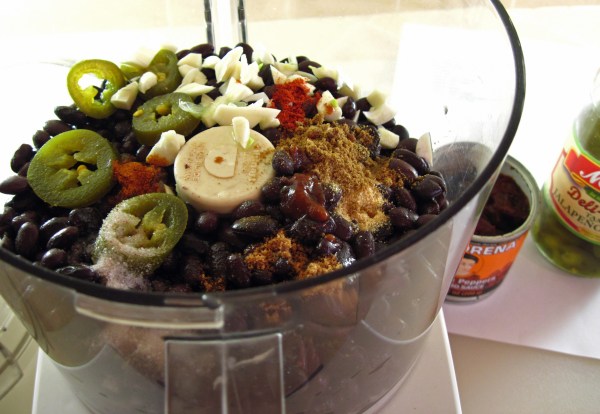
Laura and Bryon recently brought a Superb Black Bean Dip and Fritos to a family gathering. It was SO good I had to have the recipe. Laura said she’d try to get it written down for me. She had researched a couple of recipes and then just came up with her own thing. She sent me her list of ingredients while it was still fresh in her mind and I gave it a go.
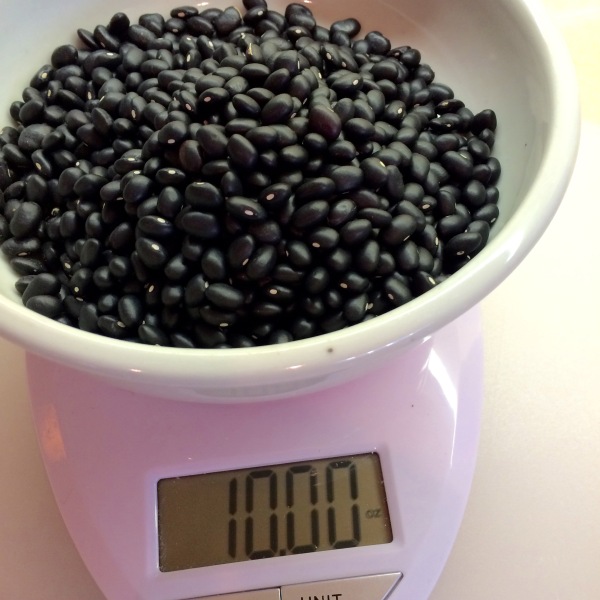
She estimated that she used 10 ounces of dried beans. So I measured out 10 ounces of dried black beans (1½ cups), rinsed them and put them in my 4-quart slow cooker, covered them with water, and stirred in ¾ teaspoon of sea salt. That’s right, I didn’t soak the beans and I added the salt in the beginning. I put it on LOW at about 8:30 in the morning and then forgot about them all day. At 5:30 I checked on them and they were done perfectly. Perfectly!!
Apparently, if you soak the beans overnight and pour out the soaking water, you lose a lot of the flavor and color. (J. Kenji Lopez-Alt of Serious Eats Food Lab did all of the testing on soaking or not soaking black beans so we don’t have to.) And adding salt at the beginning does not result in tough black beans.
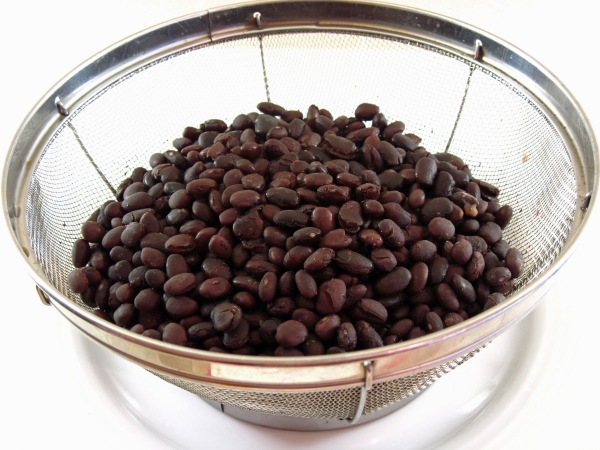
I drained the beans into a strainer over a bowl to save the cooking liquid. I saved about a cup of it to add to the dip when I made it the next day if it turned out to be too dry. The beans and the cooking liquid went into the refrigerator for the night.
The next day, before starting the dip, I measured the beans. 10 ounces of dried beans (1½ cups) made 4 cups of cooked beans. I put the beans and the seasonings in my food processor and processed away. It did turn out to be a bit dry, so I added some of the cooking liquid. I added a couple of tablespoons at a time until the texture was just right. All in all, I added about 1/3 cup.
When I tasted it, the seasoning didn’t seem to be quite as intense as Laura’s. I concluded that she may have actually used 7.5 – 8 ounces of dried beans, making about 3 cups of cooked beans. I added a bit more of some of the seasonings and it seemed just right.
You could use canned black beans (2 cans drained and rinsed) to make the dip, but it won’t be nearly as good. There is no comparison between canned beans and the beans that came out of my slow cooker.
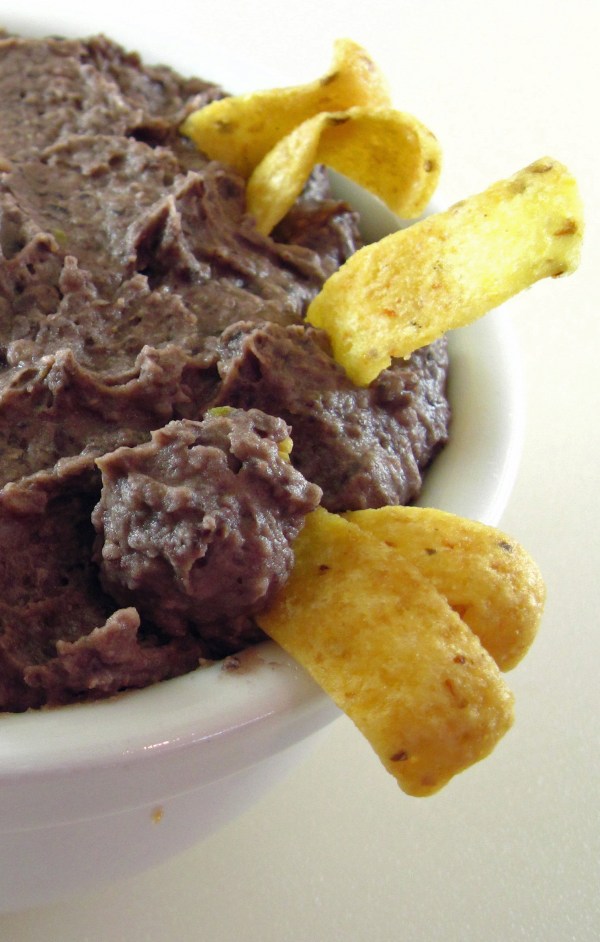
I hope you’ll give this Superb Black Bean Dip a try. I served it at our Easter gathering yesterday and it was a big hit. You could be super healthy and serve it with celery sticks, pepper strips, and jicama strips. Or you could use tortilla chips. But I have to say the Fritos were just excellent with it! 😉
Thanks, Laura, for a great recipe! ❤
I’m thinking of all of the other ways you could use this Superb Black Bean Dip. It would be a great base layer for tostadas. You could use it for nachos. You could heat it in a pan with a bit of oil to make refried black beans. What other ways can you think of to use it?
.
Yes, you could choose healthier dippers, but the Fritos were really good!
.
Superb Black Bean Dip and How to Cook Black Beans in a Slow Cooker
(Adapted, barely, from a recipe developed by Laura Dedon Oxford.)
.
I used Goya brand black beans which were top rated by Cook’s Illustrated and are widely available at the stores where I shop.the stores where I shop.
.
Makes about 4 cups, or twelve 1/3-cup servings.
To cook the black beans:
10 ounces (1½ cups) dried black beans
¾ teaspoon sea salt
- Rinse the beans and check for rocks. (I have never found a rock in dried beans, but recipes always advise you to check them over.)
- Put the beans in a slow cooker. Cover with water by about 2 – 3 inches. Stir in the salt.
- Turn on LOW and cook for 6 – 9 hours. (I cooked mine for 9 and they were perfect, but they may have been done earlier than that. I used my older 4-quart cooker which does cook cooler than my newer 6-quart one. The timing will depend on how hot your cooker gets and the age of your beans.)
- Drain the beans through a strainer into a bowl. Reserve about a cup of the cooking liquid; refrigerate the liquid and the beans separately until you’re ready to make the dip.
Cooked Beans
To make the Superb Black Bean Dip
4 cups cooked black beans
5 slices bottled jalapeno pepper slices (I used “Tamed” jalapeno for a hint of spice.)
1 tablespoon brine from the bottled jalapenos
3 cloves garlic, coarsely chopped
1 teaspoon sea salt
½ teaspoon sugar (I used coconut sugar.)
1 teaspoon onion powder
1 teaspoon ground cumin
¼ teaspoon paprika (I used smoked paprika, but you could use regular.)
1/8 teaspoon cayenne pepper
½ teaspoon adobo sauce (from canned chipotle peppers in adobo sauce)
The juice from 1 wedge of lime squeezed in
Reserved cooking liquid, if needed
- Put all of the ingredients in a food processor.
.
2. Process using the pulse button, at least at first, until the ingredients are well-blended. You’ll probably have to stop the food processor a time or two to push the ingredients down from the sides with a spatula.
3. When it’s all blended, if it seems too dry, add some reserved cooking liquid about 2 tablespoons at a time. Process after each addition. Continue to add a bit of liquid and process until it is the texture you like. (All in all, I used about 1/3 cup of the liquid.)
4. Taste for seasonings and adjust if necessary. If you want it spicier, you can add a bit more of any of the spicy ingredients and process to blend them in.
5. It can be served right away or covered and refrigerated to serve later. (I do think the flavor develops a bit more if it’s made ahead.)
.
Share this:

Vegan Lemon “Crazy” Cake
By Kath Dedon
.
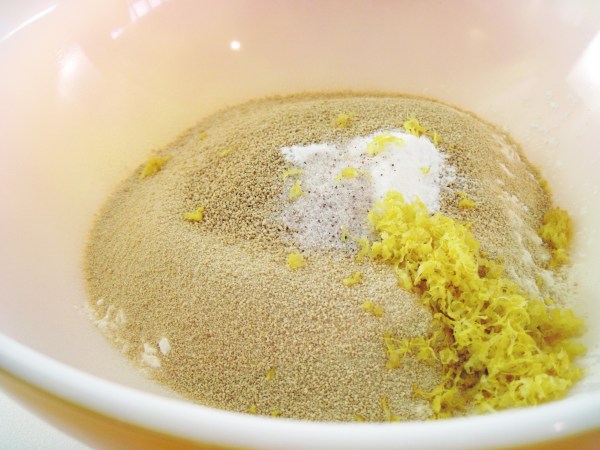
Cocoa “Crazy” Cake has always been a favorite of mine. So I was excited to find other flavors of crazy cakes on the Sweet Little Bluebird blog. I decided to try the Lemon “Crazy” Cake first.
Mary, the Sweet Little Bluebird blogger, uses regular all-purpose flour but I wanted to make it gluten-free. With a little searching, I found Jeanne Sauvage’s recipe for gluten-free Cocoa Crazy Cake and figured I could sub her gluten-free flour mix for the all-purpose flour. I made the Lemon Crazy Cake using Mary’s recipe. I put the dry ingredients in the pan and then added the wet ingredients and mixed it all together right in the pan. (That’s what makes the cakes “crazy”.)
Mary’s Lemon Crazy Cake was very good, but it didn’t rise as much as my cocoa cake does. Comparing the two recipes, I realized that I use 1 tablespoon of vinegar and she uses 1 teaspoon. I wondered if that made a difference. I also wondered if I had over-mixed the batter using the “crazy” method of mixing it in the pan. With the corners, it seems harder to me to blend the ingredients quickly. And it’s important to get it mixed quickly and into the oven because the vinegar starts reacting with the baking soda as soon as it’s added.
I made the cake a second time. This time I mixed the cake in a bowl and I also increased the vinegar and lemon extract. I was very pleased with the way the second cake turned out. So much so, that I asked Laura to make it for our Easter dinner. (Thank you, Laura! 🙂 )
If you are entertaining family or friends with food sensitivities, you may want to consider this Lemon Crazy Cake. It’s free of gluten, wheat, nuts, soy, dairy, and eggs, and yet it is quite delicious! And it’s nice to have a dessert that everyone can share.
.
.
Vegan Lemon Crazy Cake
(Inspired and adapted from recipes from Sweet Little Bluebird and Art of Gluten Free Baking blogs)
.
.
Serves 9
.
Dry ingredients
1½ cups + 3 Tablespoons gluten-free flour* (recipe follows) (or use regular all-purpose flour)
1 cup sugar (I used maple sugar.)
1 teaspoon baking soda
½ teaspoon salt
Zest of one large lemon
.
Liquid ingredients
1 cup cold water
1 Tablespoon white vinegar
½ teaspoon vanilla extract
1½ teaspoons lemon extract (do not substitute lemon juice)
5 Tablespoons oil
.
For serving
Powdered sugar to sprinkle on the finished cake (optional)
.
- Preheat the oven to 350°.
- Stir the dry ingredients together in a bowl.
.
3. Measure the liquid ingredients into a 2 cup measuring cup.
.
4. Add the liquid ingredients to the dry ingredients and stir quickly to blend it together. (It’s OK if there are still a few streaks of flour in the batter.)
5. Quickly pour the batter into an ungreased 8×8-inch square cake pan and get it in the oven.
6. Bake for 30 minutes. Cool completely in the pan before cutting.

.
7. Sprinkle with powdered sugar, if desired, and serve.
.
*Jeanne’s Gluten-Free Flour Mix (found on her Art of Gluten-Free Baking Blog)
Jeanne says that 1 cup of her blend is 140g. So if you use this blend for the cake, you need 236g if you want to measure the blend by weight. Be sure to stir the blend together before measuring.
Mix together and store in the refrigerator:
1 1/4 cups (170g) brown rice flour
1 1/4 cups (205 g) white rice flour
1 cup (120g) tapioca flour
1 cup (165g) sweet rice flour (Mochiko)
2 scant teaspoons xanthan gum
.
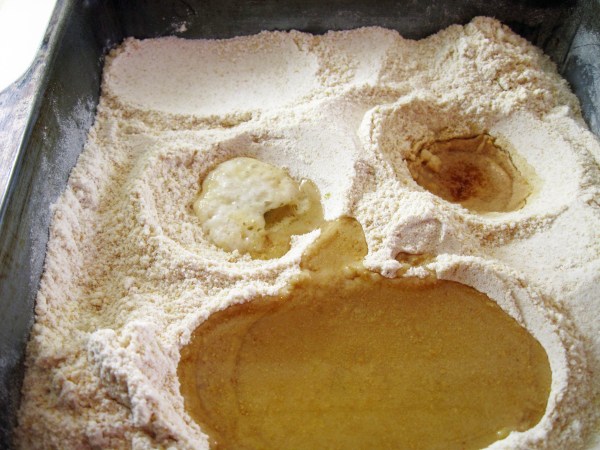
In case you want to try mixing it in the pan, here’s how it’s done. Preheat the oven. Stir all of the dry ingredients together in an ungreased 8×8-inch square pan. Make 2 small indentations and 1 large indentation in the dry ingredients. When the oven is preheated to 350 degrees, measure the liquids. Have a cup of water ready to pour in. Pour the oil in the large indentation and the extracts in one of the small indentations. Then, and do this last, pour the vinegar into the other small indentation. Immediately pour the water over all and quickly mix together. It’s OK if there are some streaks of flour in the batter. Put it in the oven immediately. Bake for about 30 minutes. Cool completely before cutting.
Here’s how mine looked just before I added the water. (Maybe the time it took me to take the photo was part of the problem.)
.
.
Share this:

Oven-Braised Beef with Tomatoes and Garlic
By Kath Dedon
Oven-Braised Beef with Tomatoes and Garlic is the perfect lazy Sunday recipe. I discovered it on Smitten Kitchen. Deb gave it rave reviews and said she adapted it from a recipe in the February 2001 issue of Gourmet magazine. It’s also in The Gourmet Cookbook. With such a great pedigree I trusted the recipe from the get-go.
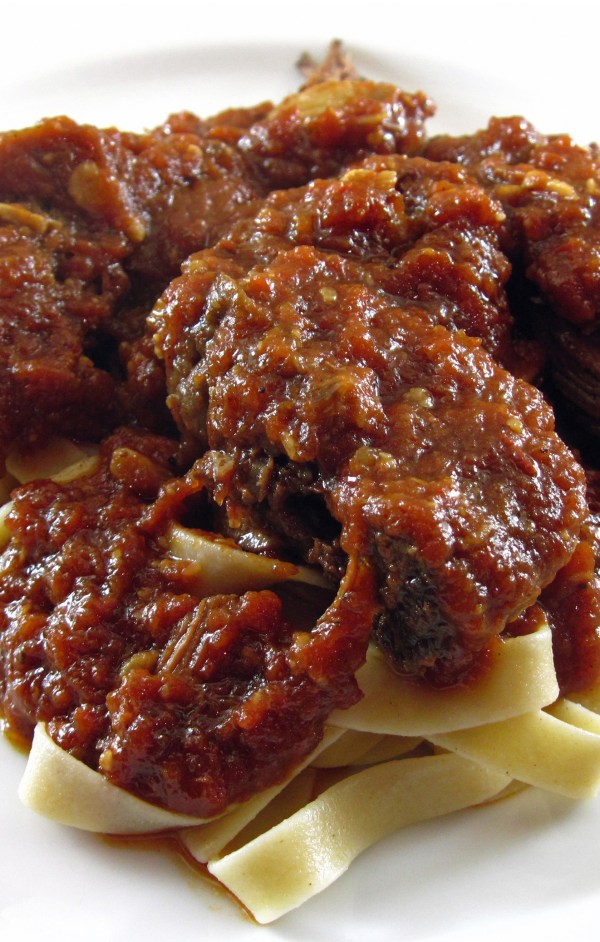
It would be hard to find an easier recipe that delivers such great flavor! Just three ingredients, plus salt and pepper, go into the pot in the oven for 3 – 4 hours and you have a fabulous meal. I served the finished Braised Beef over egg noodles (I used Jovial Gluten Free Egg Pasta), but you could use orzo as Gourmet suggested. It would be great over polenta or with mashed potatoes, too.
Trussing is recommended to help the roast keep its shape so it will cook evenly and be easier to slice. I used this method which was quite easy.
This is one of those recipes that is almost better the next day. We enjoyed it for Sunday dinner the day I made it, and it was fabulous heated up a couple of nights later for a quick weekday meal.
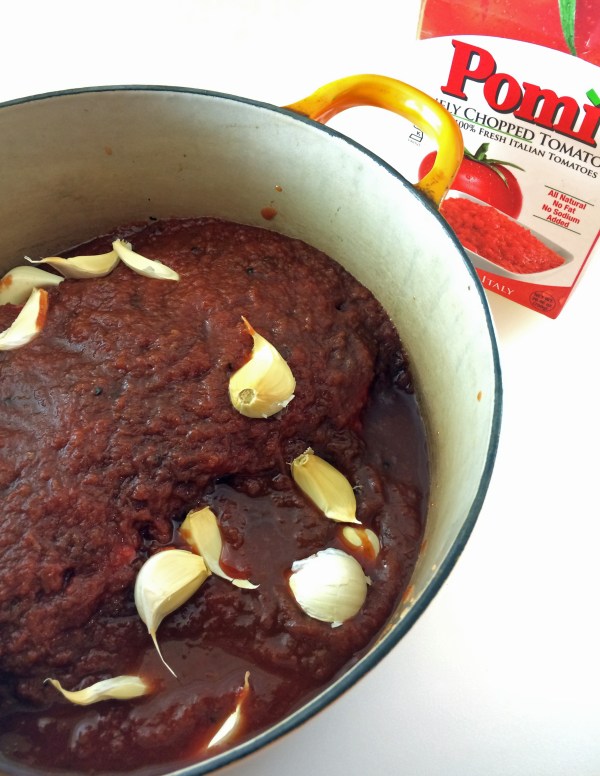
If you use unsalted tomatoes, don’t be afraid to season it generously with salt. I used Pomi Finely Diced Tomatoes (ingredients: tomatoes) and added a little over a teaspoon of salt to the sauce in the end.
Do keep this Oven-Braised Beef with Tomatoes and Garlic in mind when you have a lazy afternoon at home. It’s comfort food at its best!
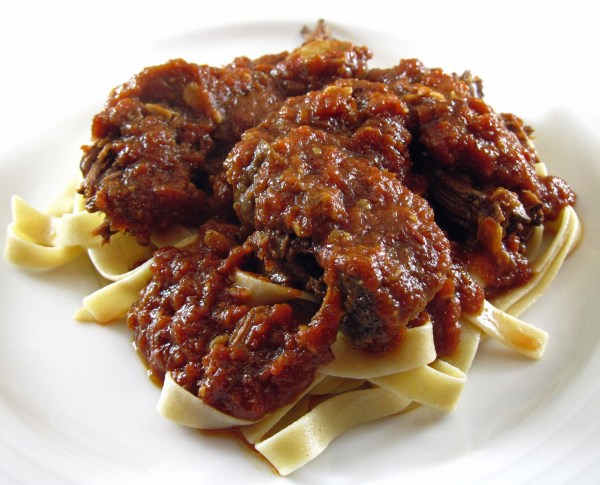
Oven-Braised Beef with Tomatoes and Garlic
(Adapted from a Smitten Kitchen recipe, credited to Gourmet)
Serves 6 (or 2 with a fabulous leftover dinner and a couple of fantastic lunches)
Deb used whole tomatoes that she cut up in the can with scissors. I used a 26.46 ounce box of Pomi Finely Chopped Tomatoes.
It is so simple to add the garlic unpeeled. During the braising process the garlic manages to pop out of the peels and dissolve in the sauce. The peels are easy to pick out with tongs or a fork when it’s done.
1 28-ounce can of tomatoes (If they’re whole chop them up.)
1 (3 – 3.5 pound) boneless beef chuck roast, tied with a string
1 head of garlic, separated into cloves, left unpeeled
Salt and pepper, to taste
.
- Preheat the oven to 300°.
- Put the roast in a pot with a lid.
.
A 2.75-pound roast in my 40-year-old Le Creuset dutch oven

.
3. Pour the tomatoes over the roast and put the garlic cloves in. Stir the garlic into the tomatoes. Sprinkle generously with salt and pepper.
.
In the pot, just before I stirred the garlic in
.
4. Put the lid on and braise in the oven until it is done and very tender, 3 – 4 hours.
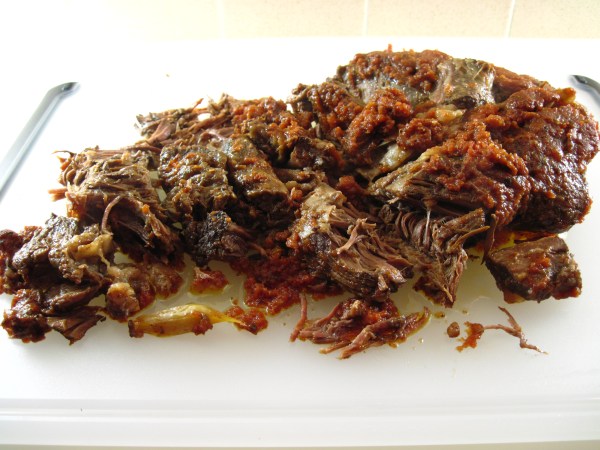
5. Remove the roast to a plate or carving board.
.
6. Pick the garlic peels out of the sauce. Taste the sauce for seasoning. (If you used unsalted tomatoes you might want to add as much as 1 – 1 ¼ teaspoons of salt. Start conservatively, say 1/4 – 1/2 teaspoon. You can always add a bit more if needed.)
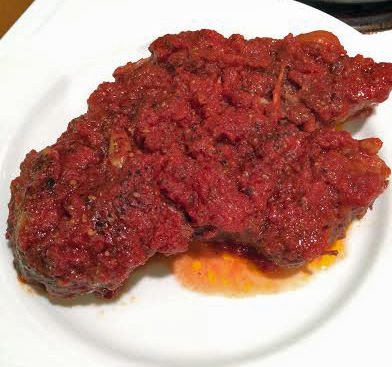
7. Slice the roast and serve topped with the sauce.
a
a
a


